3 Easy Rope Braided Updos For Short & Medium Hair | Hairs Affairs
This week I'm back with 3 quick and super easy updo ideas for short to medium hair, that are all based on the rope braid!
These can easily be dressed up or down and they're heat proof and perfect for upcoming hot days
Please THUMBS UP this video if you enjoyed it ♡
Thank you so much for spending time with me and watching this video!
You can find more hairstyles and tutorials on my blog:
♡ Where you can follow me ♡
Find me on social media:
https://instagram.com/hairs_affairs/
https://www.facebook.com/likebraids
https://www.pinterest.com/HairsAffairs...
https://twitter.com/Hairs_Affairs
Stay in touch! ;)
Music via Epidemic Sound
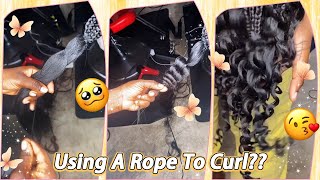
( techno music, ) Hi there, I'm Anna from Hairs Affairs, if you're new, here welcome back to my channel. If this is not your first time. Today, I want to show you three very simple hairstyles that are all going to be based on the rope, braid. And they're perfect if your hair is mid length or on the shorter side.. If you like, getting your hair out of the way when it's hot, this video is definitely for you., Please give it a thumbs up if you like it and let's jump right, in.. So to start the first hairstyle I'm going to part my hair from the top of my head to the top of my ear.. I'M going to clip that away and then I'm going to divide the rest of my hair into two sections and I'm going to braid. Two rope braids., Basically all I'm doing to keep the braids from unravelling is I twist both strands in the same direction towards my face, and then I twist them over each other in the opposite direction. Away from my face., I do that all the way down and tie the braid off with a clear elastic, and then I do the same thing on the other side.. Then I slightly pull on the edges of the braids to make them fuller and then I'm folding, the braids to the opposite, side., I'm folding and tucking the end of the braid underneath and I'm using several bobby pins to pin everything in place. So it feel secure and so that I hide all the ends. ♫. I know this cage into your heart ♫ Way to get lost inside Once that feels secure. I do the exact same thing to the other braid.. Now, moving onto the front pieces., I'm taking a small section close to my part and dividing it into two strands, which I then twist over each other away from my face.. Then I add in additional hair to both strands both from my hairline and from the back.. I twist them over again., That's basically the entire step.. I repeat that, and once I have no more hair to add from the back. I just add in hair from the hairline. Once I've added in all the hair to the braid. Again, I twist both strands in one direction, which is towards my face and then twist them over each other away from my face.. I do the same thing on the other side. I secure both braids with clear elastics, and then I pull them apart for more volume., Then I simply fold them over the other braids hiding the ends, pinning everything in place with bobby pins, and that is it. And That is the finished look of this simple four row: braid option. Next up is a simple rope: braid bun, where I've simply put my hair up in a high ponytail and then divided my hair into several sections. And created several rope braids.. I think I created five in total.. If you have long hair, you can even opt in for two, but if your hair is on the shorter side like mine, you might want more of these braids. So you have more options when you start folding them over and placing them over each other to create a nicely shaped, bun. And remember to pull those braids apart a little bit for volume.. As for these fly aways I was having down there. I didn't want to fuss over them because I was going to create another hairstyle right after this., But you can definitely either curl them or hairspray them in place to make it look more neat.. Lastly, I did a side rope, braid updo, which is a really simple way to get your hair out of the way in a kind of elegant way, with literally just a few moves., I'm starting with a section close to my part on the heavier side. And this time, I'm adding in hair only from one side into the rope braid twisting the strands away from the face only adding in new hair from the hairline.. I do that on purpose, to create a pocket over the braid and that's where I'm going to fold the ends of the braid and tuck them underneath and pin everything in place with bobby pins. Once you've, adding on all the sections. You start twisting each separate strand in the opposite direction of how you're twisting them over each other, which is exactly what we did before. Then just secure the braid with an elastic and fold it and pin it in place.. As for the face framing pieces, I left out in the front I just curl them and that's it.. It'S a super quick, elegant, hairstyle option.. Thank you so much for watching and for spending time with me.. I hope you enjoyed this video if so give it a thumbs. Up. Comment down below which one of these hairstyles is your favourite and I hope to see you next time. Bye, (, techno, music, )


Comments
Julie Kozlowski: Love the first one! They're all beautiful but the first one looked so complicated but it wasn't. Your hair is looking beautiful.
Laura Bianchi: I love your new haircut, it looks so neat!
Lisa G.: I liked them all.