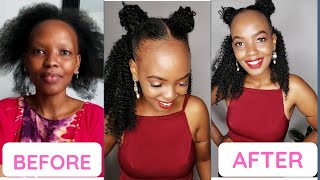
5 Quick & Easy Hairstyles On Natural Hair / 5 In 1 Updos / Protective Style
Hey Babes,
Welcome back again and thank you for always checking out my videos.
This tutorial is on QUICK & EASY NATURAL HAIRSTYLES (5 In 1 HAIRSTYLE) using braiding hair extension. These hairstyles are super easy and beginner friendly. Anyone can achive them.
I really hope you enjoyed the video and learned one or two things from it.
Please don’t forget to give this video a thumbs up, subscribe, and share it with your beautiful friends. Also, click the notification bell so you don’t miss out on new videos.
“I will tell of the Lord’s Unfailing Love, I praise him for all he has done for us”. Isaiah 63:7
Also, check out...
My website www.oliviangene.com
How to do Large Knotless Braids with Beads
https://m.youtube.com/watch?v=PJjJPX_...
How to Part Your Hair for Box Braiding
https://m.youtube.com/watch?v=ZGAMyTH...
Mohawk hairstyle on Natural hair
https://m.youtube.com/watch?v=BPgozkT...
Products used
Petal (black gel)
Hair wax (please use any braiding gel)
Braiding hair extension (Lush color 1b & 900)
Small brush for the edges
Pepus hair growth oil
Rat Tail comb
Parting comb
Spray bottle and water
Wide-toothed comb
Bridal pins
All products sourced from local beauty supplier.
I filmed this video on iPhone XR
Edited using KineMaster.
If you made it this far, thank you once again. Please let’s move this channel to a permanent site.
Remember that you might not get it right at first attempt but with constant practice, you can.
I can be reached via [email protected]
KEYWORDS
Quick hairstyles on 4c Hair
Braided Updos
Sleek down on Natural Hair
#naturalhair #protectivestyles #ghanabraids
#protectivestyles #braids #blackgirlmagic #kinkyhair #hairgrowth #hairinspiration #rubberhairstyles #simplebraids #4chair #naturalhairtips #hairtips
Hey guys welcome back to my channel with your girl olive. If this is your first time seeing this face, welcome, welcome. Welcome please kindly subscribe and don't forget to turn your notification bell girl. You don't want to miss out on new uploads if you already subscribe to the channel, hey love! Thank you! So much for coming back. Today'S video is on how to achieve these beautiful, looking hairstyles. You want to find out how i achieve them. All then continue watching. Okay guys so i'm starting with spraying some more on my hair and using my fingers to detangle my hair before going ahead to section it into two another equal sizes, the back section is actually bigger than the sectioned front hair and, like always, i love to start Patting my hair with my rat tail comb and then use my cotton comb to like make the lines very neat. I also went ahead to use my white today, comb to make sure there are no tangles in my hair because i'll be applying the all to the hair. You don't want to apply it on a tangled head seriously, i'm using a black toad. I got from a local beauty supplier, i don't even understand it, so why are they added black tie because by the time i finish applying this thing to my hair? My fingers all terms what i don't even know like my fingers, changing colors. I wonder what i added to it, but i somehow love the way ease um. It'S made my hair darker. I just hope it's not going to spoil my natural hair color. I mean i've used black tools before, but i can't remember experiencing this at all. After applying the gel to the back section, i used my bristol brush to make sure everything is well laid before going ahead to apply detail to the front section. Add a section in smaller parts to enable detail, touch every strand of hair for people with shorter hair. You will have to like section your hair into smaller sections in order to achieve the same results. Okay, applying this gel was a bit messy because the duct tape in the jaw kind of messed up my line. So i had to use my bristol brush and also applied hair wax by using my small tooth edge brush to make sure my lines were visibly clean. That was basically all i did for the gel application part before covering my head up with a scarf and then left it on for like six hours for this style, i'm using this hair from expression. The hair is mostly used for crochet, but i guess we use it for different purposes. So i counted about 10 strands of this hair place on the scrunchie and attach it to the front section. Then i would just go ahead to twist the hair to the end and use um rubber band to like secure with sieze. Then i'm also going ahead to like wrap the wrap, the hair around the pony um. But before you start wrapping this around, you have to flip it over in order for your hair not to be showing okay to secure the hair after wrapping it around the little pony that we created at the front section. You need some bobby pins to achieve that and make sure you have enough sciss. You don't want to run out of these things by making your hair okay. For the back section, i used almost one pack of the crochet hair attaching to a scrunchie. I placed it on the ponytail and then flipped it over before using a smaller piece of the hair to like secure it down. Hmm look at how everything is looking so sweet nice juicy to see all that good stuff. I actually like this hair and see what i talked about the black gel. It gives some kind of definition, or should i say, precision i don't even know what to use for it. I just love the hair. What do you guys think about for the second style? I didn't do so much. I only reduced the hair at the front section to five strands and then counted about 20 strands of hair for the back. I attached a scrunchie and then attached it to the back section before twisting and wrapping the ends with a rubber band. I also went ahead to like wrap the hair around the ponytail before securing them down with some bobby pins. I know i know i know, but today it's not my wedding gosh. I think the pride of pins that i added here was what give the apply to be vibes, so the style also came out, looking really nice and sweet okay. So for the third style i attached my kinky puff to the ponytail through the string and then wrapped around in order to secure it, you can see how easy these hairstyles are. Anybody can actually achieve themselves. The fourth style goals me with using a different hair color at the front section just to spice things up a bit. You know everywhere. It was that i used lush braiding, hair extension, color 900, attaching to a scrunchie attached to the pony, then went on to like twist it and then wrap around the pony while securing them with some bobby pins. For the back section, i used black braiding hair extension. Lush color 1b, attaching to a scrunch. I went on to attach the ponytail at the back and then wrapped it around before securing down with some bobby pins. You see the reason why i said that you need enough bobby pins here. I added extra hair at the front because i felt it will look much better and more visible and this style also came out. Looking really nice and juicy, i mean look at your girl, i'm loving this fourth style. Let me know in the comment section what you think about it: whether you're feeling this style as well: okay, so for the final style, i actually didn't think about it, but then one mind was like: why not try attaching the two kinky hairs that you have? If it's not fine, you can remove it, and that was exactly what i did. I had to make the front ones look smaller by using bobby pins like push it inside a bit. I wanted to create the illusion that this is my hair, and i achieved that. I fell in love with this particular style because girl, it looks like i section my natural hair into like nobody's, going to believe that this is not my hair. That basically brings us to the end of this video. I hope you guys really enjoyed it. Please don't forget to like, by giving a thumbs up comment below what your favorite style is and share with your beautiful friends. Thank you guys so much for watching and bye for now. Bye,


Comments
Philyz: I definitely love this style