Pretty 1960'S Inspired Vintage Hair Updos Tutorial || Fitfully Vintage
#1960shairstyles #beehivehairstye #1960supdo
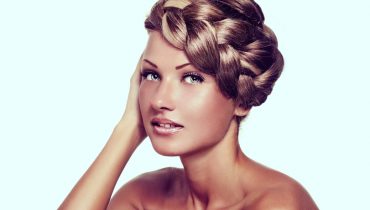
I asked you what decade you would like me to create hairstyles from and you said 1960's so here are not one but two pretty 1960's inspired hairdo's for you. Height was the thing back then and although these styles are not sky-scraping beehives they are still very volumous and reminiscent of the bouffant styles of the time - except these require no teasing or heat styling ( unless you have a crazy fringe like mine - then maybe a little heat styling!)
If you are living for the 60's then check out the playlist below for much inspo.
https://www.youtube.com/playlist?list=...
If you love a bun then check this playlist out too
https://www.youtube.com/playlist?list=...
Don't forget to catch me on IG and Facebook
www.instagram.com/fitfully.vintage
www.facebook.com/fitfullyvintage
Hair isn't the most important thing in the world but, some
times knowing you have a super cool 'do' can make you smile and that can only be a good thing right?
Welcome to Fitfully Vintage, here, in my own litttle corner of Youtube I will show you how to create beautiful hairstyles from all eras. Sure, my main focus is on simple vintage hairstyling but I also love easy modern styles.
I don't have a favourite era, it changes all the time. One day it'll be Edwardian hairstyles that I'm all over, the next, pinup girl hair, the next I'll be all about Greek Goddesses and their crazy Barnets! I just love it all!
I do hope that you enjoy my videos and that you can learn something from them, even just a tiny bit - and even if you learn nothing I hope that they make you smile.
http://www.youtube.com/watch?v=OV0jFwe...
Hey guess who forgot to film an intro me today, I'm going to show you how to create a couple of really lovely 1960s inspired, updos very chic, and they look quite tricky quite detailed. I guess but they're not really so the first one and secure I've got a fringe and I'm gon na have to incorporate this into my style. It'S not ideal, but you know okay, so da da and put your hair into a nice smooth, high ponytail and then create a little secure, elastic band Fang with two bobby pins and an elastic band you'll see what I use this for in a second, it's like A I don't know, I don't if you see flip your ponytail up and over your face and then push one clip or bobby pin in one side stretch the elastic band over the top of your ponytail and secure on the other side, with the other bobby pin. Can you see it kind of holds your ponytail flat? You can use just two bobby pins if you like, or three or four or five or six. However many it takes to hold your hair, but it is much easier to do it with this hairband. Why? I thought I speak: okay, take a bun donor and push it over the top of your ponytail and then you're going to take the hair else. No you're not you're, going to secure that bun donut down with some hair pins all around so catch a little bit of the bun donor and then push it into your scalp right in, and so it secures nice and tight. This is the foundation of the style. So you're going to want to keep this nice and secure to your head. I used, I think, four bobby pins actually just anchor it down as best you can once you've anchored your bun donor you're, going to take the rest of your ponytail and flip it back over itself. So you're now covering the bun donut come on girl get with it. There we go you're going to flip that hair back over the bun donut smooth it around, so that it covers everything and then tie it off underneath with a little elastic band. Now I don't quite know what's wrong with me and why I keep forgetting to buy hair bands at the same color as my hair, but I do as I'm using a nice pastel purple, one which you'll see is my downfall later. But if you can use one of those really tiny elastic bands, or certainly an elastic band that matches your hair color, that would be best tighten it up, so it secures kind of it pushes up against the back of that bun donut and then you're going to Split that hair in two and smooth it around what is now a bun and pin it in place. Try poking any ends that you've got it's going to give the look of a like a wrapped and covered bun looks very smart, so smooth that hair around. If you want to spray it first or maybe gel it first to keep it from kind of keep the strands from pinging up or fuzzing out or whatever your hair might do, then please do but just try and poke those ends in so that it just is A nice little wrapped, bun, almost like no one, could work out how it was formed, looks like one of those stick on buns, but it's not bangs fringe, whatever just style it by flicking it outwards. I don't know if this is particularly 1960s. It seems to look okay, maybe turned under would be better. This is quite a 70s. Actually. I guess this fringe, it's quite nice. There, I'm enjoying wearing it. Now. I think that looks pretty good yeah. Okay, so that's one nice, oh yes, grosgrain ribbon make it into a bow, because this is the problem you see. I'Ve got a big pink band at back of my hair, so I made a ribbon into a bow and then just slid a bobby pin into the knot and trying my best to cover up this, this pink band, but I've seen lots of girls in the sixties. Wearing nice, big floppy bows at the back of their hairdo, so I think this sets it off really nicely action. Yeah give it a go. Let me know what you think. Let me know if you try it lemon on the card sex down below what decade. You think my fringe is from 60s our 70s. Who knows, I don't okay, so next one kind of similar kind of different rappy rappy, section II, Section II, so I'm sectioning the front of my hair off, so I've got rid of a fringe for a start and then from the crown of my head down to Behind my ear, so just those front sections of hair and I'm tying it in a beardy fashion under my chin, just the keep it out of the way then, as if you were going to do a half up, half down style, take the top section of that Back bit of your hair and secure it away in an elastic band, again, don't go for the pastel purple, choose one! That'S nice and closely matched to your hair color for best outcomes. Should I say right, gon na do the same thing here. I'Ll show you I'd. Do it this time with bobby pins, it's a great idea to try and get these parallel to each other or to meet each other in the middle you'll see I don't so if I could have slipped that over in exactly the same place as the one on The other side, it would have been better mine's like an image different, it's not so good, but it still works and again pop that bun donut, just as you did over the whole ponytail but you're doing over half this time and secure it down in the same Fashion you're then going to flip that hair back over the bun donut, much like you did in the first style and smooth it over. So the bun donut is completely covered by your hair. You'Re then, going to again in exactly the same way, tie the hair off underneath and then secure with a bobby pin might poke it up. Underneath the bun donut, I kind of just caught a bit of the hair bad and then poked it up just to make it extra secure now, just as in the first star, taking that kind of tail of hair and smoothing it around towards the front of my Hair, so when, with this tail of hair, try and flatten it out so that each piece is almost like a ribbon of hair, it just gives a really nice, smooth and layered effect. You can really see the the sections of hair. They stay nice and separate again. If you want to spray these or gel these sections first, then that might help you even more. I'M gon na release the front section of your hair and side one side at a time. Obviously, it's doing both sides at the time would be almost impossible, you're going to smooth the hair back and a wrap it around. The bun that you've formed at the back of your head again try and keep the hair as flat and ribbon like as possible. Does that does that make sense on my dishwasher? Oh my goodness, it's so noisy! I hope you can't hear that um so noisy, so just smoothing it around trying to keep it ribbon like and flat underneath and then up over the top. Obviously the length how long your hair is will determine how far around your bun your hair goes. At this point, when I still in this video, my hair was pretty long, although these were the layered sections. So yeah still quite long, but you know just give it a go and just repeating that on the other side to keeping it nice and smooth and taut wrapping it around the back of the bun and up to the front and pinning in place trying to poke Away any ends as you go yeah it used about a ton of hairspray for this video. I just really wanted it to be really nice and smooth. It'S all on show really over the back. So you want to kind of make sure that it looks quite well done. I guess so use your finger to poke it under. Like I'm doing there. It'S not difficult. Just try your best. Okay, then splitting the hair at the back into two and again, I'm sure you can guess what we're going to be doing now, brushing it nice and flat and straight and pulling it up and over the bun this time so you're getting an effect of like folded. Pieces of hair, just keeping it nice and flat and smoothing it around the bun ribbon, like you see generally as you're doing this it kind of tucks in all the sticky out bits from the last piece anyway. So that's quite handy and the last piece I can see a bit sticking out. That'S not fair, never mind can't be perfect, except it wasn't using a mirror. It'S all. Okay, obviously you won't be filming a video when you do your hair, so you will be able to stop and check the back of your hair, make sure you've not got any frizzy bits sticking out. Also, I could have done with poking that bobby pin in a bit tighter, just try and poke your bobby pins into your hairstyle, rather than laying them flat across the style. So you see the entire pin, that's not what you want. You want to poke them in. Okay, so that's as good as I can get it, I'm just poking. The edges in my friend has gone hella crazy. So I need to style that and again tucking it under this time, see if that works a bit nicer and I've got the grow, gain ribbon and just tied it around the back. I think that looks pretty cute. I hope you like it. Let me know if you try it in the comment section down below thanks so much for watching bye.

Comments
Fitfully Vintage: What do you think the best occasion for wearing these styles would be? Party? Work? Dinner drinks? Smart or casual? Let me know!
Vanessa Janke: That’s it. I’m growing my hair out again.
Inquisitor OperaLc: I just wish my hair was this healthy. Yours is absolutely beautiful! I love these styles.
shimmygirl linda: These are stunning, Natalie, I managed to get very small bun rings for my thin hair and I should be able to do my own version of these, your hair is particularly amazing and lush in this tutorial xx
BrigitaKu: Such a great tutorial! Yesterday I was upset with my long hair that I don't know how to deal with them and this morning I found this inspiration. I will try it today!! Thank you!!
Irene Chavez: Beautiful! Loving all these hair vids! Can’t tell you how much this helps me and my mane lol. So happy you’re back! Love any and all videos you make
GrayLandscapes: Love these styles! Can't wait to give these a go when my hair is longer. Fingers crossed I don't give in and chop!
Jessica Darby: I really enjoyed this! I will try it tomorrow, but am certain to achieve different results with my curls. Thank you!
Daniela London girl: Love love love these . Right..off to buy a donut and you r seriously convincing me to get a fringe again after growing it out and super long hair like yours!
TxNursePatti: Gorgeous as always! ❤️
carboncookie: I love it!! My hair is a bit too short at the moment, but I will try this once it is long again. xx
mirrisa baez: You have a very soothing voice and I love these hairstyles I can't wait to try them out
Karen Wright: Very nice...I liked both!! Have a lovely day!!
Ms. Sherlock Holmes: your hair looks beautiful!
IvysMama: Lovely
Ms. Lemonhead 09: I can’t wait till my hair grows back.
Serena: Natalie, what shampoo & conditioner & other products do you use? xx
Rick G: No hate, but it’s a 6/10 for me on historical accuracy. You’ve essentially reverse engineered a 60’s updo- it’s very nice for what it is, but 60’s buns are a lot more reliant on backcombing and the cut isn’t really compatible with the look (but I won’t fault you for keeping your hair length as is)
Claudia Melo: Reminds me of Trixie from call the midwife
Michelle Tackett: I try to use bobbypins, but this could work as well.
Ms. Sherlock Holmes: fringes are timeless
Daniela London girl: Ohhhh wow im doing these for sure. I tried one but it tirned out lot messier than yours inguess its just practice
Layla Elizabeth Chester: Lush