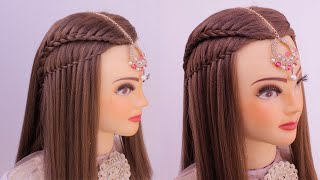
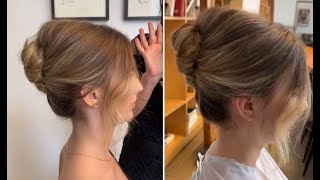
Textured Up-Do Short Hair. Get Volume In Fine, Thin Hair & Create A Low Bun On Straight, Short Hair.
Learn how to create a soft low bun on short straight hair. In this hairstyle tutorial for short hair - Pam creates a textured hair up style adding oomph and volume. A lovely updo and easy to achieve on short hair, a perfect hairstyle for bride or style for a bridesmaid. Learn now!
Join award-winning bridal hairstylist Pam Wrigley on this hairstyle tutorial and learn how to get volume and oomph in fine thin hair blow using the right products.
A good video for our fans in the ASMR, unintentional ASMR and hair and beauty ASMR fandoms
Pam texturises the hair using mousse and salt spray and blow dries the hair to get root lift, before she creates a fabulously soft, textured hair style on short hair.
Hair prep is key when it comes to creating beautiful bridal hairstyles, especially if your client is looking for a smooth sleek finish to the hair.
Achieve a natural looking curl, and get lots of lovely root lift, great when it comes to making fine hair look thick and full, and dull hair look shiny and glossy.
Learn how to Create Beautiful Bridal Hair-styles step by step with Pam Wrigley, UK Wedding Hair Stylist of the Year.
Subscribe and learn the latest wedding, bridal, prom & party hairstyles alongside timeless, classic hairstyles and vintage looks that never go out of fashion.
Learn all about hair prep, which hair styling tools & hairstyling products work best, and find how to work with different hair types.
Join Pam and Learn all about hair prep, what products to use, how to work with padding and hair extensions.
We'll also teach you how to blow-dry with videos on curly blow dry, Victoria secrets blow-dry, short hair and smooth & sleek blow drys.
We've got it covered . . . we even have tutorials covering the curly girl technique!
Great for fans of natural unintentional ASMR!
Hairstyle tutorials include hair prep, hairstyling and hair up, blow-drying, curly girl techniques, working with different hair types, hair textures and hair lengths.
Create hair up & bridal hairstyles and become a bridal hairstylist with Pam Wrigley, UK Wedding Hairstylist of the Year
Just SUBSCRIBE & LIKE!
I'M going to show you how to do a lovely textured updo on Celeste today, so let's has very fine hair, so I'm going to give put a little bit of texture in the hair using some mousse and some salt spray. First of all, when you're adding texture to the hair, if you're working with fine hair, you don't need to work with very small sections, so big, quite generous with your sectioning, so you don't end up putting too much product in the hair, so the hair becomes weighed Down we actually want to give the hair. We want to help the hair to get a little bit extra volume and oomph. So you don't to put too much product in there right at the beginning, for quite a big section of hair comb that through and then we'll start to blow-dry I'd love to know what products you find work well is really fine. Hair just drop me a line, and let me know you so lots more kind of oomph and volumes. The hair and the hair feels like it's a little bit more kind of textured, maybe just make sure it's all dry. So now we've got a little bit of texture into the hair. I'M going to show you how to do a couple of how to do a style working with straight hair. First of all, I'm just going to separate the side sections, so I can come back and work with those next and adapt the style to suit Celeste face and we're going to start off working on the crown area. Here get our section for the crown first leaving hair down at the back and at the sides just to hold the hair together. First of all, let's pop a little band in the hair. So I'm just got super soft silky hair, and you want to create a little bit of texture and root lift here. It can be helpful to pop a band in the hair to hold it together. You can, if it has a little bit coarser, you could pop a couple of grips across the back there and the soft liver hair and the fine of the hair, the stronger their products you'll need to use. So if you were working with somebody now, who has quite maybe dry or coarse, textured, hair you'd probably be able to get away with the styling care lotion. If you need a little bit more staying power and I would move on to the silhouette setting lotion. But I think for Celeste hair today, I'm going to go for the maximum power and I'm using like OSIS number three dry hairspray, just to get a little bit more staying power with each of these sections of hair. For now we're going to start working on the side sections, so we've got our little bit of root, lift here, making sure you're happy with the shape and the texture. And then we can I'm going to backcomb the hair a little bit at the side. A little bit of hairspray I'll bring the hair over the band and secured so holding the hair flat against the head. Using my thumb here and one of the strong hold bobby pins, I use a blonde one, so you can see what I'm doing properly and I'm going to slide the bobby pin in the same angle as my thumb, so my thumb against the head. The bobby pin needs to go underneath your thumb and you push against that bobby pin. So it goes close to scalp and slide that under so it's going underneath your thumb might be a finger you're holding their hair with, but which, which ever comes easiest for you and then once you've got that in position and the the bobby pin is replacing the Pressure of your thumb, so it holds that in position perfectly working with short hair, so we can't pull the hair too loose. I need another bobby pin on these shorter bits of hair. I'M going to go in not open the bobby, pin and slide that over the top. Now, let's do the other side a little bit of spray. I'M gon na use a slightly stronger, hold spray on this section, so I'm not going to go all the way over to the other side here, because the hair is quite short, so I'm just going to create a little pleat. Just here loosen her a little bit move around. You have strong, hold bobby pins going to go in push against the back of the head. Your client needs to push just gently against you and you can slide that up make sure it goes underneath your fingers I've gone into useless underneath your finger, so it holds it nicely in position. I'M going to do Celeste, hair as if it were trial run. So I'm not going to add any texturizing dust in if this were Celeste wedding day. I definitely would add a little bit of texturizing dust into the hair here, I'm just playing with the hair a little bit to get that natural, a little bit of movement in the hair. You can use little pins to give you some separation here. If you would like to, and now let's create our little lo-roll at the bottom, it might take a couple of sections: the shorter, the hair, the smaller the sections that you'll need to work with so a little bit of backcombing on top because I'm going to roll The hair up, what's so again, we don't have any curl in the hair here little bit of stronger hold hairspray, so it all holds now smooth out underneath and then let's just create a little loop in the hair and creates a little pleat. You just noticed with this pleats I've created it sort of the hair. The end of the hair comes down push that in against the head. Take another bobby, pin I'm going to push the rest pushes back against me. I push my finger in against Celeste slide. That bobby pin underneath my finger against the scalp and it should feel nice and secure. So then you can go in and loosen a little bit use a slightly stronger hold hairspray there, and then let's do our next one, so the little bit of hair. That'S actually that feels like it needs one more bobby pin. So if it's still moving, you can go back in just look down a second for mr. Lester, that's better! Sometimes you can go in and not open the bobby pin this time and slide it across that feels better go at right-angles across the other grip that you had in and then it's much more secure. So don't worry if it doesn't work. The first time the sections a little bit thick, you don't the sections to be too thick and chunky. Let'S do another one texturizing spray would be good if we weren't imagining we were doing a trial, but if you're doing a trial run, you don't want to cut that texturizing dust in there too soon, because it just limits you. So then you come if she doesn't like that style. You'Re then stuck and it's hard to try something to try other styles so avoid as much as you possibly can using any texturizing. Just when you're doing a trial run. Well, that's great another loop, just a loop in the hair try and go in a different direction, so it doesn't end up looking too uniform pinch, the hair better, not look good going into the midnight joy yeah, then we're going to create a nice low kind of Chunky looking bum, even though she's got very short hair, I've got one grip in just looked down again Celeste, please now we need another grip here that feels better yeah. I'M gon na get a love for the little updo for somebody with short hair. Make sure you're happy with the shape can always come back and loosen these little sections a little bit to give it that little bit of fullness just put a bit of pressure on where you've got the pin. When you do this, just to make sure you can feel that everything's secure and nothing is moving that shouldn't be moving, because the hair is short, sit and come back up again great and let's keep going so say I want to imagine it's your doing. The staff or somebody for a trial run, so we don't want to have texturizing dust in so we have to work with the hair that we have, but you would just explain to your clients if this were the case. Just explain to them that you haven't put texturizing dust in so that you can try different styles. Just drop me a line, and let me know what styles you'd like to learn next remember: to hit the notification bell that hair doesn't want to go in. So I'm going to let that drop down, look down again, Celeste, please that's better yeah pushing against Celeste this hair. Here it gets shorter as you get lower down, so it does get harder. But persevere keep going a bit more about coming down here now, secure it in place. That'S it go in find your thumb go behind your thumb or, whichever finger you're, holding that herring with and secure it with your bobby pin when it comes to back combing the hair. We want nice compact back combing and that really does make all the difference when it comes to the style staying in smooth the surface of the hair, not too much, don't you take the back coming out now. This may well need to be two sections, but let's just try it first little twist might be able to pick that bit of hair up there and pop it in there. Let'S just see if we can do it in one you might be able to and if not just come back and do it in two sections. Just remember that when you work with short hair, you need to work with smaller sections. I can't pull the hair out too much here, because the hair is short and we don't want to pull it out of the pleat at the back. But you can tweak a little bit here and there to get the movement that you want. Then we can curl. These front sections and then we'll curl, this hair back. It will just help her to stay cool and we've got our fabulous little updo for short hair if you've enjoyed this tutorial. Just click like and subscribe and join me on my next video
Comments
Angela Hagood: Great job! Fine hair is so challenging, especially when it is on the shorter side. Thank you for sharing your techniques!
A pp: this is so helpful and amazing, thanks!
Kimberly Ann Designs: This is the best short hair updo tutorial I’ve found. Thank you.
Pamela Abdelnour: Oh my goodness, your soft voice and beautiful accent are so relaxing to listening to! I’m falling asleep from the relaxation from your voice and imagining I’m Celeste getting my hair done… :) beautiful hair style too!
Lila 1978: She does not have thin hair