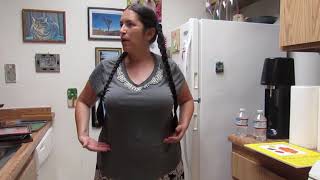
Romantic Bridal Upstyling With Anna Peters
Elevate your upstyling work by learning how to create a lived-in, fuss-free upstyle for your wedding-ready boho babes. Sam Villa ArTeam member, re:TREAT Salon Owner, Anna Peters, will share her styling shortcuts for quicker updos that have a firm foundation with stay-all-day power. Tune in to learn how to improve every step of your upstyling process from start-to-finish.
Class Takeaways:
- Hear how to prep your bride with the proper products to build a firm & pliable foundation
- See how to create a fast texture for a relaxed wave set that's full of body & polish
- Hear Anna's time-saving tips when styling special occasion hair so you can maximize your time
View all upcoming live online events at https://www.samvilla.com/education-cal...
So today we have the awesome anna peters joining us. Anna has been in the industry for close to two decades. She started when she was two and she spent 11 of those years as a redken educator. She is an art team member here at zambia who specializes in color, bridal, styling editorial and finishing. She is a salon mother. She is a mother, she is a superwoman. So please, let's welcome in the chats, anna peters, hi, hello, you're, so sweet. I think you are. Oh, thank you. Hi. Everyone welcome to mannequin monday, i'm so excited to be sharing this romantic bridal. Look with you today, um we're going to talk about how to get a really modern kind of bend and wave in the hair and how to set your client up. So for me, it's all about making sure that we set ourselves up for success from the get go and a lot of times where i see stylists struggling. Is they haven't done the proper work at the base to build that foundation and direction to make their job? So much easier when styling the hair. So let's just say your client comes in with this center part um, her hair that she washed last night, preferably it's nice and clean, but just has like a little bit of bend to it. Um we're wanting to work off of a side part because i'm so excited side parts are coming back, so we're gon na um scoot her part over, but watch what happens when we do that, because the hair has dried down in a center part. I'M really going to fight this hair to stay in that position. So what do we need to do? We need to. Let me see my comments and see if anyone's participating this morning, hi everyone um. I would love your feedback, so please ask any questions and andrew will help field those for me too. So when we do this side part, what are we battling? We'Re battling that her base has dried in the opposite direction, so to counteract that we need to wet the hair at the base and dry those bonds and set them in the direction that we want that hair to move. So the way i'm going to do that is i'm going to come in on dry hair with redken's guts, a targeted, moose, volumizing mousse spray, and i'm going to use this as my water. But it's also going to build that volume and that grip for me. So killing two birds with one stone: we're gon na go in and we're going to spray directly at the root. So it should look like that. Okay, then we could go through comb that product in and don't be afraid of too much product on dry hair. We really want to make sure that we're getting that direction and that grip that we need and setting yourself up with the right product is how we're going to get there. So i'm just going to comb that through this base, i don't need to go all throughout the hair. I really want to practice working smarter and not harder and saving some steps, so i'm just gon na go through where i need it at the base. Now we're going to take our nine row finishing brush and we're going to use this as our grip, so we're going to place those bristles into the hair like so, and you could see that inside that brush that hair is really bent right. So we don't want to blow dry that we want to pull this, get that tension, that you see right there and that's where our nozzle is going to go and blow-dry that hair in the direction that we want to go. So here we go. I'M going to turn this on. I'M gon na just blow dry, that hair straight up for volume and to the side for that direction. We'Re gon na see what a huge difference this is gon na make working this way on dry hair again using the brush for the tension and the nozzle to direct that airflow. What do you guys think of that volume so far right there through her part? Isn'T that amazing and that hair is going to hold that because we've tried those bonds into that direction? Now i'm going to go down on the other side? Okay. So when my client comes in that's my first step is getting those roots and that base moving in the direction that we need so now, she's set up there, i'm now going to move on to our first set part of our sectioning and i'm going to use My tail comb and i'm going to just outline around the round of her head. So let me turn her for you kind of creating a halo so on this side i'm going to go. It depends on how much hair we want to leave out here, and this is going to be based off of your client's, hair density, but all of this is going to move back, but we're going to treat this a little bit differently. So you can see this volume that's built in there already, and this section is going to drop to right at her occipital bone so that that bump right there at the back of your head and then i'm gon na go to the other side. And i'm going to do the same thing, so i'm going to take about a half an inch around her hairline and then start working my way back to the occipital bone at the back of the head, and this line does not need to be perfect. This is something that we are just going to go in and secure. This is like where her volume is going to be, so you want to look in your mirror check yourself out in the profile and see. How does that? How does that look? How does that sit? Pay attention to her face, shape her jawline, her nose, her lips? Is this lifting or is it dragging her down? So all these things we're paying attention to as we take these sections really intentional, with our styling and mapping out our look before we just go in and start curling the whole head. I want to save you guys time and energy behind the chair, and this is definitely going to help with that. I wanted to ask too you know you mentioned about: is the sectioning helping balance face shape? Do you have any tips for that, or is it just to kind of keep moving the hair, no different ways and just keep watching in the mirror to see what how it affects things or what are you? What are your tips for that yeah great question, so obviously everyone's face shape is so different and sometimes you'll notice, it quite a bit and just their facial features their nose, their chin, their cheekbones. What i like to do is follow a line and that's about where i like to place um. So if there was like a a line from here to here, so you could see my fingers here and it followed down straight with her her jawline and lifting a little bit like that's. What'S going to really help in this situation, or if we have another focal point, you know following her cheekbone line and lifting if she has a really long face, creating a lot of height is going to just accentuate that even more. So we want to be aware of those things just the features from the front view and from the side view so i'll always turn them and kind of check out how that looks, and if it's standing out to you, then you you know that you need to Adjust thanks for that question all right, okay, so we're just going to secure this now with an elastic and i'll turn her around for you, and this is where we're going to to build some volume through here so say. Your client has some like really fine hair that won't lift up. Let me move this hair out of the way and i'll show you this i'm going to keep my crown section isolated, but i'm going to go in with some texture through her her crown area to help me even more so this is just to keep that hair Out of the way for me right now and we're going to go in with the zambia, texture iron and this lovely little tool here is one of my favorites in creating a ton of volume where's, my camera there. We go all right so going in here through this crown, we're going to just go in and tap the base with this iron, and we will get a ton of lift and volume. So if this is something that you're struggling with it's getting that volume for those clients with that really silky, either heavy or really fine hair that you just can't get to lift up or to tease go in with your texture iron at the first inch to two Inches of the base and you'll notice that little ripple effect and what that does is just create a lot of froth and grip for you through that crown. So, wherever you need that extra lift just go in with your texture iron and place some volume right there, and you will be amazed at what that will do for you and your grips are going to love that as well as you pin those in. So i'm going to re-grab this section here, just using my fingers right now to place that hair and i'm going to take this elastic out and secure it to this top. So i love right now the direction that texture is going with its natural textures coming back and uh. Celebrating those um as well as you know, not the perfect um beach waves and curls, and all of that that we're seeing we're either seeing a ton of body or we're seeing like a really modern natural bend to the hair. And i love that it just gives that effortless look um and moves away from what we've been seeing so much of with the um the beach waves, so creating that lived-in look, but not in a new way right. So, in a new way, with a little bit of bend and texture, let me re-grip this one, really quick. So what just happened is while i was pulling out that pulling up that volume, you can see there's a little snag here. So if that happens to you, this is why it's because the section wasn't brushed through thoroughly first, and so, when you do that, and you go to pinch and pull that hair. Has this ever happened to anyone? Let me see it in the chats. If it has you get that kind of like snag right and it's not the pretty pension pool that you are hoping for to get that volume, so try brushing, through your section first getting all that hair to move in the same direction before you tie it off With an elastic, then, when you go to pinch and pull and create that volume? Okay, awesome, i'm glad it's not just me that that has happened to now when you go to pinch and pull because there's no tangles underneath this surface, when we pull we're going to get a nice clean, lift of volume there so just going through creating that. Let me turn her there's her profile. What do you guys think that's a nice line right like just really lifting that that jawline up okay, so now we're going to do some iron work so, instead of going in what's the first thing we usually do we go in the client shows up. We start doing a bunch of curls or a big curl set, obviously depending on the look, but this look um we're not going to need to do that. We'Re only going to put some wave and some bend in these areas where the hair is hanging out right now, so it's going to save us a lot of time. We'Ve already mapped out the first step of our our look. So now all we need to do is just get some bend in there, so i'm going to go through with redken's iron shape. First, over these sections and just a nice mist throughout the hair, is going to help to protect her hair from the heat as well as let those curls or let that um wave or curls, whatever you're, creating really set and hold for the entire day. So if you struggle with your curls, holding um need some more control over that some more memory try working with a heat spray like red, king's iron, shape that has the memory and the heat protection and gives it a beautiful shine too. Hey anna yeah christy leanne ice is asking: do you ever feel like clients get this feeling of being let down? If you redo something like that or is it just my anxiety, you mean when i was pulling the hair back and there's a snag. Is that what you're talking about? No, i think i think what they're saying is because they're saying like there's a follow-up to it too. That says, i've been doing hair for a long time and i still get frustrated when it's not exactly what i want for the first time. So you know after you kind of set up, maybe your shape, and then you have to redo it. You know, or you know, kind of reshape something and do you feel like people get frustrated? If you have to go back and readjust stuff, you know, i don't think they're frustrated. I think they're thankful that you're actually taking that time and that step to adjust it. You know we're human we're, not robots, we're not perfect um everybody's hair is so different and each head is so different that i'm working on a mannequin head. We can do this look five million times the second i step on with the client and do it it's going to feel and look different. So there are going to need to be adjustments and i think the biggest thing when you're working with clients is them seeing that you are you're caring, you're, not just rushing to get them out of your chair, so um. The fact that you would take the time to go through take it back down and fix it. If that's what's needing to be done, then i'm sure they would be very happy that you are doing that. That'S a great question! Okay! So now we're going to go and we're going to create a very modern bin to the hair. So i'm working with our zambia sleeker in the ruby red - it's so beautiful, but you could see this really pretty nice beveled edge that it has - and this is going to really help to create a soft bend in the hair and not give any hard lines. So i'll show from this view and then i'll turn her and show you another angle. So i'm going to go through heat up my section first and then just start slightly pulling out turning my wrist going in pulling out going in and then a little bevel through those ends. This is a very fast way to get a beautiful finish in the hair versus going in with a ton of curls. So if any time i can create this look, i absolutely love it because it saves me a lot of time. So, there's that, from the side view you can see that bend and i love how this really mimics the bin that we get from tucking our hair behind our ears and how perfectly that accentuates the cheekbones. So do you see how that just is popping right there? All right so now we're going to go in with our next section, and here we go from this view, so you can see i'm rolling away from the head, i'm rolling into the head, i'm rolling away in and then down those ends, and you could just see That, and because of the product, the mousse that we've worked in through the base, the iron shape we're already getting a lot of grip and texture going in here. This is what's going to be hanging down, so how do we want that? To look for her? I am going to leave this volume that we have here. If i go in with my flat iron, i could take a little bit of that away. So i'm going to start this bend out about her eyes again combing through our sections. You notice. I have my tail comb in my hand, the whole time, because when we go in with the iron, if there are tangles, we are cementing those tangles into that hair. So you want to make sure that we're working cleanly with a lot of intention behind everything that we do and it's going to save you a ton of time, a ton of struggle and your finishes are going to look so much more professional okay. So here i go, i'm going to go in and i'm going to start by because we have this volume here, i'm going to start by going under and then i'm going to flip my iron over and go out in out in and just get that really nice Beautiful bend and movement tons of shine. What do you guys think of those waves awesome? Okay, moving over to this side, now i'm going to go into salon, speed and because i already sprayed the iron shape all throughout i'm already set up. I'M gon na take my section and go quickly through the hair, and you can see how fast you could get this in and move on to your section next section, which is going to be in the back moving this hair up into a style so going in. In out, it's really important sometimes i hold these ends because they'll start to move sideways down the iron, and you won't get that that in and out movement, look how beautiful that shine is there? Oh, my gosh clients show up drunk. Sometimes you can't can't do anything about it. You know. Sometimes our pet's heads are falling off. Anybody know what that's from. Please tell me it's my favorite line in a movie, it's old school! Look at that volume there! Now! Yes, okay! So this down here, i'm just gon na leave alone. It'S got a nice bend and texture to it. So we got all of that polish through the front. She'S got gon na have a very romantic messy look now because of her rolling around on the ground, but then we have all of this polish here through the front there all right now, let's take this and start moving this to the back all right here we Go let me step away okay, so we have our volume come on there. We go now we're going to take our hair from the ears back and we're going to move this up and over this hair tie. So our first anchor is this ponytail. Our second one is going to sit right on top of that anna did you mention what temperature you have the flat iron at? Oh, my gosh, a great point. Thank you. Um, the flat iron is set at color treated setting, which is 392 degrees, and you could see there that we have the color treated setting. That'S the amber setting the medium one on this iron and that's going to protect her color from fading. So i love that we have that feature, because almost every client of ours that comes in has color and sharing that information with them just makes such a big difference in their trust. Immediately with you that you are going in and you're protecting their color and also it's great information for them to know at home when they go to turn on their iron, that is a dial of 1 to 10 and they have no idea what temperatures those are At let's encourage them to turn down the temperature so that they protect their hair. So you can see. I have my two sections here: we're gon na pull these up and we are going to do an elastic right above that i got that one guy that just came out from falling on the ground. Okay, so we're going to tie an elastic right above here and then we're going to pull this through and flip those ends through. So my two fingers are gon na: go up the middle of that grab those ends and pull it through now we can really start to pull and accentuate that texture through there and create some really pretty movement as well as lots of volume. So now we have these two that we're working with we're going to start to create our our bun back here. So what we're gon na do is just twist that hair around and just loosely tie that bun up. So let me move a little bit closer for you, so you can see we have our two ponytails one sitting on top here and we did that little loop d through there and are really starting to pull that texture out to create that movement. These fronts are going to move back. These two ponytails are going to twist around each other, tie it off with an elastic at the ends and then we're going to just move that up. So our anchors that we're pinning into are the base of these two ponytails that are sitting on top of each other and that's where we're going to get a lot of security with our style. When we know where our anchors are and we're pulling we're pinning into those, so this is a really realistic length of hair that a client will come in with, and i absolutely love showing it on this because not every time do we have a client with extremely Perfect long, beautiful hair that we can work with so a realistic length here to still get volume and to get be able to get this look so now we're going in with our pins. Our anchors are right here below this, these two sections right here, so i'm placing this bun right on top of those i'm going straight in with my grip straight to the head and then sliding down into those anchors, i haven't: let go yet i'm going to pin Where my fingers are first so straight in and then either sideways or down, depending on, where you're at where you're needing to go into those anchors all right and then one more over here so straight in and then sideways to go into the anchors all right great. So now we're just going to easily pull back this hair in the front, and it's up to you on how you want to to let some pieces hang out. Let'S show you from the side view here. This section easily can move back so what we can do too, if you're needing volume on the sides we could go in. We already created our wave, our polish, through the mid and ends, but sometimes those sides look a little thin. That'S where we're gon na see clients have a lot of hair, less hair density, sometimes on the sides so going in with this texture iron again right there at that base creating that volume, and you could see that grip right there and watch as you frock that The amount of volume that you get from that is just so beautiful, so i i like to do one of those right at the base here. All this hair is going to move over that so you're not even going to see it, but it's going to really create a nice foundation and i'm going to do that on the other side, for you too. So if you're just joining in, we are creating a really romantic bridal style, easily setting ourselves up with for success by creating a really modern bend. So the hair is going to get set really fast. It'S not going to take a lot of time. We'Re mapping out our section and only applying the iron and the movement where we need it, not all over the head, then sectioning and doing our style. That'S gon na save you so much time. Okay, so got all of that volume in there, and now we can start to move this hair back. So it's up to you, you determine and the client what she feels comfortable with hanging down. This look has a little bit more of a looser softer feel. So we are going to leave some hair out and we're just going to twist this hair away from the head from the face away from the face. So it's just sweeping back across, and it's just going to float right over that that look that bun, that we have there - and this look has a lot of hair. That is just kind of some of the ends are still sticking out and that's what gives it that effortless feel. Okay, the other side's going to come back as we twist away from the face. Now we could pinch and pull and create that volume through these sections. Okay, so this is coming back and across that one and first anchor it in and then you could go in and and froth it up a little bit. So i'm going in straight in with my pen, i hit the head with that, pin straight in and then slide that down into those anchors straight in with my pin and then slide that down into those anchors now step away from your work. So often we get so zoned in on the section we're working on that we forget to step away and look from afar check. The balance make sure that this is looking good with her face shape with her her hairline, that everything is in proportion and then do your finishing touches. So here i could go in and start to blouse this a little bit cool and then we'll do some final. Pinning for the security get that volume where you want it, and obviously we have these ends that we can secure all right. What are you guys thinking of what are you thinking so far? Any questions love the term froth it up. Yeah, we're always like trying to keep um, keep changing the words that we use with our clients to keep it interesting um, to take something that you've said a million times and make it sound. Different and exciting for clients is something that i really try to do, and that also sounds beautiful and frothing. It up can definitely make you think of something really delightful right, all right, so romantic and sexy. At the same time, that's right, yeah, we're trying to you know, give her that look of effortlessness um, but she still has a polish style for for a special event. Whether it's a wedding or an occasion out so here this section right here, i'm going to just loosely pin this back. So the way we're going to do that because i really like having this hanging just not in her eyes, so we're going to do that by taking this section and we are going to take our pin slide it up a section of hair like this, you can See that we're just going to slide that in straight up and then back and you can see how that just tucks that away just a little bit all right. So, just to recap, we went in first and checked out how her base was laying where were we wanting the hair to move she came in with a center part. We wanted to go to the side, so we went in with guts. Where is it guts targeted volume, moves and just sprayed that right at her base here used our nine row, zambia, styling brush and the nozzle on our blow dryer to direct that hair into that loop that direction that set us up so that we're not battling her Part or her cowlick, if that's what you're dealing with on some clients, so just really set up the foundation of her base where the hair is moving and how we want it to light. We wanted volume in this case, so we lifted those roots up and directed them to the side for a side part next, we sectioned out that crown area and did a low ponytail at the occipital bone right here from there we took the underneath move that up And over that ponytail created another ponytail looped that through and took these sides and just moved them back very quick, very simple. This is a great go-to to have in your back pocket for a really effortless look and then just working with the irons in different ways. Instead of going in always and creating a whole head of curls, which could take a lot of time depending on how much hair they have, you can go in and easily just create that nice modern polished bin to the hair. So it's got some movement and um. Something fresh and different than what she usually wears, but it takes so much less time and you are going to save so much time by working with this type of bend in the hair. So i encourage you guys to try it at home. Use your tools differently! Experiment have fun and um. Hopefully you guys enjoyed this look. Well, as always, it looks gorgeous because your hands always creak gorgeous hair, but i think the other thing too, just even watching the chats is you make things really approachable like this was not complicated. Like you said, it was pretty quick and the approach is simple, so i love how you always take these things that i would look at that and go oh my gosh. It seems so overwhelming, but the way that you explain this stuff - it's like! Oh, no, it's actually not that difficult yeah, i think just breaking it down. You know. I'Ve learned over the years, especially early on you, do see a look that your client shows you on their phone of what they're, wanting and you're like on the spot and your mind just kind of explodes with okay, i'm just going to start curling the hair trying To figure this out along the way, let me see if anybody else has done that um. Did you just start playing with the hair, you're kind of lost on what the first step is? So i really hope that when i'm sharing these looks with you, i can simplify it and give you a few simple steps to map it out and you could take that and apply it to any style um and then just using your tools differently, you know, put Down the curling iron and pick up the flat iron for once, you know, have fun, play with different tools and creating different finishes: um, and then you have it all in your back pocket, so you're ready when that client shows you that picture absolutely yeah. Well. Thank you so much anna, please make sure to go. Give anna a follow over on social media, because she provides a lot of great inspiration and we'll see you back here soon. Anna


Comments
Kristina Blythe: I would love if you could please do a class where you take one hair style and show how you would change it based on different face shapes.
imelda griffith: I really enjoyed looking at ur video