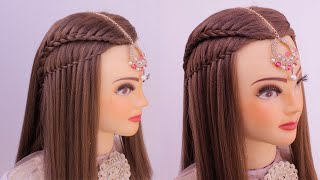
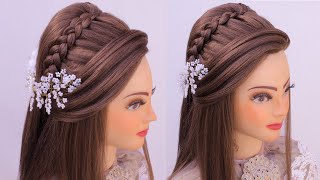
Classic Bridal Updo: Hair Style Tutorial
Hello Loves! Please watch in HD for the best quality :D
When we look at bridal pictures in magazines, pinterest, and other medias we often imagine our own wedding day. I'm always looking for the perfect hair and makeup look for my own day, but also wonder what would look best for certain necklines for the special day's dress. I find this updo is the classic hairstyle for weddings that works best on anyone with any wedding dress choices.
You can recreate this look easily on yourself or on another person. I find it a lot easier than it looks once you break down the steps. I hope you find this tutorial helpful :D
Products used:
-Suavve Keratin Infused Dry Shampoo
-CHI Heat Protectant
-Tresemme Flex Hold Hair Spray
-Sally Beauty Store Bronze/blonde bobby pins
-NuMe 25mm Curling Wand
-Hair Accessory is from eBay
-CHI Straightener
-Teazee Brush
I'm doing a PHILLIP LIM for Target Giveaway on my other network medias
***(Giveaway ends Oct 31st)******:
T W I T T E R: https://twitter.com/EmJustLikeYou
I N S T A G R A M: http://instagram.com/EMJUSTLIKEYOU
F A C E B O O K: https://www.facebook.com/OfficialEmJus...
Background Music Permission by: http://relaxdaily.net/store/
https://itunes.apple.com/album/b-sides...
This is a great hair tutorial for any special occasion, from your wedding to prom or just having a really nice romantic dinner out. If you want to recreate this look, then please continue watching this tutorial. First, I'm going to do is brush out all of the tangles and knots in the hair and apply a heat protectant to the ends of the hair, we're going to curl the hair in order to make it easier to work with for this updo, and I find It much longer lasting if you use a dry shampoo to the scalp of the hair prior to doing an updo. This is going to prevent your hair from looking greasy and oily at the end of the day as well as it adds a little bit more volume. So I'm applying it to the roots and then massaging it into the scalp of the hair and then making sure that it is distributed evenly throughout the whole entire head. Next, using your favorite way to curl your hair, either with rollers a curling iron or a curling one like I am just curl your hair, it doesn't have to be perfect and it doesn't have to go any certain order. The reason why we're curling the hair is so that it can give you texture, so it will be easier to create this updo as well as I find that adding heat to your hair really makes it shiny. So the in finish will look perfect after we have finished curling all of the hair, we're going to split the top crown area for teasing. This is going to give you volume for the updo using thin layers, we're going to spray hairspray to the roots and then start back combing. You can use any type of brush. I find that any brush really does do the work. What'S really important is how you pick these sections for the hair. You don't want to go too at the center and the portion is too small. Then you would have like a cone shape head and you don't want that. What we want is to grab the portion. The majority across the head: that's going to really help with creating that fullness and the volume now we're going to take the section that you've already teased and we're going to smooth the edges and twist the bottom loosely twist and then tuck it under this is going To give you that perfect volume for the top of the hair, once you find it to be perfectly placed start Bobby, pinning all of it in place, make sure that it's very secure. I like to crisscross the bobby pins to insure that it is really really secure. You don't want it to fall at the end of the day, depending on your length of hair for the ends I like to twist it and then tuck it under the bump that we just made now dividing the bottom section into three and we're going to work With the center section first using one-inch sections of your hair loop, it around your fingers but loosely and then just using Polly pins to place it in different directions. We don't want it to look uniform the Messier, the better I find and the looser it is. It'S going to look more romantic, you don't want anyone to look at the hair and notice where it starts and begins, so you can loop through the holes that you've already made and just place it in place wherever you'd like there isn't really a formula to this. Look you just kind of go along with the hair, depending on the length of hair that you have. If you have longer hair, then of course you're going to have to loop the hair around your fingers more than once, and of course, if it doesn't work out the first time that you've already looped it around, you can just undo it and start over again for Each loop and then on the side. I find it to be a lot more challenging because you don't want it to be too tight because then the look won't look as romantic and effortless. So what I do is I roll Attili in and leave it loosely. Then I will pin it to the side of the hair, make sure everything is in place and we're almost finished. You can leave your hair like this or you can actually accessorize it with a beautiful flower or a hairpiece like I am I like to apply to the side of the hair, so you can still see the beautiful volume on the top and then make sure you Secure it with some bobby pins, we ran out of blonde color bronze bobby pins, so I'm fortunately having to use black ones. But of course, if your hair is dark, use the bobby pin accordingly. Now, moving on to the bangs, I like to use my straightener to curl the bangs, to give it the most natural look. This way there isn't any crease and it's much easier to maneuver in order to make the hair look more effortless I to tuck the bangs in with a bobby pin to hide any type of bobby pins that you need to use for the veins, and that is The in finished look, it looks beautiful, just like this without any other accessory, but of course a broader look would not be completed without a veil. So right where we did the twist to tuck away the ends. That'S a perfect place to place in the veil and you just Slough the bay a little bit, and my secret trick is to spray a little bit of hairspray into the veil so that it will stay in place, and that is the finished look. I hope you guys enjoyed this quick tutorial and hope that you find it helpful. This is the sneak peak of the beautiful bridal make-up. Please come back at the end of next week for the tutorial bye. You
Comments
angel: This was the exact tutorial I was looking for! This is going to be my Easter style, thank you!
Kitty 89: That's a beautiful style, you've given me inspiration for my upcoming wedding. I will definitely be trying this out on my block for a practice before giving it a go on myself. Thank you very much :)
Lydia Decker: Awesome! I'm doing this on my sister for a wedding we're going to. Pretty and easy :)
Ashley Gwynn: Thanks for the tutorial and tips! Perfect look for an updo with a veil! Xoxo
Laura: Awesome tutorial. I used this to do my daughter's hair for her wedding (with a few personal changes she wanted added in) and it turned out wonderful. I AM NOT a professional hairstylist. Thank you for the help and inspiration we needed to make her hair perfect. :) I wish I could show you pictures of how it turned out.
BayAreaNative: OMG you saved my life! Have a bride tomorrow and this is EXACTLY the hairstyle she wants!!!! Yay!!! It looks beautiful THANK YOU.
Day by Day Beauty: This is a very interesting hair style! Thank you for this awesome tutorial
Debra Rogers: Great job on this tutorial. Very easy to follow along with.
Little Missie: What a beautiful style! Love it! :)
Chronic Pain and Depression: This was the hairstyle I chose for my wedding. My hair was nearly to my waist and shines without sunlight or highlights so each curl was different dimension. Beautiful hairstyle! I had so many compliments about it!
Christina's Cleaning: loved this, we are doing updos in my cosmetology class next week and I was nervous but this looks like something I can do :D God Bless
Tanya McKiver: Loved it , you made it look so simple :)
Pearl: I won Ms. Dazzling with the great help of this style at my seniors' prom yesternight. My mom did the hairstyle and we had problems in teasing my crown because the hold did not last long enough but thanks for the twist at the back, the style still carried it's elegance throughout the night. THANK YOU SO MUUUCH!
Shana G: I love this and find it to be helpful! Thanks! And her makeup looks AWESOME!
Wanda Metcalf: I like this! Gorgeous loom for any dressy event. Thank you for posting.
Catherine Rose: Beautiful! Awesome job Jenn! I wish I could do hair =\
Tamara Giallonardo: I'm an apprentice stylist, and I have an interview today where I have to do an Updo demo. I'm totally doing a rendition of this reminds me of one I did last year. Love !
Sara Chatterton: Thank You!!! I love this and am doing my bride tomorrow with this style
Nazma Islam: Hi i just subscribed to your channel based on this tutorial. You did such a simple but elegant updo and you made it look easy. It was beautiful.
Eveline Strandell: Such a romantic updo. Love it! ;-)
Maria Flores: Thank you for these video, you really make it look so simple to do it.
charrece1: Very pretty! Looks super easy, gotta try this 1. Thx for sharing!
Dakota Driscoll: love the twist trick to get the volume! I'm always struggling with covering the Bobby pins so I'll try that!
Tulipe: The explanations were clear and the steps easy to follow. Thanks.
Marie Sa Yue: This is so pretty. Can’t wait to try it on my daughter . Thank u
Linda Manjarrez: Very helpful, I love it!
zahra rezai: So pretty I might just do this for my wedding thanks for the video!!
Alisha Adat-Nurani: This was a great tutorial thank you!
Cas Berta: Awesome! Beautiful and easy :)
PrunellaFong: Wow u make it look so easy 2 do...fantastic Jen! Simply gorgeous...
Momma2one: how long does this updo take to do? would love to have this done for my wedding.
Elina C: So beautiful ❤️ well done
Sarah C. Malarkey: It is so great to watch someone with such skill in their hands! thanks for posting this.
Nemixtli: I'm not really in need of an updo like this but it just looks so easy and the results are beautiful! Please post more hair tutorials
megan blair: Great tutorial! I'm 13 and doing this for my aunt at her wedding
Nicky Kondratovits: I love this updo :)
Angelina Gigi Williams: Absolutely gorgeous updo and her hair is beautiful....
Adriana Stiliano Marcondes: MARAVILHOSO!
mercy kaamba: This is a great idea definitely going to try this
Nelly Compean: Te quedó hermoso y facilísimo... Felicidades.
riya ramjattun: amazing tutorial love it
EmJustLikeYou: Thank you sweetie! :D Hair is actually easy! Messy and cute! NO need for perfection
The Australasian College Broadway: Amazing! You really made your model look so elegant! Girls: try this out on your next date.
Svetlana Brady: Great tutorial and great tips! ;)
César Nascimento: Lindo!
Kathy Happle: Just what I'm looking for. It looks great!!!!
Noemí chulita: Me encantó
Angelina Merineo: you made that look so beuitful and so easy to do Thanks so much for your teaching skills on this hope i can do it for my self
jessie lam: thanks a lot for sharing this video! it helps a lot!
Sandra Cristina: MUITO LINDO,,,,,,,SEM PALAVRAS
Maria Wilks: Love it. well done!
Anum: i think im going to use this updo on my wedding day
Ann marie White: Wow this is the first up do that's gorgeous and doesn't look impossible to do that's for sharing going to give it a go I'm useless with hair but you make it look easy!
Kala's Stage: Very helpful! Thank you!
MzChynaBarb: Wow this was very helpful and gorgeous
Bríd Doherty: she's beautiful! At certain angles she looks like Jennifer Lawrence C: Gorgeous updo, makes me want to buy a pack of bobby pins to try it out!
Kaela Schultz: I am doing this for the formal this year!
beti mikalkenas: Great tutorial! thanks for sharing
natright: very pretty and really easy to do
TA L.: great tutorial! love it.
NingOnline: Looovely bridal hair style! She is so lucky to had you on her wedding! - saw it on FB ;). I wish I could fly you over here on my wedding (some day... haaha) to do my make-up and hair ;D - and pay for it of course!
Elisa Ferreira Penteados: PERFEITO!!!
Magdalena Żołnacz: That was my wedding hair :) Thanks for idea :)
Lissel Sutherland: love it, thanks for sharing ;)
Belle Michelle: Beautiful. She's got a gorgeous hair colour too :)
MollyRose 🎀💙🎶: I actually love this look
HighlandAngel: loved your tutorial have watched it 3 times already but I am hopeless at doing it on my own head!..Id like to watch your bride make-up video next but cant seem to find it. Please could you post a link to it! Its my Birthday tomorrow and would like to look pretty when my husband comes home from work to cook a special dinner for me! <3
NativeAfghan786: your bride is beautiful, great job, Thanks for sharing.
Nancy M. Rapavi: Beautiful! love the music too:) Easy to follow.
Ravinskye Desjarlais: So easy thanks♥♥♥
xokattp: awesome tutorial!
Daisie Mae Thurston: the updo is beautiful x x x
EmJustLikeYou: Aw thanks! Wish I could do your makeup and hair too! Love it! :D
stinkybats: Great job, Jen!
Melinda Zupan: beautiful i'll try this one
Barbara Gray: Very pretty, love it...
Karlita Garcia: hermoso me encanto lo intentare hacer
Clairee: I love this look and i think I'm going to try it for my school dance. How many times did you loop the hair inside another hair loop? (4:36)
Shahrzad Modiri: Very nice. Great job. Thank you
Becky's Background: thank you soo much you helped me and now i know what to do
SphiwoSethu Thando Ngcobo: wow this is amazing best bridal up do ever
Ratuara Kavita: Eish, I really love the way she did the style it is very simple and nice really. I wish I could be one of demonstrators.
EmJustLikeYou: Thank you so happy to hear that. I do fine it actually easier than it looks!
Jill Klatt: The hair is gorgeous and so is she!
ClayClaim: Very amazing! Thank a lot for your channel :)
faustina Ortega santos: divino me encantó .
teacher jAke: thank you so. much.. this turorial was so helpful
teacher jAke: thank you so. much.. this turorial was so helpful
jacqui shepherd: Amazing upstyle well done
roslinastars: beautiful! Lovee it
Ji Jo: How long does it usually take to style your hair like this?
Priscila Ricardo: Muy bonito!
Amanda denman: This is GORGEOUS!!!!!!!
Kevin Onthank: Really great tips!
Youtique Bridal & Lifestyle: Great Tutorial! Thanks for sharing:)
Prabh Kaur: absolutely gorgeous! Of course i wouldnt be able to do this on myself though haha, i think i should book an appointment with u :P
lou_polefit: Beautiful
rosenilda: Ela é fantástica
beti mikalkenas: eu adorei eu vou fazer
Amy Rohr: Gorgeous!