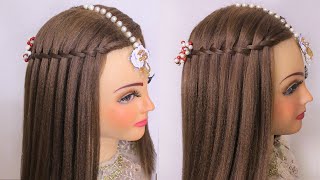
Braided Bun Hairstyle - Perfect For Bridal Hair Style And Great For Bridesmaids Too!
Join award winning bridal hairstylist Pam Wrigley for this braided low bun hairstyle tutorial. Learn how to create a beautiful, secure french or dutch braid that hugs the scalp, and build it into an elegant low bun hairstyle, perfect for a bride or bridesmaid. This style works best on long hair or medium length hair (adding hair extentions may be a solution when working with shorter hair). Learn how to texturise the hair, creating movement and texture in the hairstyle. Learn how to create beautiful bridal hairstyles step by step with Pam Wrigley, UK Wedding Hair Stylist of the Year.
Subscribe and learn the latest wedding, bridal, prom & party hairstyles alongside timeless, classic hairstyles and vintage looks that never go out of fashion.
Links to the products used by Pam (where available):
Fudge Urban Sea Salt Spray: https://amzn.to/2BJ1onG
Big Sexy Hair Play Dirty Spray Wax: https://amzn.to/3g7oVwA
Bastie Dry Shampoo - Blush: https://amzn.to/3bUGMFb
Bastie Dry Shampoo - Dark: https://amzn.to/3g4iDyZ
Goldwell Style Sign Superego Structure Styling Cream: https://amzn.to/30wZSPx
Visit https://www.createbeautifulhair.co.uk/... for more information on learning with Pam.
Want to master the art of bridal/wedding hair and learn with Create Beautiful Hair? There are many ways to learn with Pam:
1. Join our Habia approved award-winning online bridal hair course, learn from home and submit work directly to Pam for assessment and feedback as you work through the models; receive as much support as you need! Complete the assessments and receive a Habia approved CPD certificate upon completion of your bridal hair training. We have a 50% off offer on the full subscription over March-April 2020 (use code HOMESTUDY at checkout), or join from 9.99 per month on a view-only basis. Click for more information: https://www.createbeautifulhair.co.uk...
2. If you are in London or nearby, enquire into private Bridal Hair 121 tuition for yourself or for a salon! DM for more information on private courses!
3. Check out more of our YouTube channel for a selection of our freely available tutorial...like and subscribe for more information and updates, YouTube link: https://www.youtube.com/channel/UCDKU...
4. Join us on Facebook for more tutorials and all things bridal and wedding hair!! https://www.facebook.com/createbeautif...
Whichever option you choose, please do get in touch and share your fabulous creations and suggestions on what you want to see next!
We've got it covered . . . we even have tutorials covering the curly girl technique!
Great for fans of natural unintentional ASMR!
Hairstyle tutorials include hair prep, hairstyling and hair up, blow-drying, curly girl techniques, working with different hair types, hair textures and hair lengths.
Create hair up & bridal hairstyles and become a bridal hairstylist with Pam Wrigley, UK Wedding Hairstylist of the Year
Just SUBSCRIBE & LIKE!
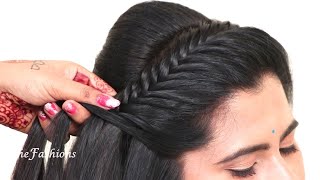
I'M going to show you how to create a beautiful braided updo on our practice head today. I'Ve already crimped the hair and put a little bit of texture in there. So she's got some salt spray. I'Ve been through the hair with the crimpers and brushed the hair through.. The hair on this practice head is quite coarse. It'S not that soft anymore, but if you were working with a client who had quite soft silky hair, you could also put some dry shampoo or some dry texturizing spray through the hair.. Then what you want to do next is start creating your sections., So you want to decide where you want your parting to be at the front. Here, I'm going to go for a side parting for this particular style.. I'Ve created a section here. I'Ve kind of gone from the corner each edge of the forehead back, and let me show you the section here: it's wider at the front than it is further down here at the back, so you can see i've gone a little bit narrower as i've come kind Of down towards the back., I'm not coming all the way down to the nape of the neck. That'S the section that we're going to braid. So i need to clip that out of the way first of all., Then with our other sections, we're going to work with our side section. So i think i'll just clip that away and then the other side section. So I'm going just from behind the ear you can just do a little bit of a zigzag down just to behind the ear there. Doing. The zigzag lines will actually help when you're creating these textured styles. The zigzag lines will help to disguise the section lines later on when we create the style.. So then, let's get our section on the crown here, we're just going to leave this bottom section down. I think that might belong in that side section there i'll put a little clip on here just to keep it out of the way, and then we've got our bottom section here.. So the next thing to do is to create your braid. So i'm going to do a dutch braid here. A little bit of spray wax, because we want to make sure that all our sections here are smooth. You don't want any flyaways, so you could even use a little bit of your styling cream.. This is a structure. Styling cream just to smooth the hair, that's going into the braids, make sure it's nice and smooth before you begin and tangle free, A little bit of product on the section we're going to braid and then start your dutch braid, nice and neat Add a little bit Of extra product as you need to, as you work your way down the braid just to make sure that it all stays, neat and perfect. Do quite a tight braid. Keeping the hair neat all the way down.. If you're not sure how to create this braid, you can have a look in our braiding section where we have french and dutch braids made easy and they're very easy. So now i'll come down to the end and then what i'm going to do is I'm going to get some bobby pins and i'm just going to put the bobby pins along the side of the braid, because i want to make this braid really loose. But i don't want the hair that goes into the braid to be loose., So i'm going to put a row of bobby pins alongside the braid, underneath the braid. Be careful not to go up into the braid and you'll be able to see why i'm doing this? In a minute., So here we go at the back, a row of bobby pins, just underneath the braid overlapping each other and then we're going to start pulling the braid out.. So take your time when you do this and just do a little bit at a time. Working your way up the braid. Just to start off just to get everything a little bit, looser I'm going to just pull these whole sections out and just keep going. Try and avoid getting too many fly aways in the hair and just take your time, and you Can loosen it a little bit at the front as well and then, as you get a little bit further on and it's getting a little bit looser, you can start pulling the edges out. Then too. I'm going to put a little clip on the end, because i think we've kind of reached our amount of looseness that we need and just keep going until you've got the braid as big as you want it to be.. The key is to not rush this step. Any visible bobby pins. You can just push under., You can see because we've taken our time, the braid still looks shiny and glossy and held together. Finish with a little bit of wax spray. If you've got any fly away. Bits. So now, let's start working on our side, section., I'm just going to clip the braid just out of the way for now and bring these little piecey sections back and get some movement in there.. So i think i might pop a bobby pin just at the back here, make sure you've covered your little part here and nothing's visible, that's better pin in there and then the braid can come down, have a look around check your position and then we'll move on To our next section., So we're going to work with the crown and next and i'm going to try and bring everything kind of down in this direction towards the braid. So it's all kind of gravitating towards this point here.. What you can do here with your structure cream is start to create your little piecy sections in the hair. Get a little bit more product. If you need it and remember, i'm going to bring everything slightly over to the side, here. Pop your braid out of the way and sweep everything over. Just check, you can bring that into position. Yep, that's going to be perfect and then we'll do our side. Section. Here. So check from the front decide which little bits you want down. If you're going to have some sections, down. Work with your little sections and sweep the hair back and then we're going to put a little twist in the hair, just as we bring it round towards the back here, something like that.. Everything is going to come over to this meeting point over here, where the braid is going to come down.. So, if you want to here, rather than just go straight for the bobby pin, you can pop a little hair pin in just to prop the hair in place. Just while you make sure you're happy with the position of everything.. I think this is going to come on top here so now. I know that this bit's right ... now i'm going to put my row of bobby pins across the back. Nice and secure. That'S it A little bit of spray wax to make sure that everything is smooth and gorgeous. Before we start working on the bun at the back, i'm just going to help to define these little piecy sections.. So i'm just going to use the fine pins and when you put them in ..., I just bring her a little bit closer. So you can see what i'm doing .... So what you can do is just pinch. The hair together pop your little hair pins on and sometimes I just give them a little twist.. It just helps to give the hair a little bit of extra movement. A little twist as you push it as you push it in and go all along the sections.. You can squeeze the pins together a little bit if that helps, but just pop them on and give them a little twist. So keep an eye in the mirror. As you go along. I'm using the strong hair pins to prop the hair up into position. That'S it! We get to the end. I can just twist it and secure that with a bobby pin. Tuck, that out of the way we've got half of our bun and then this one we're going to twist over in this direction to finish it off.. So the hair pins are just there as a temporary measure just to hold the bun in position. While we finalize the shape. So have a little play around and create your perfect style., So you could sweep over, but i'm just going to sweep over to here. I don't want to go over the top of the bun, I'm just going to go kind of halfway pop, a bobby pin in there to hold that hair next to the scalp., Then come back and perfect. Have a little tweak and a little play.. You can pop your hair pins on these sections as well to help create that definition or if you want a smoother look, you can just leave it as it is., I'm just using the fine hairpins here just to help create that lovely piecy definition. Pinch the hair Together and pop your hair, pin just on top of the hair., Make sure you're happy with each section. We don't want to get a little gaps here along the side of the braid., So we need to either nudge the hair close to the braid or bring the braid a little bit closer to the hair.. Much better Keep an eye in the mirror. So you can have a look at your style from a little bit of a distance and keep working with the shape and the style.. So we've got our hairstyle created and we're just going to put a little curl in those front sections and then we'll be able to take the pins out and the style will be done.. Then we'll be ready to take our pins out.. You might find you can push some of these pins in the ones down at the bottom holding the bun in. But if you do just make sure that the pin isn't going across the sections of hair. But it's going in the same direction as the hair, so that when you push it in it kind of gets hidden and it doesn't sit on top of your section.. I actually don't think we need this one at all, because it really feels secure, but you can see how, if you've got it in the right direction, it can get hidden quite easily in the hair.. You might need to kind of move something around a little bit, but essentially it will be hidden. If you don't need it. Just take it out Pop a little sparkly bit in the hair, little hair accessory and it's really secure in there. So the hairpin has gone in behind some of the bobby pins that are there, so it doesn't need any extra help to stay in position.


Comments
Shannon Day: Usually I fast forward on these videos. But this lady is memorizing!
surf1ncybersis: Didn't realize how the hairpins really do make a difference in the piecing process,
Carlo Ricciardi: Another super video pam!
TORI: How am I supposed to learn when your voice is putting me to sleep. Great unintentional asmr.
R C:
Adwoa Amankona: Hey Pam!!