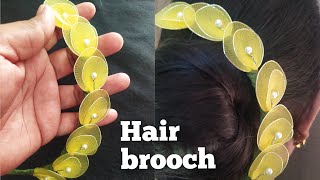
How To Make A Wedding Hair Flower Using Organza & Tulle
DIY Elegant Organza & Tulle Hair Flower. Perfect for wedding season and special occasions. This hair flower looks gorgeous with a birdcage veil. Enjoy!
HERE IS THE LINK FOR THE PATTERN DOWNLOAD:
https://www.dropbox.com/s/oxz3x0e25irz...
Hey guys welcome to the untidy artist today we are making an organza and tulle hair flower. These are really elegant and beautiful for weddings and special occasions. Let'S grab our supplies. First off you'll need a copy of the pattern that you can find in the comments below. So download it trace it onto a piece of paper and cut it out. You'Ll need some organza fabric. This piece is 45 inches long by about 12 inches wide you'll need some tulle. This came on a spool, so it's six inches wide. You can use just plain. I'M using two different colors of purple that are sparkly using different colors adds more dimension to the flower, so mix it up. However, you like some felts and a clip for the back, a needle nc thread, and you want the thread to match the color of the flower and for the center of the flower. I have beaded trim or some sparkly rhinestone buttons and then a ruler, sharp scissors and some pins. The first step is to grab your organza fabric and you are going to cut out 12 flowers using the pattern. The flowers are around five inches in diameter. So I find it's easy if I just overlap the fabric back and forth at about six inches and cut out my twelve flowers from that another tip with organza is to make sure you use a lot of pins the fabric likes to slide around a lot. So you'll want it to stay into place while you're petting and definitely while you're sewing and assembling your flower. So once you have the pattern pinned on go ahead and cut it out, I'm cutting out six at a time and it helps to have very sharp scissors and then use your pattern to cut out the next six flowers. So you have 12 flowers cut out of the organza, then go ahead and measure out the tool, and I measure it out into about six or seven inch strips and overlap them, and I actually cut all of them out. At the same time, you'll want six of the lighter purple tulle and six of the darker, if you're not using two different colors, just make sure that you have twelve flowers cut out of the tool and now we're ready to assemble now, starting with the organza flower. We'Re going to start making little piles of the flowers so you'll layer them you'll, do an organza and then two of the tulle and then another organza, so you're, starting with the organza and ending with the organza and then pin it together. So it doesn't move around and you'll do that with all of the flowers. Until you have six different piles, then you're going to take those piles and alternating the layers layer them on top of each other. It found that it was easiest to overlap three and pin them together and then take my next three stacks and overlap. Those and pin it together and then take my two big stacks and overlap. Those making sure that the layers alternates pin it together and then make sure you get any of the pins that were inside the layers will goes out and now we're going to sew our flour together and then using your needle and thread find the center of your Flower fold it in half gently and Stitch a small section in the middle of the fold to secure the flower and you'll want to put about four to six stitches in the middle. To make sure it's secure, you can see, I'm just pinching it and securing it with the thread. This will give it a more authentic shape. Once we have that done, we're going to fold it the other way so essentially you're making an X in the back. With your thread, secure it with six more stitches and don't cut off your thread just yet we're going to use it to add the center to our flower. So you can see it gives it a lot of dimension and makes it look really pretty. So this is what it would look like. I'Ve done, some with the beaded trim. I decided it would be fun to put a rhinestone button on this one, and this one from the back has a hole. So I'm going to take my thread up through the center of the flower towards the front. So I move from the bottom to the front and then I'm going to slide my button through the needle and secure it from the back making sure that the needle and the thread go through the back of the button. And I take that through several times. And then just knot it off tightly. You have a beautiful flower. Now we're going to attach the clip to the back of our flowers, so cut out a 1 inch square from your felt and then shape that into a circle and glue it right to the center. On the back of the flower, that'll cover up all of the thread then cut out a small strip of felt use, a little dab of glue and tack. The alligator clip into place in the back and then open up the clip slide in the strip of felt line it with glue and hold it into place until it sets. You can separate the layers of the flower to give it a more full effect, and that's it. You have a beautiful, beautiful flower. I think these would be gorgeous for a wedding really pretty with a birdcage veil and obviously really fun for special occasion. If you have any comments or questions, please post them in the comments below, I would love to hear from you give this a thumbs up. If you like to check out some of my other tutorials and please subscribe


Comments
The Flower Art: This flowers are so so pretty, thank you for the tutorial. Bori
Winterfay 89: I love this. I am going to make 5 for my wedding. one for my birdcage veil and one for each of the girls in my wedding party for their hair. Thank you so much.
Marcela Petroni: Hermosos diseños! Me suscribí. Gracias!
Gwen Davis: Elegant! Thank you for sharing.
Laura Barba: thanks for sharing! . thanks for the pattern.
Amanda Theiben: I love this idea but im wanting to make a snowflake for a frozen bday party i think i may try this with my own drawn snowflake shape.
Belem Vazquez: i loooove the result!!!! i just wonder about frayin the organza fabric, how many times do you consider can be use this flower??? Thank you so much for your time.!!
Laura Barba: Beautiful . purple is my favorite color.
teceyS3: ♡♡♡
gbet63: The result is beautiful but I had a difficult time hearing you. Have you considered doing on-camera vocals?