Easy Backbraid | Easy Step By Step | Pakistanibride| Beginners
Welcome Back!
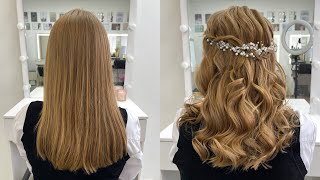
In this tutorial I have shown you how to create a Pakistani Bridal look in alot of detail!
This look is ideal for Pakistani Brides, Asian Bridal Makeup, Indian Brides etc. You can change it up to suit you.
If you like this video please do leave me a comment and subscribe to my channel that would make me very happy :)
Follow me on Instagram for lots more content
https//www.instagram.com/shazmamua
Bookings Please Email Me - [email protected]
#asianbridalmakeup #pakistanibridalmakeup #Flawlessbase
Hairstyle
Backbraid
Messy Backbraid
Bridal Makeup
Pakistani Bride
Asian Bride
Indian Bride
Long lasting makeup
Full Makeup Tutorial
Bridal Makeup Tutorial
Foundation
Bridal Eyeshadow
Step By Step Bridal Makeup
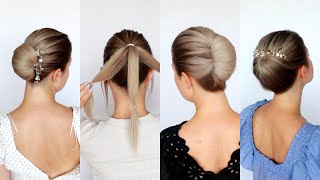
That'S right with them guys, i hope, you're well welcome back to my channel today. I'Ve got the hair tutorial for you for this particular makeup. Look that i put up a few days ago. Thank you so much for all the comments and all the love you've shown on this video. So today, i'm just going to show you the hair. This was like a messy back braid, so um. I did it this. This can be done in so many different ways. Um, but i've done like a messy, very quick braid here because, like i said this was a um a photo shoot and i'm always rushed for time here. So i've started off by putting on the necklace. That'S very important, it's a very simple detail, but it does obviously get missed out and i've forgotten so many times and then it's cause problems. So it's important to get your necklace on first, especially if it goes over the head, then i've done a side to side parting and then i've taken this section here and just putting it up into a bubble. I'M gon na get rid of this by adding some pins and then i'm going to start adding some pieces. So i'm using my kinky bulkhead. I have got a video coming soon, where i'm going to show you all these pieces. I'Ve got where i'll get them from um just to make it easier for you, so you can always refer back to that video if you need to so i'm just using you pins here and i'm just adding this in now i tend to. There are two ways to do this: you can add it in first or you can add them in after as well. Now. What i find is, if i add them in at this point, it gives me enough height and then i add my hair piece and then i don't need to do much back combing to the front, and i can just bring and like end up doing like a Bouffant and everything, so i find it quite easy doing it this way. So it's up to you how much you want to add at this point um foreign! You can follow me on instagram as well guys and there's always lots of new things that i'm putting up there as well. Everything gets put on to instagram first um and then obviously it comes on to youtube as well. So you can follow me there, it's chadsmartmua and if you need to contact me, you can obviously i do try and read all your comments and reply to all your comments, um on youtube as well. But if you do have any um anything to say, and obviously you don't want to put it on on a public forum, you can send me a direct message on instagram. I try my best to reply to all my messages. Sometimes obviously the odd one does get left out, but i do try my best to reply to everyone, so you can see i'm just forming the shape slowly slowly and adding the padding on the padding side. So i'm just going around now and i'm curling all the hair before i actually add my hair pieces. So i'm just going around all this section here, all the hair that i've left out, i'm just going to curl it. So i tend to hairspray it first and then i go through and curl it. I did a very loose curl here. I wasn't spending too much time. You can obviously make this as neat and as tight as as you want, but, like i said, i'm rushing always. This is why i'm trying to do a few more shoots where i'm not actually doing them at a venue, i'm doing them at home. So i can take my time and do lots of different hairstyles, for you guys and show you exactly what i do and but this one was a little bit rushed and so i'm just curling very very lightly and i'm using my ghd curlers here there are two Barrel sizes, this is a slightly smaller one. I always forget what the sizes are. I think it might be 24, millimeters and 30, i think or 32 um, but this is a slightly smaller one. I tend to use this one a lot more and but i do like the ghd curlers now you can use other colors as well. I'Ve only had this um, probably for about two years now before that i think i was using um one from bombay hair, so they were really good as well. It was like a five in one, so it had like five different barrels to it and that you could attach, but i needed a new one and they didn't have any in stock. So i had to just rush and then i bought this one. And but there are lots of curlers and that you can use for longer hair i like to use curling tongs rather than straighteners, because the curls actually stay in a little bit longer smoother. So so so i've added up my half head wick. So what i've done is i've just secured it on i'm using grips around the sides of it and inside i'm just using you pins now, sometimes they're a bit difficult to get in because you've got the pieces there and things. So it's just getting through everything. So just appreciated your comments and likes on my last video as well. It really helps me out and my channel and the growth to my channel as well when you, when you comment and like, and you share my videos and i'm honestly just trying my best to show you everything i do because um when i started, i had no One to help me out and if you don't know you don't know it could be something really simple that everyone seems to know about. But when, if you just don't know, then it just makes life a bit difficult. So i'm just trying my best to obviously show everything i do. It'S not going to be to everyone's taste. I i understand that i get that um. You know you're not always going to like everything i do, but i do appreciate your comments and it really does help in the growth of my channel. So if you could like and share and comment that would be amazing and and i've got lots of new content coming inshallah for you guys, so i've gone around and basically what i'm doing now is just taking a section. I'M working with just the middle section of the hair. This is literally the the wig that i've had added on. So this is not her natural hair. So all i'm going to do is take small sections like this twist them across i'm pulling them over and then i'm adding a pin. Now what i tend to do is, i add, like a u-pin first and don't secure it completely until i'm happy with where it is and then i'll go in with a little grip as well and pull it in i'm going to do this either side, and you Can see i'm doing it quite roughly, i'm not even brushing it through, i'm actually just using my fingers to comb through, and you can use a little bit of like gel here, but it works to make it a bit smoother as well, but literally it was a Very quick, messy braid. I was doing so yeah your middle section. It here now you're just making it look um. You know you're, obviously securing the pins in and you're just making sure that it looks right and it's falling, it's kind of like going wider and then it goes down and as it goes down, it goes narrower. So you can see i've just twisted those two bits and i'm just pulling out loads of bits as well, and then i'm just going to pin it as well so be so that's pretty much like the back side of it done so now. What i'm doing is i'm taking the hair from the sides and then this was her own natural hair. Now so again, very roughly with my hair, i'm just you know using my fingers to comb through it, twisting it and just adding in where i want it. So i'm just kind of like loosely pulling at the curls as well, and i'm just pinning in where i think so. The initially this this side, i'm going a little bit lower, because i want to kind of fill out the braid a little bit and then the top sections i'm going to use a little bit higher up in the pony, so yep lightly fingers saying brush through cardio And jelly so again, i'm just working on the other side now and i'm just pinning it in where i think it looks nice you so i'm just using um, it's the tresemme hairspray here. I think this was number three um and i'm just using this. I tend to use the number, i think it's number four or five as well, which is in the white bottle, which is like the um, the um like stronghold hairspray. So from the front now before i do anything, i'm adding my dick guy and i'm making that sure that that's secure. What i did also do is actually take a section of the hair from the front, and i took it over to the back. I think i've missed that bit out foreign, so there's a lot of different ways. You can style this hairstyle from the front um or any hairstyle, to be honest with you, so um. What i could have done is actually curled. It pinned it up and really smoothly and neatly kind of like, given it a lot of lift so but, like i said, as i was rushing, what i'm doing is i'm just backcombing it. I haven't bothered curling it or anything like that. I'M just taking some i've split that side section into two sections taken one section back already, then i'm taking the second one back and we were just deciding whether we wanted a few bits out and things like that. I asked if i could cut her hair a little bit, because you know it was a little bit too long to kind of like just leave out and curl it, which we did. We snipped it a little bit at the end, and so i'm just very lightly. Just back coming towards the back and then i'm pulling the hair backwards and just shaping it. So i normally work in front of a mirror, and obviously i didn't have a mirror here and what i am doing is quite loosely just pinning it first and i keep coming and checking at the front and making sure that it's it's you know framing the face Nicely so again from this side as well: i've just sectioned it i'm going to take some of this hair back and then one section i'm going to pin at the front and slightly differently. So i'm just backcombing very lightly. And but the backcombing shouldn't come to the front so you're just going to smooth it out and then take it backwards. So if there'll be a section, come in a door misplaced, so i decided just to take this whole section back and then that section that i've just moved to the other side is obviously the one that's going to come over. So i'm just going to do that. Slightly differently as well, you'll see in a second, it's really nice to. Obviously i try my best to do these photo shoots and then i've got the hair, the jewelry and everything going on, but they're always so so rushed and they're becoming very, very stressful. So what i've decided to do is i'm going to be doing a lot more of these without the actual outfits, i'll probably have jewelry, but without the actual outfits, even though that finishes the look off for me, but it's just a such a stressful job to do And i have to travel quite far to go and do these shoots and it's just becoming really difficult to do and plus i just find that i'm always rushing and then, whenever i explain things to you, i'm always saying to you that, oh i was rushing this And this is why i've done it like this, so i'd rather do it where i can, you know, take my time and explain it properly to you guys, so this section, all i'm going to do, is i'm going to give it a quick back comb, and so I'M back combing it towards the side very very lightly, not too much, and then i'm just going to kind of like pin it in and shape it a little bit. So your front section is here: i mean it's much easier to obviously have had curled this bit. First, so normally i would curl it and i leave it up there and then it's easier to actually, you know place it in and just maneuver it a little bit, but obviously can this can be done without curling, the hair as well like i'm doing here. So i've just gone for a slightly different way of doing it, so i've just backcombed it a little bit. I'M just gon na. I didn't want too much lift either. So i'm just giving a little bit of lift and then i'm just going to pin it in where i think it looks so. I'Ve just set the front and then i'm just going to hand spray later on as well, and i'm just pulling it out and i've used the stronghold hairspray here so that helps out and then at the front, i'm just curling away from the face. Just for these bits here, so that's pretty much like the front styling done for me. So now. What i do is i'm just going to work on the back. So all the bits i was pinning in, i was just leaving the backs hanging out, and so what i'm going to do now is just go around curl these and then i'm just going to pin those in wherever i think they. I think they look right. So it's just again you're just going to eyeball it and see where you think it looks nice m. You just have to make sure that you, when you're curling you hold on to the hair a little bit, because you have got that pinned in so it does actually make a difference to the front tail start pulling things out. So i'm always holding that pin in position first, so now i'm just going to pin in wherever. I think it looks fine, i'm just going to pin this in just like that and then finally, we just added some fresh flowers, just at the top, instead of going through the whole braid, we just put some in right at the top and that hides a little Bit of the pins as well, and then it just looks really pretty as well. They were just fresh for hours, flowers, so just a final spray. Now i'm kneading everything up, so i hope you guys have enjoyed this tutorial. I hope it's it's something that you know. You'Ve learned from and uh, please do leave me a comment. Let me know if there's anything else, you want me to show you and inshallah. I will see you all soon. Alas, you


Comments
ShazmaMua: Watch the make tutorial https://youtu.be/cndjmjudY84
Preet ghattora: So beautiful and helpful, thank you shazma!❤️
THE COMMENTER: Beautiful tutorial. Love the hair ♥️♥️♥️
sheraz khan: Very beautiful hairstyle im from Hertfordshire and I watch regular tutorials as I've just started make up ☺️
Seemi Mansoor: @SHAZMAMUA thanks alot for teaching such a beautiful hair style,one request that I work as freelancer in pakistan so I don't have any wigs to use for clients and usually people dont pay me extra amount for this so please teach some simple hair styles without using wigs,one more request suggest one best curling hold spray to use after curl. JazakaAllah
Orjita B: Love it! Can you possibly show how to do this hairstyle without using the half head wig? Maybe by using kanekalon hair or padding? Thanks!
N khan: Love this!! Will you do a side braid hairdo that you can do on yourself?? I have a mehndi coming up and don’t have a clue what to do with my own hair!
RexFlex: wow the hair style looks easy to follow will try it In shaa Allah on my cousins wedding
Aarzoo Saifi: Plz start the course as soon as possible I'm waiting btw lots of love from India ❤️
Bilkis Hussain: Love this. Will give this a try for sure. It would be nice to know where you got your half head from please?
Beenish Malik: your work is beautiful mA... have you worked with brides who have very thin hair on the crown and top part of their hair? are you able to do a tutorial showing how you would do that?
Iqra Jee: Amazing work mam ♥️
Tania Mehmood: Hii love your videos very good and full off information I have a question how do you organise shots with shops do you pay them or they pay you please answer thank you xx
saher ahmad: Super easy way of long hairs style...thanks
Aisha Bibi: Thank you so much ❤️❤️
aliya sohail: Hello from Norway....nice hairstyle....best explanation....can i substitute it from bunn.???...because it is difficult to find such products in Norway....plz do more hair styles
m Lakyy: Can you please link where you get the half head wig, I’m having a very hard time finding good half head wigs even on Amazon. Please please link where you buy it from.
Zartasha Zar: beautiful hair style for bridal
Alisha Ana: Hi Shazma Really love your all tutorials, will you plz solve my problem every time why my foundation moved from nose when all makeup was done
canadafemme12: Thank you! Where’s the half wig from?
Rabeya Sultana: Thanks for sharing hair tutorial
EK Videos: Thank you and lots of love lease tell me where do you get your half head wings and hair pins and u pins from xxx
Mian Basharat: Masha Allah
aliya sohail: Where do u buy bombay curler?
Jas: Thank you Shazma
Hood Shahzad: Slaam aapi,very nice look so beauti ful
Mohsina Nazzar:
Shabnam Begum: Assalamu Alaikum mam mera skin bahut dry hai mera rang fair hai mere aankhon ke niche pigmentation hai please mujhe bataiye na main Kaun sa foundation concealer aur face fowder use karo please mam reply dijiyega mam bobbi brown ka foundation theek hoga
Soft & Nude Makeup by Laraib saba: all good but her hair volm is very healthy .....isse zada acha front bn skta tha ...need more neatness on front part
sadia jazib: Zabardast shazma ji jitni tareef karon kam haub
Maria Sam: Plz must reply me Im waiting ur reply kindly Allah pak ap ko buht sari kamyabian etta fermaye ameen
nazia parveen: App curling se phaly kon sa spry karti hain..?
Naushiya Nadeem: Mam plzzz ek acha glowing foundation highcover batao plzzz meri shadi hai plzzz plzzz
Nãzîâ_Attárîyâ🇵🇰: Mam ap kaha rehti ho apse mekup karwana ho to kese contact karen apko pleas batayegha plzzzzzzz mashallah bhot accha kiya sab kuch so nice hunar Kamal ka he
Maria Sam: A0A h r u? Im in manchester ap makeup ki.classes b dete ho ??main ap se milna chahti hon but how????
Naushiya Nadeem: Mam bata do plzzz
Naushiya Nadeem: Plzzzz tell me
Mohsina Nazzar: First comment
Mian Basharat: I am Shamaila