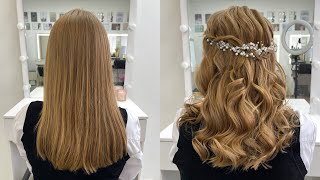
100% Durable Waterfall Braid!!
Hi all! I hope you enjoyed my tutorial:) Don’t forget to take a look at my Instagram https://www.instagram.com/sweethearts_... for daily inspiration
Hi everyone, its Beth and Sweetarts hair, and welcome back to another video. So today I have a new model: her name's Chloe she's, a schoolteacher she's, got beautiful hair for us to work with today. I'M gon na be showing you a waterfall braid, but bear with me. It'S not get average waterfall braid because they look lovely but they fall out so easily. So I've come up with one that I think, looks really pretty. But it's literally like bomb-proof, like you, could do a forward roll at a wedding and it's gon na stay in. So let's get started, okay guys, so I'm gon na kind of leave out all this section of hair here. So from the front it's gon na. Look quite soft. I don't want to kind of pull all this back and use all that hair. So I'm just kind of taking my fingers kind of rough, no comb and leaving out this front section here, I'm taking a section of hair like that and I'm just gon na break it into two. I'M then going to take this left piece or you need to meet the right piece. Can you see my two fingers are coming up? They'Re grabbing hold and pulling it through like that. Now this section here, I'm just gon na clip outta my way like that I'm gon na release this hair down for the moment. Now we need to secure this section because it's just too loose as it is like that you would never just want to leave the hair and hope it stays in now. One way of doing it is to put a grip there, but then you always fight in to sort of make sure the grip can't be seen. So, instead of using a grip, I'm using a small elastic, I'm taking a really small section of hair from underneath there and I'm going to combine those two together put my elastic in and that now is to cure that piece of hair. And it's literally, although it looks delicate, it's not going to go anywhere. Okay, so I'm going to release this little bit down and we're going to go again. We'Ve got one piece: okay, we're going to take a slice of hair. I kind of want the brave guys to come down a little bit and then come back up. So my next piece, I'm going to take it underneath again, like that two fingers come off. I'M gon na pull it through, but can you see how I could tighten it to go higher or I could kind of pull it down there a little bit? That'S where I want it to sit so this one here, I'm just pinning out the way take in another, really small slice of hair, joining them together pop another elastic in tighten it up there again now that one's secure now before I go any further guys, I'm Just gon na tease out this first one. I'M gon na leave this one for now, because we're still connected here, so I'm just going to kind of hold on to the elastic and just tease up that hair and I'm also gon na just pull this bit of hair as well. Just to give a little bit of extra volume, we're gon na go again guys make sure that has flowing down the back of the heads you're gon na get a slice of hair. This section comes underneath two fingers there to grab hold of that one and just pull it through. Pin this one out the way grabbing a piece of hair, okay guys. So I'm just going to work my way around now, but I am going to try and just make it have a nice little bend and then coming up to the right here. So I've weighed my weight background now. I'M gon na do possibly two more you're trying to make sure guys that you finish at the same place on the opposite side. So it looks nice and match from the front. And can you see our but just let the sorta braid bow down a little bit and then to bring it back up? What you do is exactly the same, but when you do your like little pull through bit there, okay, rather than a lie, we need to cut sort of come here. You just lift it slightly and that will sort of bring your braid back up again. My last one now guys, I think, because I work without a mirror, when I do my videos, I'm hoping it will level on both sides, so bringing it up there. This is my last one, so I'm just going to pin that out the way and then just on this last one guys, because obviously we haven't got anything to connect that to I'm just gon na take one small, bobby, pin or hairgrip okay and I'm just gon Na place it through the back there taking my time to make sure you can't see it, okay, push it through. That'S held that in place now, and that now won't go anywhere. Okay, guys! This is optional. I'M gon na make hopefully a little bit of like his sort of head fund of jet going across the front like that. So this is Jack or gypsy, philia or baby's breath, whatever you want to call it, and I'm just going to start just placing it like that. I'M gon na use these little hair pins. That'S why gypsy feely is so good because it's got these really thin. Stems that pin really nicely so that's the style finish guys. We won't very brides, maybe at the end there I'm loving it. Don'T think you'd wear that every day you could, if you wanted to, but I don't think I would, but I love it for a wedding. I'M gon na do a little spin for ya thanks so much for watching guys - and I will see you next week for the video bye

Comments
Mia Clément: I'm always looking forward to your tutorials - you're so creative and talented, and I've picked up quite a lot of tricks that I use on my own hair
shohna: Beth, you look amazing! That blue top is so flattering on your skin tone, your hair looks beautiful, you look great. Chloe also looks very pretty. Love this hairstyle. :)
Preslava Minkova: This is sooo lovely and just the right thing for my hair. Thanks again, Beth.
Kelly M: Ah! Yes! The waterfall has honestly been such a difficult braid to stay put so this is very helpful. Thanks a great deal!
BaddieBecca: Ah! Such an amazing tutorial!! I am definitely going to give this a go
Book Your Imagination: So simple & so beautiful!
Pennie Roehrs: Beautiful! All the elementary school children would call her a princess.
Ruth Salinas: This is genius and so beautiful! Waterfall braid problem solved! Thank you for sharing
April Fetting: Gorgeous and such a great idea! Love the added babies breathe!
Jannah: This looks so beautiful.
Kristi Gibson-Cormier: Absolutely gorgeous
Elizabeth Yates: absolutely in love ! I wonder if I could do this in myself??
Kellie Boulton: I swear I watch every single tutorial you post. Obsessed with your styles.
Tehilla Marek: Very beautiful And thank you for the amazing idea thet will Make the Waterfall braid Stay for all the night
Maratrancas Medeiros: Grata por passar seus conhecimentos.obrigada
Dalia Aguirre: Day 1: I Cant Do It! But Looks Amazing❤
Monica Machuca: *Thank you I will try*
Shauna Beveridge: Beautiful
Martina K.: It's always nice to watch you work. I love your work , Thank you! Greetings from Munich
Gaby: Me encanta tu trabajo
Kimberly Clearwater: Genius!
Annie Wael: When I need to go to a wedding what hairstyle should I do OHHH this one it is the best
LaraD: You have lovely ideas and they are always so pretty. But could you please please start doing videos showing them being done on your own hair? It’s always such a very different job and so many just don’t work out right. Also please make more using straight hair?
ArtwithArt: beautiful
twominutetips: Lovely.
little biffy: Your such a good teacher.
Veronica Rocha: Yay I am the first to comment. I love watching you I have tried some styles on my hair & my granddaughter *;0)
Kenneth Rebello: I came as a skeptic, left as a believer!
m b r long hair: Your this model is nice and u
shanna knepp: Do u have ur own salon or just do YouTube
Sheina: 1