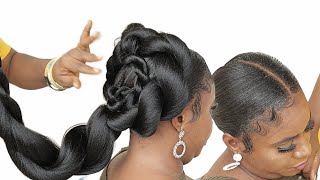
Live With Pam - Contemporary Half Up Half Down Bridal Hairstyle With Soft Straightener Curls!
In this weeks live tutorial, Pam will be teaching you how to create this gorgeous contemporary half up half down bridal hairstyle with beautifully soft curls, achieved by correctly and effectively using straighteners - yes, straighteners! You can achieve a range of tighter and looser curl textures when using straighteners, so ensuring you have the know how to do so is very important.
To continue learning, join our online bridal hairstyling community and have the ability to create a variety of beautiful curl textures, including straightener curls, blow dry curls, heated roller curls and many more, that will allow you to create beautiful hairstyles for your bride!
Links to the products used by Pam (where available):
Goldwell Style Sign Superego Structure Styling Cream: https://amzn.to/31IoFiq
L'Oreal Infinium Extra Strong Hair Spray: https://amzn.to/2wQ5b08
Subscribe and learn the latest wedding, bridal, prom & party hairstyles alongside timeless, classic hairstyles and vintage looks that never go out of fashion.
Visit https://www.createbeautifulhair.co.uk/... for more information on learning with Pam.
Want to master the art of bridal/wedding hair and learn with Create Beautiful Hair? There are many ways to learn with Pam: https://www.createbeautifulhair.co.uk
1. Join our Habia approved award-winning online bridal hair course, learn from home and submit work directly to Pam for assessment and feedback as you work through the models; receive as much support as you need! Complete the assessments and receive a Habia approved CPD certificate upon completion of your bridal hair training. Our SALE has begun! ***Use code SAVE200 to join this course with HALF PRICE OFF!*** Find out more at https://www.createbeautifulhair.co.uk/...
2. If you are in London or nearby, enquire into private Bridal Hair one-to-one tuition for yourself or for a salon! DM for more information on private courses!
3. Check out more of our YouTube channel for a selection of our freely available tutorials . . . like and subscribe for more information and updates, YouTube link: https://www.youtube.com/channel/UCDKUM...
4. Join us on Facebook for more tutorials and all things bridal and wedding hair!! https://www.facebook.com/createbeautif...
Whichever option you choose, please do get in touch and share your fabulous creations and suggestions on what you want to see next!
We've got it covered . . . we even have tutorials covering the curly girl technique!
Great for fans of natural unintentional ASMR!
Hairstyle tutorials include hair prep, hairstyling and hair up, blow-drying, curly girl techniques, working with different hair types, hair textures and hair lengths.
Create hair up & bridal hairstyles and become a bridal hairstylist with Pam Wrigley, UK Wedding Hairstylist of The Year!
Just SUBSCRIBE & LIKE!
Welcome to tonight's tutorial, i'm pam wrigley and tonight i'm going to show you how to create a beautiful kind of half up, half down style, that's kind of almost a ponytail, and this is a style that one of my brides has chosen to have and um. You can you know you can actually vary, how much hair you pull back, but we want it to have a little bit of height. I'Ve cut, you could curl the hair with straightness first of all, or you could just give it a very kind of soft wave. But really it's not about having a strong curl, this particular style. So if you wanted to, you could actually once you've curled the hair, the straighteners you could go through. Maybe pull your fingers through the curls or even brush through the curls. If she wants a very soft kind of soft, barely styled, look, if you have any questions, please just pop your questions into the chat box and whoops, throwing everything around today. So if you got any questions, just pop them into the chat box - and i will do my best to get back to them as quickly as possible - sometimes they get a bit carried away. Styling their hair. I'Ve already done quite a bit of hair prep, as you can see, and if you've watched some of our other tutorials you'll have seen how to do this. Hair prep so do if you're new to our tutorials of our kind of live tutorials here on youtube, do take a step back when we finish this video and have a look through our kind of previous we've got recorded videos and we've got some live tutorials on The site, and so take a little bit of time, take a step back, find out how to prep the hair, because, when you're, creating kind of beautiful, bridal, hairstyles really prep, hair prep is key. So i'm skipping that step tonight. It'S certainly not something you you should skip when you are creating your bridal hairstyles and if we do have our online bridal hair course as well and lots of people from youtube. You know if they want to find out a little bit more about how to create beautiful, bridal, hairstyles or really hairstyles. For any occasion, people come, and you can join me on my online bridal hair course, where you can take your certificate and uh get qualified in becoming a bridal hair stylist anyway enough of that, let's get on with our style, so she's i've curled the hair softly With the straighteners and i've created a little bit of height here and just popped, a bobby pin at the back quite low and i'm going to kind of brought an extra couple of pieces over. So you kind of want to have a think about where you want. The height to start and bring all the hair back until you're happy with the kind of look and the shape of this hair. Here on the crown. Now, i'm also going to show you tonight we're also going to go through working with a veil and how to secure it, a kind of double layer veil and how to secure it when we're working with such kind of sound of kind of soft textured hairstyles. So that is key, so now we're going to bring our hair back just a little bit, not too much at the beginning, although i have to say my bride, who wanted this style, i'm doing a little twist and pull she did want quite a bit of the Hair back from her face now you don't have to you - could bring this hair back smooth if she preferred it smooth. So you don't have to put a twist in it and we're going to twist that little bit of hair and secure it with a bobby pin. But your questions, you know you might have questions tonight about it could be about tonight's bridal, hairstyle or it could be and make sure those little gaps are all nicely covered. I might come back and pop a pin in there. It might be about i'm just going to pop a bobby pin in here. Let me show you from the back and i'm just going to push it vertically up the hair in a minute. This is all going to be covered and let's take that out, it's all going to be covered and we're going to create a little ponytail just here. In fact, i might take that a little nudge over to the side, so we've got room for the ponytail. That'S it just a little bit over, so we're going to create this lovely soft relaxed, looking style and we'll pop a veil in there, as well just for good measure. So now, let's bring this side back, leaving a little bit of it down and that's it! Oh, don't worry, she's a little bit fine there, but i've got this hair to bring back as well. So i'm not too worried about that. Bring that back. It'S just checking. We'Ve got any questions hi louis good evening, luisa, sorry and charika. I hope you're both well. Okay, so brought that one back now, i'm just going to make a little ponytail with this section now you might want to ask your bride to just sometimes i get them to kind of just hold their hand at the back of the hair. When i do something like this, because i don't want to catch this, when i'm tying this into a little ponytail, i don't want to kind of get the hair from underneath caught in the ponytail. But whilst you're practicing on your head, you can just kind of clip that hair away. That'S it then get your ponytail a little bit of hair here and make a little pony. So it needs to be a lot of hair here and remember: we've got the height nice and secure. So you don't need to worry about that, and this is just kind of the finishing touches to the style. That'S it. We'Ve got our start of our little ponytail. She needs a bit more hair in her than that, but we can take out those two bobby pins now, but we're holding this hair in place. So let's just slide, take those out get rid of those, that's it and you can always come back in my practice. Head the hair on this practice head is a little bit dry at the bottom there, but so probably would need re-curling decide which little bits you want to have down and bring this back and then we're going to kind of wrap this around the ponytail. Just one side will do and now now you could add another kind of elastic band onto here that would work or you could maybe grip it with a bobby pin, but i think i'm going to do an elastic band here, i'm just going to pop these clips Back because i don't want to catch this hair in this ponytail another band here, that's it. I think a band. Let'S try a band, you might just grip it with a bobby pin but see whether you, like the look of it. If you fasten it with a band, so it feels a bit loose actually, so i think maybe the hair band and a bobby pin up the back, just grip that up the back there just to help hold that in position. That'S it and i don't think we'll need another elastic band now, so you kind of got this lovely. Let me lift her up a little bit so you've kind of got this lovely kind of half up half down style with a little bit of twist with this lovely ponytail at the back and then we'll get the veil in. So, let's bring this bit back now again, if you want any little soft bits down, you can bring them back, leave them out, i mean and then create. You could wrap that around there. Actually, i think that looks nice like that and just have a little play and create your ponytail. Now this one i am going to wrap around and use a little bobby pin at the back. So it's a kind of simple enough little style, but it's a kind of little ponytail with a little half up half down. I think that's perhaps a little bit long to have down, but on this side she hasn't got anything down and you could have a little bit more lift if you wanted to could make everything everything a little bit smoother if you wanted to, but have a little Play and here where we've got some little gaps here, our best course of action would be to use some little fine pins. Ideally, when we create the height, we need to be really careful that we don't get these little gaps that are too big. That don't look quite perfect, but you can always use your little fine pins remember to come back in position, the hair, where you want it to be spray. It well with your strong, hold hairspray and then once it's had a little bit of time to set. You can take those little pins out, so we've got our gorgeous textured half up style with a little ponytail at the back and we're going to put the veil in, but we don't have any backcombing in here. So it's not always easy. When there's no backcombing, it's fine! If your lady wants her, it wants the veil at the back here because, of course, you've got this anchor you've got the ponytail here. You'Ve got the bobby pins, that's hot, that are holding the height up, so it's actually would be quite easy to get it in the back there. What you would do is use our veil and, at the moment, being a bit clumsy today at the moment, long kind of cathedral length veils are definitely what most people are going for. So, let's find our comb there, but does it really matter whether you're putting a long veil in like this one, which would sweep over the back of the dress or whether you're going for a shorter veil either way we need to make the technique is the same And you just need to make sure that it's really secure, so let's have a go. Shall we so? First of all, when you're going to put the veil in you don't need to worry about which way it goes because the curve of the comb always goes next to the curve of the head. So it would never sit kind of that way with the curves pointing outwards and as long as you've got that going in the right position, the veil is the white right way around. So you don't need to worry too much about which way the veil is going to go and basically what we do. Let me just pick that up dropping my glasses earlier. Let me check our questions. Ah, as a bride, other i'm just going to read this out now: are there any tips or recommendations you have for good prep before your wedding day, any hair prepper bride can do to make life easier on a wedding day. I'M glad you like the tutorials. Have you many weddings put this yeah louisa yeah, i'm almost booked up. I think i've got like two saturdays free until i think i've got one left in june and none in august or september and i've got a couple in october and then i'm going into november. Now so and sundays are very busy, fridays are busy, so yeah, i'm very busy this year, so um but tips for brides when it comes to looking after their hair. I would say: um don't, go crazy and have a haircut just before your wedding and also um. If you're going to use any deep heat treatments on the head, don't use it kind of the day before the wedding, unless you've got natural, curls and you're going to use your natural curl, because otherwise you can find. If you use too many kind of deep heat treatments, like literally the day before the wedding, it can make the hair too soft and too slippery just a regular conditioner is fine. You can use that on the build up to the wedding, but not the day before the wedding. So you almost don't want your hair to be too soft and too silky. If you're going to have your hair up in a style, so your stylist will be able to make the hair shine. You know it's our job to make the hair look like it's in fabulous condition, but equally, if it's too soft and silky with lots of kind of buildup of products or deep conditioners on that it can be very difficult to style and difficult to keep that hair. In place all day, so that would be my best advice. Don'T have it cut just before the wedding? Don'T try anything new and um keep your deep heat treatments, the kind of weeks building up to the wedding okay. So let's get this failing, shall we so if it's going to go at the back, it's quite easy. So we've got our double layer veil here and we've got our comb going the curve of the comb going next to the curve of the head, and if it's going to go in the back here, all you're going to do. Let me bring her up a little bit. All you're going to do. Is i'm going to put it in both places at the back and at the front, so you can see and with the comb you're going to use instead of just pushing it in what you need to do is kind of get use. Your tail comb and gently nudge, as you push the veil down, you push the hair kind of up and in between these kind of prongs, like that, you can see that so here it goes decide the position of the veil and you're going to get try and Get it behind this little pleat and then we're going to go in and kind of push. That'S it and you'll, just all of a sudden, it'll just nudge in place, and that's the veil at the back nice and easy. But if it's too far back now, this isn't quite level, and it's not quite central. This always happens when i'm teaching when i'm on camera, because i'm always standing slightly to one side. What you do need to bear in mind if she's going to have the veil far back is when you bring the veil forwards. You want to make sure that it's long enough and it doesn't kind of this one is just. Although you can see it's sticking out a little bit and it should fall nicely here at the front um and you don't if it's if it's quite short and it kind of cuts halfway through her face, then you'll need to put the veil further forward. So once it's at the back here, it's actually really secure and it does look really pretty, even though the hairstyle is very textured at the back. The veil is very secure and what i would do is i would give if she's going to take the veil off, which she probably will do if it's a long veil you're going to give your the bridesmaids a couple of strong pins like this. It doesn't actually even need any bobby pins, either side like this, with the with the veil in this position, because it's very secure. So what you're going to do is just describe this to your um brides, but but practice it. You know and then you're going to hold you're going to do the opposite, or rather the bridesmaids will do the opposites, what you did in putting it in so instead of kind of pulling hair up the comb, as you gently nudge, the comb out side by side. You'Re going to hold the hair in position comes out perfectly and you've still got. Everything looks great at the back, so that's the veil in and the veil out, providing she's having it at the back. Now. Let'S imagine our veil. Our bride wants to have the veil at the front here. I would never recommend her putting it on top of the height here, because there's really, unless she's going to keep it in it's just going to squash the height and it when she takes it out. It will spoil the hair, so it's not really you don't want to put it on top of this beautiful height you've created. Would it either go behind, could go a little bit higher up if she wants it to be a bit higher or i would recommend it goes in front and because there's no back combing here we have to create an anchor for the hair. You might have some texturizing powder under there, but even then you know it's not necessarily. Sometimes it's still difficult to make sure that this stays in properly. So what we're going to do decide where the veil wants to go say i want to get the veil about here, so i'm going to go underneath the hair and i'm going to pop a couple of bobby pins in a criss cross pattern like that. You can see that so the bobby pins are going to go underneath the hair not too deep a criss-cross pattern. Quite a wide criss-cross like that, and the veil is going to slide underneath that crisscross pattern. So let's go underneath the hair. Now you could, if you wanted to, if the hair was soft and silky here, you could maybe sprinkle a little bit of texturizing dust just underneath here. First, just before you put the bobby pins in and then when you slide the bobby pins in, it will activate that texturizing powder and they'll grip in just a little bit better, so nice and close to the scalp. That'S it so we're not trying to pin this hair down notice, we're going underneath these pieces of hair and just gripping, and you know, you're getting those grips right next to the scalp. Now we have an anchor for our veil. So again, the curve of the veil goes against the curve of the head and you can use your tail comb again now i haven't checked whether this is in the exact right position so but we'll find out. Let me just move that, so you can see what i'm doing hopefully can we do have tutorials showing how to do this step by step and close up and in detail on our e-learning site and you're going to slide this underneath those bobby pins. So it's got a really good anchor there and then pop another couple of bobby pins just over. You can see that little bit of the comb just peeping through there. I hope this isn't making a noise yeah, that's better and let's pop that bobby pin over the top of that, so you've got the two grips underneath and now we've got another bobby pin here just for good measure over the top of the veil of the comb. I should say, and then that's lovely and secure, let's lift her up and actually you'll probably find that when the veil goes at the back it you actually think it will kind of it hides the hair more. Sometimes you think it's going to show the hair more, but because it's all kind of solid and kind of bunched up you don't really see the hair that much, but when the hair, when the veil is a little bit further forwards, you see a little bit more Of the hair through the veil - and we can check the pop the top layer over to the front and we've got our veil either position front. All back in our lovely soft textured hairstyle. And it's really nice and secured, and well anchored in there and again easy to take out because you just take out those bobby pins slide out the veil. Let'S just check our questions quickly before we finish for tonight. Oh, my goodness, louise! If you're based in london, you know i'm always looking for hair assistance, hair and makeup assistants, because i have so many weddings with bridesmaids lots of bridesmaids. So if you're based here in the uk in london or southeast, then please get in touch, because it's great when i work i love to work with uh. I often work with assistants and you know you can kind of i'm always there as a helping hand. You need to have experience doing hair, so you don't be kind of let loose on somebody's wedding when you've never worked with hair before so. You do need, to kind of you know, completed your training and then i'm there with a as a kind of guide. As a helping hand, whilst you learn the trade, whilst you perfect your trade, i should say so really you know if you are looking if you're already working as a hair stylist, and you want to get some experience working with hair. Please get in touch so because i've got a very busy summer coming up and uh yeah. Some new assistants would be amazing, so we've got our beautiful half up half down style with our double layer, veil oops. Let me lift her up, so you can see i'm twirling around and we can't see her there. We go, she's got our veil in and she looks gorgeous and the veil is lovely and secure. So it wouldn't matter whether this is a little short veil or a nice long kind of cathedral length fail all the way down to the floor, so i hope you've enjoyed tonight's tutorials, please if you've got any ideas, any styles that you'd like to learn just get In touch and we'll add them in we'll build them into one of our future tutorials, and i i hope, you've enjoyed the cheat this lesson today. If you've got any questions, please just drop me a line or, if you'd like any more information about our online bridal hair course, i'm not far away - and i am here to help. So i look forward to seeing you next time and don't forget to subscribe. Take care bye,


Comments
Mia W.: Red looks so lovely on you!!