Live With Pam - Half-Up Half-Down Hairstyle!
Join our award-winning hairstylist, Pam Wrigley, in this quick and easy live tutorial. Lots of the images we see online are created on models with blonde hair, however, there are tips and tricks that you can use to make sure your braids look beautiful in hair of all colours… Join Pam in this video and find out exactly what you need to do. Get the prep right and lay the foundations for gorgeous texture and movement in the hair.
Links to the products used by Pam (where available):
L'Oreal Elnett Hairspray professional: https://amzn.to/3dfXoZV
Silhouette Flexible Hold Style and Care Lotion: https://amzn.to/33vRsas
L'Oréal Tecni Art Liss Control Smooth Gel Cream: https://amzn.to/3lYYFYm
Visit https://www.createbeautifulhair.co.uk/... for more information on learning with Pam.
Want to master the art of bridal/wedding hair and learn with Create Beautiful Hair? There are many ways to learn with Pam:
1. Join our Habia approved award-winning online bridal hair course, learn from home and submit work directly to Pam for assessment and feedback as you work through the models; receive as much support as you need! Complete the assessments and receive a Habia approved CPD certificate upon completion of your bridal hair training.
2. If you are in London or nearby, enquire into private Bridal Hair 121 tuition for yourself or for a salon! DM for more information on private courses!
3. Check out more of our YouTube channel for a selection of our freely available tutorial...like and subscribe for more information and updates, YouTube link: https://www.youtube.com/channel/UCDKU...
4. Join us on Facebook for more tutorials and all things bridal and wedding hair!! https://www.facebook.com/createbeautif...
Whichever option you choose, please do get in touch and share your fabulous creations and suggestions on what you want to see next!
We've got it covered . . . we even have tutorials covering the curly girl technique!
Great for fans of natural unintentional ASMR!
We've got it covered . . . we even have tutorials covering the curly girl technique!
Hairstyle tutorials include: hair prep, hairstyling and hair up, braids, blow drying, curly girl techniques, working with different hair types, hair textures and hair lengths.
Create hair up & bridal hairstyles and become a bridal hairstylist, with Pam Wrigley, UK Wedding Hair styles of the Year
Just SUBSCRIBE & LIKE!
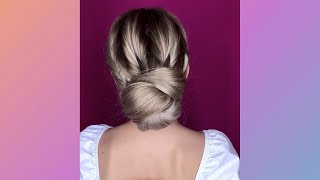
Welcome to tonight's tutorial, i'm pam wrigley. I am a bridal hair stylist and tonight i'm going to show you how to create braids braided styles, when you're working with dark hair. Now i don't about you, but i tend to get lots of people. Lots of my clients show me photographs of styles that they want and a lot of those styles have created some blonde hair or hair. That'S got lots of highlights in there and if you're working with somebody who's got dark hair, you know the hair is one kind of solid color. It can be hard to get those braids to be defined. So i'm going to show you a little technique which will enable you to make your braids look, bigger and thicker and kind of chunkier, so that they're more visible, let's just check. So if i have, if you have any questions, please just type your questions into the chat box and i'll do my best to answer. Let me get my fan. It is so hot in london tonight i don't know what it's like where you are, but it's absolutely boiling here, so i have already done a little bit of hair prep. So you can see underneath this kind of layer of straight hair here got a bit at the front here. That'S still straight, and i've got a little layer on top that's also straight and the rest of the hair. I'Ve just put a nice kind of beachy wave through the hair. Now i do find so here's our beachy wave and i used my reverse wind with a twist technique to get this lovely wave in the hair. Now we do also have an online bridal hair course. So if you and it's hard sometimes when we're working on our live tutorials, it's hard to show you close up in in detail exactly what i'm doing. But we do have these tutorials. You know we do have a online bridal hair course, where you can get kind of close-up, hd kind of quality, uh video tutorials, where it shows you step by step, how to create all these different looks all the different curls and waves. So if you're not sure you can have a look at the information in our bio, but here for today i have left. Let me just get my little tangle teaser. I'Ve left this top layer of hair out, and i've also left the front section here out and not waved so you just need to check with your client how much hair she wants to have down at the front so say she just wants this little bit down. So i've waved a little bit here. Some people will want all that a bit more hair back. Other people want their ears kind of covered a little bit. So i've just left a little bit of hair out here for a little bit of softness, and you want to make sure that the hair that you're going to braid is nice and smooth and sleek hold on a minute. Gosh, it's so hot. It'S hot in the room, it's hot in the studio lights, so the hair that i'm going to braid here is still smooth and sweet, and i haven't waved this hair and i haven't waved the hair here that i'm going to add quite often you'll find when people Want this kind of half up half down style that the hair at the front might be a little bit finer, sometimes people you know around the hairline you might find. My hair is very fine here you might find around the hairline. That hair is quite fine. So when you pick up this piece of hair, you don't have that much hair to braid and when you're creating braids on dark hair, really to make them visible, you need to make the braids kind of thick and chunky and gorgeous and that way they'll stand out. So if your lady has fine hair at the front or maybe layers cut in i'm going to show you a way to still create a lovely, thick chunky, braid and that's where this hair that we've left out this little hair section of hair along the parting. That'S where this piece of hair is going to come in. So let me just smooth out this hair again and i'm going to create a dutch braid here. So i'm going to split this section into three and start our dutch braid, so you're going to go under and under and then actually let me just do that again. Sorry, one more time make them nice, even sized sections. So take your time here at the beginning. That'S it under and under and then to this top one, i'm going to add a little bit of this section of hair that we've left out on top here. So we're going to add that to our section and come under that's it and then i'm not going to add to the bottom section. I'M just going to come under and then i'm going to add to this top section and you can add as much or as little as you like. You know if you feel you want to add a little bit extra hair, just leave more hair out and bring that piece under. So it's almost as if we're doing a lace braid because we're just adding to one side of the braid and then you're going to come under with that bottom section, but not add anything to that section, add to the top section and come under so we do Have have tutorials on our e-learning site that show you exactly how to do all these different braids. But this way, what i find happens is make sure i'm not talking too much and i'm not missing out my braiding it in the wrong way. Keep your hands close to the head come under and just keep braiding along the hair. Here it's quite tight at the moment the braid, but don't worry about that. We will be making it looser soon. So by adding these different sections of hair, it means we can build up this braid and get it to look a lot thicker and chunkier in a moment we'll come to kind of really loosen out that braid and you'll see exactly what i mean. That'S it. So go all the way, so i've already done one braid on the other side and loosened it out. So it's really kind of visible and chunky. Keep our little loose soft waves down and just keep on braiding just a little bit. You don't need to braid too far once you get to the end and then we're going to start loosening the braid and because we've added quite a lot of extra hair to the braid you'll find that it can get really thick and gorgeous and kind of full Of volume, so even if your lady has very dark hair, the braid will be really kind of visible in the hair. So just take your time, work your way up and down the braid, and i'm just kind of loosening it loosening the braid from kind of the outside edges of the braid just pulling it here from the edge, and you can take quite a bit of time doing This, the more time you spend the kind of bigger you can get the braid do keep an eye on the front because we don't want it to kind of bulge in the wrong way there. So as you're doing it as usual work with a mirror so that you can see exactly what's happening at the front and your client can let you know, make sure she's happy with the way the braid is sitting and this way by adding extra hair to the Braid you can kind of as you go along, you can get this braid. Even if your lady has layers or just a very fine kind of hair line, you can still get this braid to look gorgeous and fat and chunky and it'll be really visible in the hair. So, as i say, when your clients show you pictures of beautiful hairstyles and they've got lots of braids in there and but the bright, the bridal hairstyles are usually quite often when they've got lots of braids and detail in there that on blonde hair. So you can really or highlighted hair, so you can really see the different tones in the hair and the braids stand out, whereas when your lady has kind of solid like one color hair, especially if it's dark hair, then it can be difficult for those braids to Be visible so this way by adding extra hair to the braid, you can make the braid chunky and gorgeous and kind of visible in the hair. So that's it! You can go as big as you like. Now we do need to control it a little bit. So i'm just going to pop a bobby pin just across the back of the braid just to hold it in position better, and i might do another one here and this will really help as well. If you're maybe going to secure a veil in the hair. So then, if you had a couple of bobby pins here at the back, you could then secure pop slide, the veil behind those bobby pins. So now at the back here i can undo. Let me just turn my tongs on i'm going to undo both of these braids. You could continue and have a braid kind of coming down the back, but i think what i'm going to do here is just secure the hair and then wave the ends here. So it all blends in perfectly so, let's just secure this down here with a nice strong, bobby pin, that's it lovely, so she looks just looks like she's got a kind of crown of braids and this would be really pretty. Maybe if we had some little flowers to go around there, a little flower crown or even a hair vine better and then you can wave the end of the hair, give it a little curl and then you can get these ends to sit nicely with the rest Of the hair a little bit of brush through a little bit of my silhouette style and kale lotion, just to keep that hair smooth. Now, if you were working with a client, you know say they had very fine hair and you were finding it difficult. You know find soft silky hair, then what i would suggest you do is, let's just wave this a little bit texturize the hair first. So you've got a little bit of mousse and a bit of salt spray in there. You can even crimp the hair. You could also - and it will just give the hair - that little bit more grip. So when you start to loosen your braid it'll work, you know it won't be too soft and silky. You can also use a little bit of texturizing powder. That'S it just a little wave there, i'm just going to cool myself down because i'm super hot here, hot and humid tonight, let's wave our next little piece here and i'm just doing a little twist here. So we get a nice beachy wave so yeah she could use a little bit of texturizing powder along the length of the braid. I'M not going to do that in my practice head. I don't really need to partly because the hair is quite coarse already and that's it and also because, if you put the texturing powder into the practice head, you'll never get it out. So there you can finish the style off by blending. Those ends with the rest of the waves and you could do any curl. You know i've done a beachy wave here, but you could do a hollywood wave or a soft, really lovely soft curl, but there we go. We have our lovely visible, so even in dark hair, the braids look big and chunky and gorgeous lovely all the way around. So i hope that solves your dilemma of getting braids making sure your braids are visible, even when you're working with dark hair. This, of course, would work with if you're working with blonde hair - and you wanted a big chunky braid, but she had very fine hair, especially on the hairline. So, just by adding these extra little bits of hair, as you create the braid, you can create a really gorgeous super kind of chunky, braid for a fabulous half up, half down style. If you have any styles you'd like to learn, please just drop me a line and we will pick a style and cover it on a future tutorial. But thanks for joining me - and i will see you soon - stay safe, ah hi carter - let's have a good evening. So i've got a question off carter. Just let me read: hmm well soft curls last. It really depends on your client's, hair type. If you re, if the hair doesn't really want to hold a curl, what i suggest is you do a slightly tighter curl get some mousse in the hair. First get some salt spray, so you've got a bit of texture and a bit of grip in the hair. Then curl, the hair, you could even use a little bit of setting lotion silhouette to a great one. It'S called a pump spray and you could use a little bit of that on the hair as you curl it and pin it into place. Then, if they want a very soft curl, then last minute take the curls out. It should be. Perhaps if the curl drops quickly, it should be a little bit tighter than you actually want it to be so give give it kind of half an hour or so and it'll give it a little bit of room to drop. Whereas if you start off with a really super soft curl - and they have hair that doesn't want to hold, then it might just drop too much, so you do need to give a little bit of dropping space, so maybe start off with a slightly tighter curl. But you can definitely do a lovely soft curl even on fine hair, and it will look beautiful, but thank you for joining me carter. Just thank you again. Thanks for for joining me tonight and um. I have actually, i think part of carter's question actually is about um. Well tong's curls last well, this these waves, i've done with tongs, but it's a lot of it is down to the products that you use. So we do have tutorials on our e-learning site, which will explain to you exactly how to get really beautiful, long-lasting curls, but do join me next week and have a great week stay safe out there, and i will see you soon hope it's a bit cooler next Week because i am boiling hot thanks for joining me - bye


Comments
michele O: Is there anything you can recommend for clients who want to wear a down style but, have virgin hair that doesn’t want to hold a curl? I find I have a lot of clients that want a down style yet, the type of hair the client has doesn’t want to hold a curl and the humidity is terrible this summer! Thanks for the advice in advance!
Glam 'N' Glo by Sherika: Beautiful
Glam 'N' Glo by Sherika: Miss me but I will watch it again
Glam 'N' Glo by Sherika: Hi Pam good evening