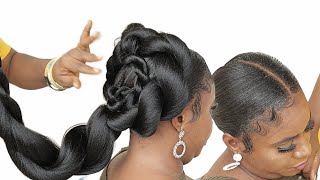
Twisted Low Bun Hairstyle With Hair Extensions - Long Hair Or Short Hair Bride/Bridesmaid/Party Updo
Learn how to work with extensions and create a soft relaxed twisted low bun with hair extensions, great for brides, bridesmaid & party hair styles. Learn how to clip in temporary hair extensions if needed then create a secure rope twist and form into a soft low bun hairstyle. Great video for anyone looking to learn how to work with hair extensions or have had trouble working with hair extensions without clips, and of course, any fans of soft bun hairstyles and low bun hair!
Work with extensions to add volume to fine hair, and work with tongs and straighteners fo create soft curls.
Join award winning bridal hairstylist Pam Wrigley for this fabulous tutorial on how to create this quick but gorgeous wedding hairstyle.
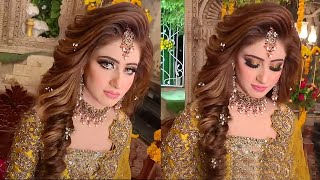
find out how to create vintage, modern, up-do, half up half down, or hair down style.
Hair prep is key when it comes to creating beautiful bridal hairstyles.
Learn how to Create Beautiful Bridal Hair-styles step by step with Pam Wrigley, UK Wedding Hair Stylist of the Year.
Subscribe and learn the latest wedding, bridal, prom & party hairstyles alongside timeless, classic hairstyles and vintage looks that never go out of fashion.
Learn all about hair prep, which hair styling tools & hairstyling products work best, and find how to work with different hair types.
Join Pam and Learn all about hair prep, what products to use, how to work with padding and hair extensions.
We'll also teach you how to blow-dry with videos on curly blow dry, Victoria secrets blow-dry, short hair and smooth & sleek blow drys.
We've got it covered . . . we even have tutorials covering the curly girl technique!
Great for fans of natural unintentional ASMR!
Hairstyle tutorials include hair prep, hairstyling and hair up, blow-drying, curly girl techniques, working with different hair types, hair textures and hair lengths.
Create hair up & bridal hairstyles and become a bridal hairstylist with Pam Wrigley, UK Wedding Hairstylist of the Year
Just SUBSCRIBE & LIKE!
So I've texturized Yanis hair and we've got a little bit of movement a little bit of curl in there. Jana has she's got long hair, but the hair is quite fine and a lot of the styles that we see a lot of the styles are popular. This season have we're working with long hair, but usually the styles are created either with people who have very thick heavy hair or working with extensions. So I'm going to clip in some extensions into Yama's hair and just show you how you can create some lovely quick styles when you've got a little bit more hair to play with, so I'm just going to clip the hair away. Now these particular extensions don't have any little clips on them, so it can be a little bit awkward if you haven't worked with extensions that don't have any clips on them before, but don't worry it's not difficult and I'm going to show you just how to secure Them in so I'm usually find it better to fold the extensions and I don't fold it so that the ends are at the end. I fold it so the ends go into the middle. So then they don't poke out so much and I'm just going to clip these in now. You can put a little bit of backcombing here. If you feel you need to better to use my tail comb for backgrounds, it's quite precise, back combing. We want here a little bit of that combing. You could put a bit of texturizing dust here at the root if you felt it was slipping quite a lot. You want to push that in, but I think I might be okay with the arnaz hair. So we've got a bit of texture in the hair, so the extension has been folded and using the bobby pins, I'm going to just go over the back and you think you'd go horizontal with the bobby pins, but I found it much better if you go vertical And slide the bobby pin down across the hair and making sure you securing securing the hole of the extension. The back of the bobby pin needs to slide across the back of the scalp. So if we do to kind of in the middle and then come back and I'll do them at the end, and I think as usual when I am styling hair on camera, I always end up slightly off-center. But when you're, creating your styles and when you're putting the extensions in make sure you stand directly at the back, so you know it's right in the middle and you can get these pretty close together. You know if you're looking for a style where you want lots of extra length and thickness, then you can pop the extensions pretty close together. Ideally, you will have the hair extensions with clips on because it would be a lot more comfortable for your clients for sure these are great if you're doing a photo shoot where they don't have to stay in. You don't have the weight of the veil she's not going to be dancing around, but you know all night with them in so if you are working with a client, I would definitely recommend buying their extensions with the clips in them they're a little bit more expensive, But worth it if you're working with extensions without clips, if you double up the extensions or triple them but fold them up in somewhere, get the ends tucked in so they're, not poking out at the sides. So I would fold it in two three kind of like that, so I brought the ends into the middle, so the ends can be secured in and you've kind of got a double thickness to secure the bobby pin to because if you just do it single thickness, It tends to move around too much so now. We'Ve got our extra hair. Let'S do a little quick bun here. I think so we couldn't try. We could separate the hair. I'Ve got a little elastic band here, ready and I'm just going to just put a little bit of smoothing spray on here. So it's hard once you get these buns it's hard to then go back and smooth the hair because it has all gone in different directions. So it's better to start off smooth and then we can add text you where we want to so here we go again we're going to twist clockwise and crossover. Anti-Clockwise doesn't need to be a big twist, but we'll twist clockwise crossover, anti-clockwise I'll. Take that all the way down to the end twist clockwise crossover anti-clockwise, so it's just a nice little rope twisting they have you've done it properly. You should be able to let go and the twist won't undo it should stay in see if you haven't managed to get your do the right actions, if your twisting clockwise and crossing over clockwise it will just all unravel. So we do have a tutorial on getting the rope twist exact in the braiding section. So if you're not sure you can go back and have a look at that, okay, so I'm going to put a band on the end of there and then we're just going to create a lovely soft textured bun with our rope twists. I'M just going to get a few bobby pins ready Jana. Could you hold those for me and then we're just going to use this twist and we're going to create a lovely kind of low bun? So you can feel these extensions under here. So I'm just going to take, but you can use those extensions. Actually, you can get your bobby pins and slide in and underneath the weft that you've already got that and we're going to just get a little section of hair. In the twist and grip, we can pull this out in a minute a little bit more we're going to get a lovely soft, knotted looking style. I have a little play with the hair as you're, creating this style. So, if you're not sure how I'm using the bobby pins have a look in our quick tip section, but I'm using the bobby pins and sliding and underneath my finger and we're just going to get this really lovely and soft and low and pull out get it Really soft and gorgeous as we go along - and I think this would be lovely - might move that band a little bit lower down. So we've got a bit more hair to play with, and it's almost like, you've put in the twist but you're pulling the twists out and just have a little play at the bottom. That'S nice just like that. What, with our little side, sections here bring this bit round, you could even do some little twists aside. If you wanted to maybe little braids that a fishtail braid might look nice coming back, have a little play around work with the side section. Sorry that better have a little play around position: the hair and, of course, you can always come back and curl these little soft bits that are down just it feels a little bit loose here. So what I'm going to do? I'M using one of my strong straight hair pins and I'm just going to go into this a bit of hair here and do one of my little up and over go in come up and it's lifting up the bundle. If you can see it's lifting up the bun just a little bit, I'm going to go in and behind that weft of hair, and that already feels so much better. So we do want these styles to be soft and relaxed, but for our brides they definitely need to be secure. So if you need to go back in, if you feel it is just a little bit loose, you can always go back in, don't be afraid to go in, find something secure and do your up and over that's better. Does that feel a bit more secure, yah yah and we're just going to work and finish the hair and we've got a lovely, quick, soft low bun. But you can see you do need quite a lot of hair to create a bun, that's kind of soft and relaxed, but still quite full. Just take this back away from the face. Just a little bit, I'm holding my tongs vertical, I'm waving curling the hair back away from Yanis face. That'S it then we'll bring these bits back and just pin them in position yeah. I think so remember to fold the hair. You don't just want to put your grip flat across so although the hair is in the right position, the grips going to end up visible so remember to just gently twist the hair fold, the hair a little bit pop that bobby pin in and then you can Hide the pin, but still have the hair, lovely and soft always remember that your clients kind of knows her own face shaped best. She knows whether she'd like more or less hair, so always kind of be there and be flexible and listen to what your clients have to say. I can tell I've done the style again from one side, because it's slightly lopsided, but when you're creating your Styles, just make sure that you stand at the center at the back. I'M just going to move the position of this one cuz. I think it could do it just being a little bit lower. Maybe two here, that's better if you've enjoyed this tutorial. Just click like and subscribe and join me on my next video
Comments
Alexandra Fahey: Thanks as always for the amazing tutorials Pam!❤️
Becky M.: I am glad I found this video! I am styling my long hair like this at my wedding this Saturday 9/19!
Linnea Sumner: I love your videos. Your voice is so relaxing and this is the first tutorial where the rope twist made perfect sense. Thank you!
Carlo Ricciardi: