Easy Diy Half Up (Wedding) Hairstyle & Diy French Manicure (Kiss Salon Acrylic Nude)
I did my own wedding hair and nails and they both turned out awesome!
Create an Amazon Wedding Registry: https://amzn.to/2QhpgTu
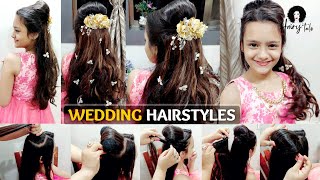
This DIY half up half down wedding hairstyle is so easy to do and it looks perfect with a veil in too (check you my Instagram for photos of that).
The DIY French Manicure out of a box, by Kiss nails (link below) is STUNNING and perfect for a wedding. So perfect I used them on myself despite being about to do a traditional French manicure perfectly as well (I've been doing them for like 15 years).
I hope this tutorial helps you out!
NAILS I Used (Salon Acrylic Nude Kiss Nails): https://amzn.to/2FAc6eY
Nail glue: https://www.ebay.com/itm/3-x-Mia-Secre...
Bobby pins I used: https://amzn.to/2NgjdiN
Hairspray I used: https://amzn.to/2FC8xEV
Follow me on Insta @DIYDalia_
https://instagram.com/diydalia_
Business Inquiries / Sponsorship: [email protected]
Thanks for watching!
Dalia
DISCLAIMER: some of the above links are affiliate links which means I receive a small amount of $ from your purchase. These are the products that I did buy with my own money, though :).
Hey guys welcome back to my channel today, I'm gon na show you finally how I did my nails for ten dollars out of a box and my hair, which I think so here are all the items that you need. The first thing is the kiss nails, acrylic nude in the style, six, four, two six, eight ka n03 in the top right hand corner so you're, just gon na pop that box open. It does come with a nail glue, but I don't really like it very much because, as it says, on the box that lasts 7 days, whereas if you use a really good nail glue, it lasts a full two weeks. So I'm gon na link that down below for you. Actually I'm going to link everything down below so once you open it you're just going to pop out the nails and line them up with your actual nails to see which ones are gon na fit. Once you do that line them up in a row so that they're easily accessible for you to apply then you're going to pop open the little package that comes with it. It includes a wood stick as well as a nail file. Then they use that nail file to buff the top layer of each of your nails. This is just gon na apply a little bit more grit to your nail to allow the false nail to adhere a little bit better. Next, this step is optional, but I usually do this. This is taking rubbing alcohol on a paper towel and just rubbing that on your nail bed, this is going to remove any of the dust that you just created, as well as just dehydrate the nail a little bit. You'Re then, going to take the cuticle pusher and just push back your cuticle so that you have as much of the nail bed exposed as possible. Next you're, just gon na shake the nail glue open it up and start by applying a little bit of nail glue on your actual nail bed and then a little bit of nail glue on the fake nail. You'Re only gon na ply it. Obviously, in the section of the fake nail that's going to be applied and stick directly to your finger, so not the top pipe edge press it down and hold for between I'd, say 40 to 60 seconds per nail next you're just going to take that paper. Towel and wipe off the excess glue on the sides and on the bottom. This is actually a pretty crucial step if you have excess glue because it'll wipe away right away. But if you let it dry a little bit, it obviously will not wipe away. So just keep doing that step by step, glue on your nail bag glue on the false nail: stick it on weight and then wipe the edges with paper towel. So this is the final step. Basically, what you're going to do is you're going to file all three sides of the nails start by filing the top which you're going to file straight then by filing the sides. So I'm trying to create a little teensy bit of a ballerina style now. So, instead of filing the sides straight, I'm actually angling the nail file to be pointed a little bit towards the center. As you can see here, and I'm just doing that on both sides and then the top again is just filed straight across and then you're just gon na keep doing that for all your nails. Okay. So these are the final nails. Stinkin. Amazing me why I wanted to do my own nails is because, when I go to a salon I feel like. I don't like the percentage chance at the time that I don't think that they're perfect. These, I think, just looks so stunning. I could do them by myself at the comfort of my own home the day before my wedding or two days before my wedding and not really have to worry about it. So I really enjoyed this plus. They only cost like under ten dollars, so good manicure. It lasts it into my honeymoon, and I really liked it so hope you guys do too now we're on to doing my hair wedding style so to get started with the wedding hair. The first thing I'm gon na do is curl all my hair. My hair is probably like two days since I've lost washed it you don't want to start out with very clean hair, otherwise you're gon na have to add a lot of product, but to make it cool and stay and last all night, so preferably not super clean. Here so I'm gon na use. I think this is some one and a half, or maybe a two inch so just flipping around here, I'm going to start out by taking a small section on the right side of my head, twisting it around and then putting it up against the left side of My head and positioning it into place. I'M then going to grab a bobby pin or two actually in this instance, and just pin it into place. You want to make sure that it has a really strong hold, because it is the first section here. That'S gon na act as the base next you're gon na do the same thing, but this time on the left side of your head grab a section of hair twist. It place it over the previous twist, but then tuck it under a little bit and then grab another two bobby pins and pin it into place. Next, I'm going to take the section on the right side of my face twist it back and do the exact same thing so just over the previous section and then pin it under the left section and just a quick tip here. Is you want to make sure that you have a mirror in the front of you and in the back of you, so that you can actually see what you're doing, instead of just going based on how it feels? And then the final section here is taking the section right at the front of the left side of my face, twisting it back over the previous twists and then tucking it under a little bit and pinning that into place and again using two bobby pins. Because I really want to make sure it's secure really just take your time with it and look at what you're doing and what it looks like as you go along. The next thing you're going to want to do is see if there are any sections that need puffing up. The extra volume looks really nice in the hair, so just to see if there's any sections that need that extra volume and then finally you're just going to hit it with some hairspray and voila. So I totally forgot to film an outro for you guys. So here it is, let me down down below and nails or the hair, which would you do for your wedding? Or would you do neither if you like, watching this content? If you like me or you, learn anything, then why not check out my instagram at DIY DeLeo, with an underscore at the end or subscribe to me on youtube, because then you'll get weekly doses of this exact content? Okay, thanks! So much for watching until next time. Bye


Comments
Alexandra Escontrias: New subscriber here♀️ Loved the hair! So simple and easy, yet elegant
Sierra Smith: I’m so glad I came across this video I have a wedding to do in a couple of weeks and this hair is perfect for my dress!!!!!
Katerin Gonzalez: So cute ! I'm planning a wedding in 5 weeks! So binge watching all of your videos !
Mrs. Bro and KK Show: I totally did my own hair and make up for my wedding. That was 12 years ago. I used to wear acrylic nails then but if it were now I'd do my own nails too. PS....I got my dress from Dillard's Discount store for $12.
Fishnet_stockings88: Love this! Absolutely what I was thinking about but feeling intimidated about as I have no skills in this area
Kinah Brown: My mom is getting married i think I am going to try this on her thank you Dalia❤
Kasey Daugherty: ok. I'm a hairstylist and you taught me a new way! small section, cross over, THEN take the rest on each side. GENIUS. lol
Francisca Zepeda: Super cute! ♥️
Anick Michel: Stunning!