How To: Elegant Half Up, Half Down Style | Kenra
Watch as Mirella Manelli teaches how to create this elegant half up half down style incorporating inverted ponytails and fishtail braids.
Click here to learn more about Kenra products: bit.ly/KenraPro
SUBSCRIBE NOW: http://bit.ly/KenraProfessionalSubscri...
VISIT OUR WEBSITE: https://www.kenraprofessional.com
About Kenra Professional
We are a purely professional brand dedicated to understanding and serving today’s stylists. Our passion is developing best-in-class innovations, delivering superior and reliable results. Kenra Professional strives to elevate the stylists’ artistry and craft.
CONNECT with US
FACEBOOK: https://www.facebook.com/KenraProfessi...
INSTAGRAM: https://www.instagram.com/kenraprofess...
TWITTER: https://twitter.com/Kenra_Haircare
HOW TO: Elegant Half Up, Half Down Style | Kenra: https://youtu.be/rY5IAzAsSkQ
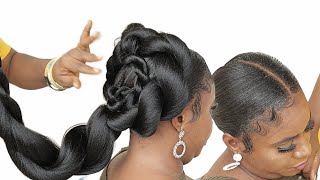
Hey everyone, its Marella Minelli here and today, I'm going to show you how to do this really elegant, half-up, half-down style, incorporating inverted ponytails and fishtail braids, so stay tuned and check it out. So what I did first was prepare my models, hair with Kenner professional thermal styling spray, and I spray a generous amount onto each section and then curled her with a two inch curling iron and the reason why I love Kenner professional thermal styling spray is because it Does have a nice high hold and it's gon na give a flake free finish and it's sizzle free off of your curling iron, so you're gon na not gon na. Have any residue left on your irons? What I'm gon na use? First, its Kenner professional texturizing taffy and if you've watched any of my videos, you know this is hands-down my favorite product and I love it because is a texturizing fiber paste and I love using it anytime, I'm doing updos or any type of styling. So I'm just gon na grab a little pea-sized in my hands, and this is just to give me a little bit of traction as I'm starting to work with the hair. I'M gon na start off by sectioning my models, hair and I'm just gon na create more of a circular section, so working about two to three inches away from the hairline and coming right back down through the back and then I'm just gon na clip away the Rest of her hair, just to give me a little bit more of a cleaner working space. So now that I have my section already separated in the back, I'm gon na go ahead and split this into three equal sections, and then now I'm going to turn these right into individual inverted ponytails. So now, what you're going to do with this section here is create a low ponytail, so making sure this is nice and flat right towards the top and then you're gon na create a space right behind the elastic and just create that inverted ponytail. So we're gon na pull that hair right on through, and this is exactly what you want. You want an in long, gated, inverted ponytail, so we're just gon na go ahead and leave that for right now and we're gon na work on through the sides. Once you have, your inverted ponytail is complete. You can go ahead and take away these clips right underneath because we don't need them anymore and what you can do with these is go ahead and pull on them just a little bit to create a little bit more of a secure snug on there. And if you want to, you can go ahead and loosen these up just a little bit to create a little bit of fullness. Now that the backs complete I'm going to go ahead and work on to the sides, and since I gave her a side part, I'm gon na work on the side that has the least amount of hair. So I decided I'm gon na, create a French fishtail and to get started on your French fishtail you're, just going to take a small slice and slip that right in half and then grip your sections and then gather from the exterior and marry it over to the Interior of the opposite side and you're gon na do this two times on each side just to get it started and then you're going to start gathering you're just going to take a small section and put that right on over just make sure that you're marrying it To the interior of the opposite side, once your braid is complete and you're done, pulling out to your liking, you're going to go ahead and pin it right underneath or right behind the very last inverted ponytail section. Now I'm going to move on to the right side and not going to do a braid, but I thought in order to kind of marry these inverted ponytails that we did in the back and go ahead and do those inverted ponytails right on through the side. So it kind of creates that intricate, looking braid, but it's really just inverted ponytails, so to get started. We'Re going to take a section right around the arch of her eyebrow and come right on up now, I'm just going to make this ponytail rather low and loose. Very similar to the back sections, so the reason why you're gon na do that is because it kind of creates an in long gated, looking inverted ponytail versus really short you're. Just gon na make this ponytail make a space right behind the elastic and then pull that right on through and to get started on your second section. We'Re gon na go ahead and move this ponytail aside for just a little bit and we're gon na pull out. Some of her hair so that way matches the other side and then take another section right, underneath just a foe or diagonal and we're gon na split this right into two and now you're gon na take your previous section and put that right in between and still Making an in long-dated ponytail and pulling it right on through so it'll create this fishtail looking great, but really is just a ponytail and you're gon na continue this for one more section, but we're gon na leave the very first sections ponytail right in place because we're Actually going to marry that with our final section here and then split this one in half and put the prior section right on top now that we're done gathering throughout the side, I'm just gon na pull on this ponytail just a little bit to make it a Little bit more secure and then just to kind of marry it now with the fishtail that we've created on the other side, I'm gon na fishtail, the remainder of the hair. Once your fishtail is complete, I'm just gon na put a little placeholder right on the end. There, because we don't really need to put an elastic just yet, and I'm going to secure where this elastic is at right under the braid. Now, once you have that secured. What we're gon na do with this braid is we're gon na loop. It right on back up through the front you're just going to take the braid right on over and I'm just going to put this little clip here as another placeholder for me and you're gon na secure this section, the bobby pin and then I'm going to take This section and we're going to secure it right underneath those inverted ponytails that we created now just to add some more security to your braids or to really your style. I like to use some open, hair bobby pins, and I'm just gon na pick. This braid up just a tad and insert my hair, pin and the opposite direction and then secure it right on back, and this is just going to allow it to lay a little bit flatter now that our hair is all pinned up. I'M just going to go through and further detail it using a one-inch wand. Now her up style is completely finished. Detailed with curls and now I'm just gon na do one last finishing touch, which is this really beautiful, hair accessory that I found online and I'm really loving how she has this accent piece right on through the back right side. So I want to accentuate that because I love how it's flowing so I'm gon na apply this right on over it and you can kind of see I bended this a little bit, so it can form into the shape of that section. So I'm just gon na apply it right on over, and I wanted a little asymmetrical. Then you're just going to take your hair, pin and secure it right behind your braids. Now that our hair accessory is pinned into place, I'm just gon na go ahead and finish her with counter professional volume spray, but she has an all-day pool. So I love how this half-up, half-down style came together, incorporating both inverted ponytails and fishtail braids, and I especially love this little accent, hair accessory that we put a little asymmetrical throughout the side. So thanks so much for watching and if you love to this up style tutorial, please like and comment down below, ask me any questions you may have and I hope to see you guys next time.
Comments
Sarah Carlstedt: Love this! Can’t wait to try it on my clients. It’s perfect for a holiday party or a wedding
JessyIsMe25: I'm just an average Jane with a passion for hair but, for what it's worth, I have to say this is THE nicest hairstyle I have EVER seen! And your tutorial was so detailed and thorough, I feel confident in my ability to recreate it for an upcoming wedding. Thanks SO much for this great video! <3
Mirella Manelli: I had so much fun making this