Luvme Hair Install + Honest Review! 20'' Body Wave Frontal Lace Wig
Hey y’all! I did another wig install and this time the hair is from LuvMe Hair! Watch me install and style this 20” frontal wig and give my honest opinion about it!
Length: 20 inches
Direct link to wig: https://bit.ly/3ySs5PN
LuvMe Website: https://shop.luvmehair.com
Don’t forget to use my code for $$$ off!! : ETAYLOR20
Thanks for watching and of course don’t forget to like, comment, share and SUBSCRIBE for more of me!
*I DO NOT OWN THE RIGHTS TO THIS MUSIC*
CONNECT WITH ME!
TWITTER: https://twitter.com/theendiataylor
INSTAGRAM: https://www.instagram.com/theendiatay...
SNAPCHAT: yonngg_beauty
#wiginstall #luvmehair #luvmehairreview #wigreview #frontalwig #wigs
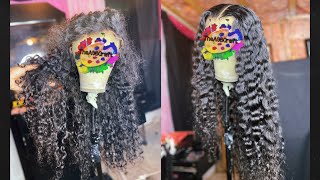
What'S up y'all welcome back to my channel, as you can tell by the video we're doing another wig installation, and this time i'm installing love me hair. They sent me this 20 inch body wave, i believe, 13 by 6 frontal wig, it's just a natural color. As you can see, it turned out really cute. I really like it. The hair is super. Soft you'll hear me talk more about the hair in the video, but before we get started, i just wanted to give you guys, like an unboxing kind of, because i think that their packaging is so cute and i really appreciated it. So this is the box that comes in the colors are purple and gold super cute, really pretty box and inside the box. Obviously they sent the wig and it came in this little bag, and i love bags like this because they're reusable you can put your wigs back in here if you need to and they can be used for anything really. So i really love when they send these bags. They sent this little goodie bag and y'all in here. There is a pack of lashes and it's two lashes in here. Usually, you know when you order hair and they send you lashes they'd, be like little thick ugly lashes that don't nobody want to wear. I always end up throwing them away, but do y'all see these lashes. Do y'all see these lashes they're, actually good lashes, like i'm gon na wear these. I really appreciated that. I thought that was really cute, because you don't really see that often they sent this little scrunchie that i could use. You know, tie your hair back or whatever you want to do. That'S always helpful. They spent a pair of earrings y'all, some gold. I mean some silver hoops. It'S always good to have some more. I would wear these they're definitely cute and then y'all look. So it is christmas time they sent me these little nails, y'all they're, decorative nails that you like press on or whatever, but they're christmas themes. I'Ve never seen a hair company saying themed nails like what nails period. I'Ve never seen that before. So that was just really nice and then there's more there's more. They sent me a whole comb. I could always use another comb y'all a whole comb, a black one at that very cute and then in the box. Obviously they just have this card. It has the care information in here um how to put it on just information about it and also return and refund information, so that is always helpful and yeah. That'S all that was in the box, but i just wanted to show you guys that, because i thought it was really cute what all they said. I really appreciate the um packaging, so i just wanted to show you all that but yeah. So in this video i'm going to be installing this wig um. If you want to see how i got my hair like this, how i cut the curls, how i laid this week just continue watching this video go ahead and give this video a like before we even continue make sure you're subscribed and yeah we'll just get into The video so first off, as you can see i already have my cap on this - was like one of the beige colored caps and i just put foundation in my cap and, like i said, i put foundation in the wig as well, so we're just gon na Get started, and the first thing i'm gon na do is just pop it on my head. Also, you guys this wig has an elastic band in it, and i thought that that was so nice because in most ways you have to put them in yourself. So the fact that it came with it that was really nice. It just helps your wig to be more tight and secure on your head, but um y'all see this little flap of lace at the bottom. I'M just going to cut that off with my scissors really fast, like i said, there's an elastic band and there's also like all wigs, come with the combs three combs inside and also these little adjustable thingies. So, whichever you want to use, they got you, but i'm gon na use the elastic band, because i think that will help it be the most secure. Alright, all right, i kind of had to switch positions, because i realized that i wasn't in front of the mirror. Duh, so i just put the wig on here. It looks really. Nice looks really good and now i'm just gon na start adjusting it to my head and sorry, if i'm looking past the camera, but i got ta look in the mirror, it looks pretty good. It fits pretty snug, so the first thing i'm gon na do is just cut um. This extra lace around my ears and i'm just gon na take this comb and i'm just gon na part, the hair over my ears. If that makes sense, and then that's where i'm gon na cut the lace up all right that looks good, i'm gon na do the other side all right. I think i want this to be a middle part. This is gon na be so cute. I can already tell okay so now what i'm gon na do is start to lay the lace and to do that, i'm just going to lift the lace up. So i can start applying my glue and first i'm going to take some alcohol and just clean this area off just so. The glue sticks the best that i can and i'm not sure, there's no makeup or dirt or oil, where i'm trying to stick the glue. So i'm just going to get that and wipe it off. Okay, and if you don't know by now, i don't really like using actual lace glue. I just prefer to use got7 spray and the yellow bottle, because i just don't like the residue of glue like it's just super hard to get off your wigs, and i just don't like going through all of that. It'S just too much so i'm gon na use a spray, and this glue, like i said, and the first thing i'm gon na use - is this spray and i'm just gon na spray. This all along the hairline, i'm gon na, do like two layers: let it dry and then put this on top and then we'll lay the lace up. Okay, i think the glue is dry enough, so i'm just going to bring this down and put the lace into the glue and i'm just going to use my rat tail comb to comb the hair into the glue. And then i'm just going to take this random scarf that i have and i tie it down for a few minutes all right and while the lace is setting in i'm just going to go ahead and start hot combing, my hair down, because as y'all can see, It'S looking helmet so we're going to flatten this out and i think i want a middle part, so i'm just going to slightly make my part and start hot combing, the hair down all right. The hair is looking better, it's all hot coming down now. So i think we're going to go ahead and take this scarf off and place. This is looking good y'all, so i'm gon na take my scissors and start cutting it, and i'm gon na do one side at a time, and usually i would use like one of the small little razors, but i left them as cool. I don't have them so sad. I'M gon na have to make these scissors work, but i'm just gon na cut down the middle first and i'm gon na try to cut jaggies. So it's not just a straight line across. I don't know if it's working, but all right, that's one side looks good. Now, i'm gon na cut the other side and boom. It looks a little bit of a mess y'all, but we don't lay it down. We go, lay it down all right. So first i'm just going to take some more alcohol and wipe around my hairline again just to wipe away any excess glue that was left on my forehead, i'm just taking a little bit on a paper towel and at this point i'm going to start taking out Slash making my edges and usually i'll just do two here, two sideburns, so i'm just gon na carve out my it's going to edges all right and now that i have what i want to see my edges taken out. I'M going to take my nairobi again and just put the push the rest of the hair back, so it's out of the way and also to try to start to move the hair where i want it to be and how i want it to lay. Then. On top of that, i'm going to take my hair wax stick and just put this on the hairline as well. So we got the edges out. We got the hair pushed back. Now, i'm just going to take my little scissors again and just cut my edges and i'm going to take my nairobi again and use this to lay my edges. First, i'm going to take my edge brush use the side with the little comb. Okay! So now that my edges are all laid down, we're just gon na go back in with the hot comb and make sure everything is super smooth. But before i even do that y'all, i just want y'all to look at the hair. Like i said, i bleach my knot, and this is a frontal closure, like it just looks so good. I'M sure a side part will look really good on this too, but, like oh, my gosh, i just wanted y'all to see that so we're going to go back in with the hot comb really quick make sure everything is super smooth and i'm going to take a Little bit of got to these, and just wherever the lid seems like it might be a little bit or not laid all the way. I'M just going to put a little bit of that to be in those places, and then i'm also going to spray. Where my edges are and then one last time i'm going to lay my scarf down and let everything set in one more time. So while that sets in, i think i'm going to start curling the hair and today i think i want to do some wand curls. So i have my one curl right here, i'm about to let it get hot and then just let y'all watch me curl the hair first, so personally, um um, so i just finished with all the curls and they look a little tight right now, but we're gon Na separate them in a minute, so i'm just gon na push them back for now, and i'm gon na take off my scarf see how everything set in all right. So now, i'm gon na just run my fingers some of the curls, and that is it y'all. This is the finished. Look. Let me turn around so that was this lovely wig. I definitely would try their hair again. Maybe a different texture, different length - i don't know, but i would definitely try them again. Like i said, the hair is super soft. It curled. Well, the lace bleached good - it is just it just looks - really good y'all. I hope you guys enjoyed watching me install this wig from love me hair. Getting love me, hair, o v, m e, p j. I r dot com, definitely go check them out. I'M going to link their website in my bio and i also have a discount code for you guys. So when you guys use that discount code, you get money off so definitely definitely go use that they have wigs for a very reasonable price. I would not steer y'all wrong, so go check out, love, me's website use my code to purchase a wig or whatever you would like and yeah i'll see. Y'All in the next video definitely stay tuned, because there's more coming make sure to like this video comment. What you guys like what else you guys want to see subscribe of course, share if possible anything helps and also turn on my notification bell. So you can get notifications whenever i post, because i will be posting more frequently and more often i'm going to get more consistent and yeah. I'M sorry! I keep playing with this video, but alright, i will see y'all in the next video bye.


Comments
Tina King: That wigs looks nice! I think I'm ready to take the plunge and try one of those types.
Najalah Brickle: You have a new subscriber I looked at your soft loc tutorial now I’m here great job girl
Niyah Love: Are you on they PR list or got a sponsorship?