Necchi Jeans Pro Sewing Machine/ Old Silk-Top Revamped/ Wig Making Time
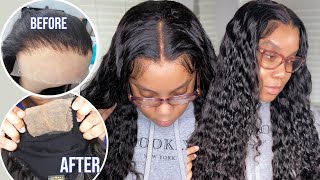
How to revamped an old Silk-top / silk base laceclosure, this Silk-top was or used to be a lacefront wig from over 6 years ago, thanks to how good Silk-top are created the silk part of the wig was still intact so it was wig making time, so I decided to create a brand new wig with it, using Necchi Pro jeans heavy duty sewing machine, the sewing machine did his thing and I did mine, this wig came out looking so good beyond my imagination.
@Faith Lets Grow - Healthy Hair
#Necchipro #sewingmachine #oldsilktop
items used/mentioned:
Necchi Pro jeans heavy duty sewing machine
two bundles of yaki straight hair 16inches
Old Silk-top
thread and needle
small wig cap
like today's video give it a like and share, also remember to subscribe xxx
You guessed it it's old soaked up cut out of an old wheel from years years years ago, here it's different between a soaked top and a regular lace closure. Today'S video is all about that perfect pattern. It'S not about perfect hairline, it's not about perfect baby hair, but the perfect pattern that soaked up have to offer. So here are the things i'm going to be needing to make this wig, i'm not necessarily showing you guys how i make wig using a sewing machine, but rather i'm showing you guys what i did to achieve this look. So i'm using the ninja jinspro sewing machine. Before i cut this soaked up out of the wig that i was on, i could never get that part to lay because of the extra layer they have on the soaked top make it extremely difficult for it to lay flat. And but my goal today is to ensure that this is flat to my scalp, with or without elastic band, so i've pinned it down the best i could giving this shape i'm working with, but that is what i'm aiming for to get this to be as flat As possible so keep on watching, so i saw one side of the closure down because i'm using two needles, i've sew one side down right to the middle of the closure. Then i will take the second needle to sew the second side right to the middle. So both of them can meet so now that the excess cap under the soaked up is all cut off. I'M just trying it quickly back on the wig head, just to make sure it's laying flat if he is laying flat. As of this minute, he is likely to lay flat lateral, so i'm just double checking before i, you know move on to the next step, so i went ahead and put in some markings this. I will be sewing this wig on a single weft. I'M not going to be doubling it because i want it's really light see the small lines you see normally will be at the top, but i've chosen to have that at the back. Just to make my life easier during the time, i'm sewing this wig in a sewing machine foreign that is going to be the hair. I will be using as a base that first line, i usually sew on on the wig just to cover up any spillage. That might be coming from all sides, so now i've taken it to the sewing machine just to seal it in because this closure is cut out of an old wig. So it's a bit frail and because i did not cut right into the silk top himself. I have allowed access list all around the silk top, so i really need to make sure this is secured on the list. That'S where the sewing machine comes in handy. So, as always, i always prefer to soda first weft of hair right at the base of the week before i start anything else, and that's what you see me doing it mine looks like pushing i'm talking but making wig with a sewing machine. It'S all about creating that flat base where you're not pulling you're, not talking you just create if i just create a flat base, and so even if i'm sewing an inch at a time. But at the end of the day i will get to where i need to get she's down. That is a neat teaching, if i can say so myself, so i'm backing on the machine, i'm just going to fill in the white filling the inside now and i'm creating a space to sew on. One thing i want to avoid is finishing: making this wig: it doesn't fit, i'm using a small size cap to do this so clearly, i have no allow room for error harvard there you go so i'm creating a smooth space between the weft, the what the emission And the wig cap, whatever i do, i mustn't pull or tug on anything that is looking more like it. It'S smooth as a pudding and i'm very pleased with the result i'm seeing so that is all the hair. That'S left out of one bundle, so i aim to use two bundles on this in total. So before i proceed, i wanted to try on and make sure everything is out as it should be, as in the wig definitely fit she's ready all ready to go. I am so excited this stitching is so good, so nate i'm dead, dead, pleased with myself, so i tried it back on on a manicure head. It'S laying really flat dead relief on that, so it's time to have fun with this wig. Are you guys seeing this? The only thing under that wig is wing grip, nothing else, she's laying as flat as hell. I'M extremely excited, i'm absolutely buzzing. This wig is going to be perfect for work. I don't know if i said before the hair i'm using is thinking it's yucky straight. So the closure is yucky straight and the two bundles i'm using supposed to be yaki straight, but it's not giving me daiyaki straight. It'S giving me more like thinking straight than yaki straight. So whatever the case, i hope in time it will blend. But this is what i've got. I have to work with it. Do you guys notice, when i turn around you notice the difference that one first weft i usually saw on that my way before i started, you saw the difference. They make massive difference. All the kitchens are hidden. What can you tell me? Nothing smash, see you later, you

Comments
Ireina Herrera: This is awesome you did great sis
C A: You are super talented. I don't have patience for this!
Imani Hakim: Very detailed video thank you