3 Easy Valentine'S Day Hairstyle Tutorials | Hairs Affairs
Hello lovely! This week I'm back with 3 easy valentine's day hairstyles (totally DIY)! Don't forget to like & subscribe (also press the bell to keep updated):*
The hairstyles are super quick to do too, I would however suggest curling your hair prior to doing them for some extra romance in the (h)air ;)
If you don't want to use a curling iron or wand, you can also use your flat iron! Watch the tutorial on how to do that here:
https://www.youtube.com/watch?v=DhOhtB...
Let me know what you think!:*
You can find more hairstyles and tutorials on my blog:
♡ Where you can Stalk me ♡
Find me on social media:
https://instagram.com/hairs_affairs/
https://www.facebook.com/likebraids
https://www.pinterest.com/HairsAffairs...
https://twitter.com/Hairs_Affairs
Stay in touch! ;)
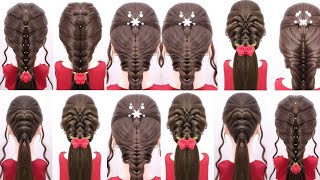
( upbeat electronic music, ) Hi lovely, welcome back we're fast approaching Valentine's day already, which is why I'm going to bring you some easy hairstyle ideas for Valentine's day in today's tutorial.. I'M experimenting a little bit today in filming in a new location, not quite sure the lighting settings are okay, but we'll see how it goes.. Before we start, I wan na say a quick thank you to all of you who wrote me emails. Who commented on my previous video for your suggestions, your input, your well wishes I've written all of it down, and I already have some ideas. I promise I will get to them one by one., I'm not quite back on track as to uploading new videos every week, yet I hope I'll get there soon. So also, thank you for your patience.. Since most of you seem to want easy hairstyles and this year's Valentine's day falls on a Tuesday and lots of us might be working, so I thought I'd really keep these hairstyles simple, especially since we're already gon na spend some time curling our hair. Now I did not film the part where I actually got these curls. I used this Remington Silk curling wand and I just wrapped my hair around the wand, like that I used a glove and heat protectant.. I alternated the direction a little bit., But I made sure I curled the hair near my face away from the face and that's basically it., But you don't have to use a curling wand. You can use your favourite curling method. You can even use a straightening iron, like I showed you in the previous tutorial.. I personally do like to give my hair a little bit of curl, especially for Valentine's day, since it gives more of that romantic vibe that I'm definitely going for.. Please give this video a thumbs up if you like it and subscribe, so I can see you next time. And now without further ado: let's go ahead and begin. Okay, so this first hairstyle is a very simple and cute heart: half up style. We are going to take two sections from the front and tie them together in the back. That is going to create the base for the heart.. Then I'm going to pick up another section about the same size right underneath the first one. I'm going to smooth it out a little bit with the brush.. Now I'm going to bring that section to the other side. So now I have that section and the upper base. And I'm going to place two of my fingers in between those two sections. So over the lower one and under the upper one and I'm gon na grab unto the lower section and loop it through. And then clip it securely in place. So it doesn't go anywhere. While I do the exact same thing on the other side. And I have to say it's much easier to do this than explain what I'm doing so, I hope this makes sense. And I hope you can see easily what it is that I'm doing. Now, I'm just Going to tie all of these strands together with a clear elastic and pull the heart apart a little bit to give it a little bit of a nicer shape, and that is the finished hairstyle.. I really like it because I think this has a little bit more of an adult feel to it than many other heart hairstyles. For the next hairstyle. I'M really just going back to the basics and I'm going to make a regular French braid.. But I'm going to make it nice and loose and voluminous and also diagonal, so I'm starting on the side on my heavier side and I'm picking up a section close to my parting, I'm making sure to leave out some face framing layers, so I'm dividing the hair Into three strands and I'm tossing the strands over the middle one and then I'm adding in hair from both sides as I go along., I'm taking quite large sections when I add them into the braid and that will make the hairstyle quite fast to do.. ( upbeat music ), You are going to need at least medium length hair to do this side braid. But even if you have shorter layers around your face and on the sides like I do the fact that the hair is curled even if something falls out or starts sticking out from the braid. It really looks like it's supposed to be that way. ( upbeat music ). When I tie off the braid, I make sure to leave out a good two inches or so of the ends, so that I give myself some space to pull this braid apart. And for the fluffy romantic. Look, it's really good to pull it apart as much as you can. And here's the finished look. I hope you like it. If your hair is shorter, just do a regular french braid without it being diagonal or if you can get away with a side braid, you can tuck the ends under and pin them to your head if they're too short and are sticking out. For the last updo. I'M going to create two dutch braids. One is going to be a little bit bigger though.. So I start very similarly to the previous hairstyle except I start crossing the outer strands under the middle one and I also add in hair from both sides. And they are quite good chunks.. So, on my heavier side, I'm making the braid slightly larger. So I add hair from both sides. I pass a little bit further than the middle, as you can see here when I add in the sections - and I add them, diagonally down.. So after I've incorporated the hair all the way down towards the neck, I just braid. It in a regular three strand, braid all the way down, and it's important now that you don't braid too tightly and also that you don't tie the clear elastic too tightly. And soon it will become clear. Why that is. ( upbeat music, ), okay, so after I've pulled this braid apart a little bit, I move on to the other side and create another dutch braid and also tie it off with a clear elastic and remember to tie the elastic loosely.. Now I'm going to put my fingers through one of the loops and create a hole in the bigger braid and bring the other braid through it and then pin it in place.. Now I'm going to grab onto a thin strand at the end of the braid and I'm gon na hold onto the elastic and bring everything else towards the nape of my neck. So I'm gon na push it up. That'S why it's so important that the elastic isn't too tight. ,'Cause then you're, just gon na have a hard time moving anything and I hide the ends, and I don't let go of this construction until I've pined everything securely., Then I repeat the same thing with the other braid.. This pushing up technique will work for you, even if your hair is longer, it will actually give you more of an effect. It'S going to look like a big fluffy messy bun, and if your hair is shorter, you can just tuck the ends under and pin them in place without this step. ( upbeat, music, ), Here's the finished look of the final hairstyle.. That concludes this Valentine's day. Hair tutorial, I hope you found these hairstyles helpful. I think that they can be either dressed up by some hair accessories or dressed down by not curling your hair, quite like this, by giving it more of an effortless wave with straighter ends or not curling them at all.. These could definitely work for a day to day basis for school and work as well.. Let me know what you think in the comments below also, let me know what you think about this background.. I know my lighting isn't perfect, yet I do need to get a ring light. Right now. It looks kinda dark back there, but other than that. Let me know what you think., If you like this video, please give me a thumbs up. That will make me really happy and, of course, subscribe, and I hope to see you next time. Bye,
Comments
Julie Kozlowski: Beautiful styles. I love the last one it's so beautiful.
Squishables !: Ania, thank you so much for this tutorial. When I was scrolling through videos to try to find one that was easy enough for valentines day, I was going to give up before I saw this! Your tutorials were great and I love how you can do so many creative things with your hair! Thanks so much! I am definitely doing the first one tomorrow for Vday! Tysm!
Nicole Williams: I LOVE the last one and I'm going to try it on Valentines Day!! So BEAUTIFUL xo
Laura Bianchi: I tried the last one for the gym today, sweet styles, thanks!
Wheelsnoheels - Gem Hubbard: so pretty. i love the second one. i think ill have to give it ago. xxx
Marielle M: very nice hairstyles, the last one is my favorite, I will try it tomorrow for work
Kate Moore0717: wonderful I love your technique
Bilgread Karki: Wow supup excellent
Wanda Barr: Might try it
Wanda Barr: Pretty