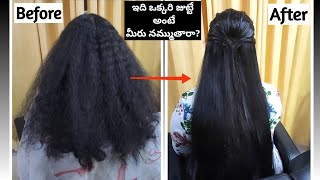
How To Straighten Thick Natural Black Hair Without Heat Damage

Don’t compromise your curls for the sake of the style!
Imagine being able to wear your natural curly or kinky* hair straight week after week while still retaining length and avoiding the dreaded heat damage. Let’s face it, some of us prefer not to use relaxers in our hair but we enjoy wearing our hair straight from time to time, or even all the time!. Yet we don’t want to risk our strands for the sake of a hairstyle.
Before we start, if you want to receive email updates when more articles are published with more tips on looking after your hair and gaining the length you deserve then please enter you email address in the form below:
Let’s get started . . .
When thinking of straightening your natural black hair you must first understand that straight hair is just another hairstyle. People with naturally straight hair will always want to add curls and people with curls will always want to straighten their hair occasionally. It’s human nature to assume that the grass is greener on the other side! Learning to wear your hair in its natural state should make up the bulk of your hairstyles with straightening only being one of them. This mindset will greatly improve the overall health of your hair!
Now that you have made the decision to get your natural hair straight, you must be prepared. Any styling that involves applying heat to the hair can be damaging but it’s not all doom and gloom! There are certain ways you can arm yourself against heat damage and give you the sleek style you want for that special event whilst not compromising your lovely kinks and curls.
1. First things first, pick the best straightener for your needs, a ceramic tourmaline ionic one would be the best but a plain ole ceramic one will do just as well.
2. Before attempting any straightening, your hair should be completely clean and freshly deep conditioned with a penetrating conditioner. Deep conditioning* gives hair that added bit of moisture so that it doesn’t dry out completely during the heat styling process. Some low molecular weight conditioners especially those containing cetrimonium bromide will also help combat against heat damage.
3. Apply a leave in conditioner* as well as a good heat protectant* and comb through the length of the hair to evenly distribute the product. Choose a heat protectant with glycerine as this has been shown in studies to prevent excessive moisture loss. A silicone serum heat protectant can also be used in addition for an extra smooth finish.
4. Black people have a variety of hair textures which can be straightened in different ways depending on the thickness and the degree of the curl. Loosely curled or coiled hair can be straightened and smoothed out with just a roller set, so you can probably skip the flat iron* altogether (Read the article ‘How to cheat at roller setting’). Thicker, coilier strands on the other hand will require a bit more attention AND heat.

5. It is important to ‘pre – stretch’ your hair before straightening as this gives the best results. For the sleekest results it is best to blow dry damp hair in sections as straight as you can get it on a medium temperature. There is no need to use high heat as this can be damaging to the hair and never blow dry when your hair is dripping wet.
You can also pre-stretch your hair by air drying it in large braids or twists or by banding. Although be warned, depending on your texture, the final results may not be as smooth and you would like and you may end up losing more hair to breakage when you come to flat iron your air dried hair.
6. Now that your hair is dry and stretched, you can move on to flat ironing or pressing. At this stage you can apply a little more heat protection serum. You must always use a temperature controlled appliance for the straightening process. Stove heated pressing combs and irons are not recommended as the temperatures can get quite high and literally burn your hair!
7. Set your flat iron on a medium temperature, around 315°F or 157°C to begin with. Starting from the back, work in small sections clipping the rest of your hair out of the way and begin to flat iron your hair. Raise or lower the temperature of the appliance slightly as needed. Pass over each section just once preferably but twice at the most. Use the lowest temperature at which you are able to get good results. You want your hair to be straight but left with a bit of body and bounce.
8. You will find the ‘comb-chase method’ particularly useful for straightening natural hair leaving you with sleek straight hair from root to tip. What you do is take a small section of hair and run a fine tooth comb or brush down the section using one hand while ‘chasing’ with the flat iron held in the other hand. Be warned, this requires an ability to use both hands at once! Otherwise pick a straightener that comes with a comb or “teeth” already attached.
9. Straighten the rest of your hair in this manner then apply a small amount of an anti humectant* pomade to keep your hair from reverting before your next wash day. Good ones are Aveda Brilliant Anti-Humectant, John Freida Frizz Ease and Frizz No More Serum.
10. To get your hair super flat, wrap it around your head, essentially using your head as 1 big roller. Apply bobby pins* or clips where necessary to hold your hair in place. Cover your hair in cling wrap and sit under a hooded dryer* for 10-15 minutes. This technique is called silk wrapping. Alternatively, you can wrap your hair overnight in a silk scarf* which will achieve the same goal of reducing the volume of your hair.
That’s it! Your hair is now flowy and silky straight.
To protect the style at night, you can wrap your hair again or tie it into a loose ponytail or pin it up. Whichever method you choose, you must also and cover it with a satin scarf or bonnet. Be sure to moisturize your ends daily with a good moisturizer to keep them healthy until your next wash. Click the card above or the link in the description to learn how to use the LOC or LCO method to moistuirize your hair effectively.
So there you have it, getting your natural hair straight is not difficult at all and with these tips, you should be able to get a professional silk press at home!
Quick tip – If you like the extra sleek, that is “relaxer straight” look then all you have to do is add a bit of coconut oil* before or right after flat ironing. Coconut oil* is not a heat protectant* however so don’t treat it as one! Your hair will be less flowy with oil but will be much straighter and shinier. Remember, your final results have less to do with the temperature of the flat iron you use than your technique, styling tools and products. And this goes for even the kinkiest of hair textures!
Read more in-depth information on picking the right temperature to use for flat ironing.