‼️Back To School Must Have ‼️ Detailed 360 Lace Frontal Wig Install | Baby Hair| Ft. Nadula Hair
- Posted on 07 August, 2019
- 360 Lace Wig
- By Anonymous
●▬▬▬▬▬▬▬▬▬ ◆ Nadula Hair ◆▬▬▬▬▬▬▬▬●
With My Code “msnaturally", get $10 OFF!
I’m using top-selling body wave wig: https://bit.ly/2O4rOp6
90% of Girls choose these wigs: https://bit.ly/2Lw5Fhl
Get $$$ OFF on Nadula.com: https://bit.ly/2Yg1BI4
New-in Popular Transparent closure hair:https://bit.ly/32zXfeh
Back to school must-have:https://bit.ly/2XQ6AjB
12370 SOLD #bodywave hair bundles with closure:https://bit.ly/2Z3v4lO
Can $5 make a wig? Yesss!!!:https://bit.ly/2YdZ7Kk
Nadula Hair #BacktoSchool sale!
20% off for chic wigs with Code: WIG20
Over $89 Get 10% OFF with Code: BTS10
Over $169 Get 16% OFF with Code:BTS16
Hot selling Nadula Hair Bundles on Aliexpress: https://bit.ly/2SqPF0J
New Arrival Hot Sale Nadula Wig: https://bit.ly/2O4uNOn
Nadula Hair on Amazon: https://amzn.to/2rqyP57
#NadulaHair monthly giveaway: https://bit.ly/2GXgKqn
Nadula Instagram: https://bit.ly/2R9Xf2q
Outfit deets:
-Top: Shein
Skirt:http://bit.ly/2y8nvOQ
Use the coupon code : 15msnmary(15% off)
Shop SHEIN here : http://bit.ly/2y85FLY
Shoes: Steve Madden (Amazon)
Necklace deets: @blessedafriqueboutique❤️ Use Code: “Msnaturallymary” to save
http://www.omoladeenterprises.com/prod...
Other Wig videos:
⚠️The MOST NATURAL LOOKING WIG EVER ⚠️ Step By Step Tutorial: Coily Lace Frontal MUST SEE
https://www.youtube.com/watch?v=zKBUTF...
Long Natural Hair WITHOUT Waiting YEARS.. The Most Natural & Realistic Natural Hair Wig (type 4hair)
https://www.youtube.com/watch?v=vUkq50...
I'm Shook! No glue No tape! Most Realistic Wash n go on a Wig: Perfect for natural hair ( DETAILED)
Hubby RATES My WIG COLLECTION!! NO TAPE, NO GLUE Wig Try on Haul: Hergivenhairhttps://www.youtube.com/watch?v=AH98B...
Got me in my FEELINGS!! This is the MOST NATURAL WIG EVER!! https://www.youtube.com/watch?v=KA50b...
THIS DRAWSTRING PONYTAIL IS CRAZY AWESOME!! High Bun with a Drawstring Ponytail: HERGIVENHAIR-https://youtu.be/YrTci1bWZWM-
How to Put Short Hair into a Low Sleek Ponytail using a Drawstring Ponytailhttps://www.youtube.com/watch?v=EDhCg...
WATCH ME SLAY THIS WIG!! THE BEST FULL LACE WIG EVER!!! Detailed tutorial:SECRETS TO LAYING A WIGhttps://youtu.be/xMDEjuZgSAA
This CRAZY HOLD Lace Glue has my Edges SNATCHED! Start to Finish Detailed Natural Lace Wig Installhttps://www.youtube.com/watch?v=_UEsN...
WATCH ME SLAY THIS Full Lace WIG: Styles, Tips and Secrets Revealed (Wig Removal)https://www.youtube.com/watch?v=0fflo...
Low Ponytail Style worm to the Wedding Last Year:https://youtu.be/WBoB-LzTxH8
KINKY 4C Natural Hair FULL LACE UNIT:Wedding Inspired Hair for A Natural Bridehttps://www.youtube.com/watch?v=FKTVg...
KINKY 4C Natural HAIR full lace wig: TWIST OUT| WEDDING & PROM HAIRSTYLEhttps://www.youtube.com/watch?v=epORz...
WATCH ME SLAY THIS WIG!! THE BEST FULL LACE WIG EVER!!! Detailed tutorial:SECRETS TO LAYING A WIGhttps://www.youtube.com/watch?v=xMDEj...
The Most NATURAL Pre-Plucked FULL LACE WIG: How to LAY your Wig WITHOUT the Stocking Cap Method https://www.youtube.com/watch?v=wc6pa...
M U S I C Deets:
No CopyRight Sounds
Let's Stay Connected!
Instagram: http://instagram.com/msnaturallymary
Facebook: https://www.facebook.com/mary.taylor....
Twitter:https://twitter.com/MaryTaylor7
Tumblr: Msnaturallymary
Pinterest:http://www.pinterest.com/marynatural/
____________________________________________________________________➡️For business and partnership opportunities please contact [email protected]
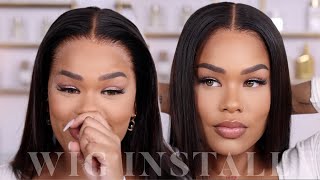
Hey y'all welcome back to my channel today I have a long luscious body wave unit that I'm gon na be showing you all how to install. It is a 360 lace unit. So you already know you have the capability. To put it up. There are two cones on the side, one in the middle and one at the bottom for added security. I also really like the color of the lace that it comes with. I feel like this one would be great for any skin tone, especially as a base, whether your dark, skin or lighter skin. The parting space is also really good. You get about 4 inches of parting space throughout so from ear to ear. You get about four inches of parting space and it doesn't seem that they cut down the parted space on the sides either. So that's really good. So this is what the pre plucked hairline looks like it's a really really good start. I only had to pluck minimally, but you really don't have to plug it all unless you're just desire to take the extra step, but they've pretty much done a lot of the work for you now I am going to go in and actually do the Sally Hansen Method - and you are, let me know, if you're interested in seeing another tinting method. This is used to conceal the knots and also tint the lace. Now I'm using it to tint the lace in this instance and also conceal the knots a little bit, because it seems that the unit has only been lightly bleached if bleached at all. So after going about this process, I just wiped away the excess using a makeup light, and this is what it looks like. I feel, like the parting looks so much more natural now and it blends much better with my skin tone. Let me know if you also want to see a bleaching, not video, I'm thinking about doing that soon, just to help those out who are interested. So the next step, I'm going to lay down the area on the sides, also the hairline using mousse. Now this is a new mousse that I'm trying it's my aussie and i really like their deep conditioner, and i saw this and i was like oh, i wonder how this would perform, so i spread that all over the hairline and my goal is to actually get The hair to mold into the direction that i want it to go. So it's a really good idea. Whenever styling your units to use a foam, styling mousse, this one does create a great deal of hold it's the instant freeze by aussie. Now what i did notice is that i did see some residue and that could have been a function of actual using the leg spray prior. So I'm gon na continue to play around with it and see if I like it more, but it did the job just for the time being. So after doing this, I'm quickly tweezing the hairline. I didn't do a whole lot to it because again they already had a really really good start. Now I'm taking out some baby hair and for this install I am doing more baby hair than I typically do, because I know there's some girls out there who really enjoy baby here this year. It did come with baby hair, but they were rather long. So I'm just using an eyebrow razor in order to trim them down and you can modify it. However, you desire, you can add thicker baby hair thinner, you can do them shorter, but this is about the lint that I like. I think I did go back and cut it a little bit more and then after I do this, I'm just drawing the area where I put the mousse, and this is gon na really help to set that area in place. You can also put a scarf over before actually doing this, but I just tried it the way that it was and you can decide to leave it as is or comb through it, and I just comb through it a bit so now, I'm adding mousse to the Other side, I want the hair in the front to kind of flow backward a bit, but you can't have it flowing straight down. It'S really just up to you and I'm using a comb to kind of guide the mousse in the hair in the direction. I want it to go after completing that process. I'M just going to briefly go in and tweeze the hairline in that area and then I'm gon na proceed to dry it and then I'm gon na trim the baby hair on that side, getting it down to the same length as the other and then I'm gon Na begin to work on using my edge brush to actually mold the baby here, as you want to probably notice, I like to complete the process in segments, so I usually start on the right side, then I work my way to the middle and then over to The left now we're working on the baby hair and I'm just using my baby hair brush after applying the blues and I'm just using my finger to press down on the area at the top of the baby hair and then I'm gon na use my comb to Sort of mold it into this little swirl, swivel type, look that most baby hair has, and you can decide to do this while on your hand or on a mannequin head, I'm doing it prior to the install, but sometimes it can be a bit tricky, especially because Of my hairline, so sometimes the placement is off, but if you're someone who has around normal hairline you're gon na be good regardless, so now we're gon na actually curl the hair. I wanted some really nice free-flowing curls, so I decided to use my curl one in order to do this, and this one is by Remington. Now I also work in segments with this process as well. I found that with hair that's wrong, especially 26 inches that I can't get it all around the barrel. So what I typically do is wrap a portion of the hair around the Pearl on first and then after getting that portion and it heats up and everything. I release it and then I wrap the next portion and I can see this process until I've gotten down the length of the hair and it looks really really beautiful. So I'm just going to let you all watch this process and then I'll come back on when it's time for the install every morning, I'll go peepee. Why are you crying? Why so many tears you belittle me, but not for you, look in the mirror and think this to something is perfect and pretty, as I never can live, you got ta believe, but you think my heart's, not there cuz it's been a while you keep telling me It'S better. Let me tell you something to me: why do you just go back to sleep? I know you love me. I love you all right guys. So now it's time to install the unit, so I'm just gon na place it on my head to make sure the placement and everything is where I desire it, and then I'm gon na use an adhesive in order to secure you're afraid of time. So these are the finished results guys I love. This unit is so so beautiful and I did not have to do a whole lot of work to it right now. I'M gon na spray the shine infusion on the hair, just to give it a bit more sheen and luster and make sure that it looks really really flawless and juicy. The natural luster of the hair was really great, but I just wanted to spray this on the hair, and this is a really good option for your straighter texture units. The scent isn't my favorite, but it is really lightweight, and I love that about it. So I'm gon na show you all my outfit and also how long this hair is. This is the longest hair that I've ever tried. 26 inches. I never thought I would try hair this long, but I really liked it guys. One of my followers recently asked me about here: that's 26 inches, so I said, let me try a unit that has here this long. Many girls love it hair. That'S touching your bum. This hair looks really really good, and it went very well with my outfit once again. This is what it looks like on the sides you kind of get a bit more of the curl and just how beautiful it looks and now we're gon na get into the outfit deeds. So the top, and also the skirt, is from she in and I'll link. Those in the description box, my shoes are from Zara. This will be a really really good, back-to-school, look or just hanging out with your girls or even a date night with BAE, I got the top in a size medium and the skirt is in a size large. I was surprised it fit me, but I hope that you all love this hair install as well as the outfit be sure to leave your comments and feedback check the description box for the link to the hair and also the outfit deets, and I will see you All in my next one bye, guys love y'all,


Comments
Monifa 360: Beautiful unit! Love the whole look
Bella Channell: Your versatility never ceases to amaze me! Beautiful as always!
Sunflower4ever: love the hair you're a great teacher, and you give great tutorial keep it up!
Peachy Gege: I love this. I would love to see another tinting method.
Theresa Forte: Beautiful! Curling it shortens it so it doesn’t look extremely long! You nailed it Mary again! The Sally Hansen method works for me! I think it’s quick, easy and fail proof.... There’s plenty of videos on the bleaching method so unless you can show a quick, easy & fail proof method then show away......
Pat Samuel: This is one of the best wigs u have reviewed looks so beautiful
Princess Toyia: I know Im late Mary and I usually never comment but I am a supporter, and this unit looks AMAZING on you. Its a must have❤❤
Rena Cyrus: You have slayed every hair style you've done
Tonya Smith: You Rock!!!! Beautiful as ever
Samantha X: I usually don't like baby hairs but they look good on this unit the length is nice the outfit is gorge
patrice moore: I love that unit. You are so pretty with any unit you wear
Tameka D: You and this hair looks bomb ❤️❤️
Jess Mark: Ooooh Mary this is GORGEOUS on you honey!!
Negretta Hughes: Love it
Sherees'h: Now Ms Mary, THIS IS PRETTY ❤❤
Natasha Waldorn: Lovely look
Carmin Cherry: Awwww I was hoping to see you secure the back!
jenny: I love this hair but I wanna see something else other than wig reviews
Keshia Chanel: I would really love for u to review the curly Laurasia wig from MyFirstWig!!
Nakeisha Keisha: That is really NICE!
Dee Chocolate: Pretty
Ajie Samba: Girl i think its time to show us yr wig collection and also do a wig give away...
Michelle Okere: What density is your wig?
MrCaptk7 .Taylor: It's beautiful on you baby..Love it..Mom
S. Crockett: NIIIIICE! YOU ARE GIVING ME MALAYSIA VIBES (FROM BASKETBALL WIVES)...✔✔ MY BIRTHDAY IS COMING UP ON THE 18TH AND MY TWIN AND I ARE GOING TO SAN DIEGO. I MAY JUST SPLURGE AND GET THIS UNIT! THAAAANKS MARY
Flourish 5 Blessing: Wow!
Jadie Wadie: Okay I got a Malaysian curl 360 lace everything is good except it’s wavy so when it’s dry it looks frizzy how do I stop that and another thing is that I never had a 360 so the lace is all around and I don’t know how to glue the sides down
angel lynn: she’s so pretty
Ms. Michelle Agalte: Well shucky shucky ni! You look like a sweet lil college girl. Perfect video for back to school.
Cynthia Cummings:
Jada S: Oh lala! Mary chill down a bit I’m broke lol