How To Install A 360 Lace Wig On Yourself! Everything You Need To Know Ft Superb Wigs Easy Tutorial
- Posted on 09 February, 2022
- 360 Lace Wig
- By Anonymous
➡️ Wig Coupon: Beige
➡️ Direct Wig Link:https://bit.ly/3ebHvoN
Colored Wig Link: https://bit.ly/2RAX6GG
360 Lace Wigs: https://bit.ly/2SuNMzx
Skin Melt Swiss Lace Wig: https://bit.ly/2lv0pix
Hair Information: ⬇️
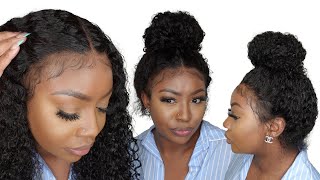
Wig Name: OLYMPIA PREPLUCKED HAIRLINE LOOSE WAVE HUMAN HAIR 360 LACE FRONT WIG
Cap construction: 360 lace frontal wig
Length: 20 inches
Hair density: 150%
Cap size: 22.5inch
Swiss Lace Wig: https://bit.ly/2lv0pix
Pre-made fake scalp 360 wig Link:https://bit.ly/2WtEFjL
360 lace wigs Link: https://bit.ly/2SuNMzx
13×6 lace front wig Link:https://bit.ly/2F4Gv3Z
Full lace wig Link:https://bit.ly/2HiBV5M
E-mail: [email protected] (Provide Wholesale)
Follow us know more about promotions and fashionable hairstyles:
Instagram:@superbwigs
Facebook: https://bit.ly/2Jc1OG9
YouTube: https://bit.ly/2Ce91Q3
Email: [email protected]
-----------------------------------------------------
Hey loves! ♥ Become a Beige-ian by SUBSCRIBING here ▼
https://www.youtube.com/user/Mahoghany...
NEW VIDEOS POSTED EVERY WEEK!
TURN ON POST NOTIFICATIONS
**I do not own the rights to any of the background music being played in this video. The background music is for entertainment purposes only. Here's the music playlist, check out the amazing Artists below ▼
1.) Music by Mr. Chase - Pendulum - https://thmatc.co/?l=FDC28E9B
Thanks for Watching!
Contact me: ▼
https://beigemedia.wixsite.com/beigeoj...
L E T S B E F R I E N D S: ▼
INSTAGRAM: BEIGE OJAI
TIKTOK: BEIGE OJAI
TWITTER: BEIGE OJAI
FACEBOOK: BEIGE OJAI
SNAPCHAT: BEIGE OJAI
BEIGE OJAI
P.O. BOX 520
LANHAM, MARYLAND 20703
#SuperbWigs#360laceWigInstall#360LaceWigTutorial
Hey guys welcome back to my channel. My name is beige. If you're new here welcome, don't forget to give this video a huge thumbs up and comment down below before you leave. Today'S video is going to be a tutorial on this wig that was sent to me from superb wigs. I will have all of their information the promo codes and direct links down below in the description box. The wig that i received is a 20 inch loose wave 360 wig. The wig comes with four combs, an adjustable strap and a removable elastic band. The 360 wigs from superb wigs now offer a new upgraded, clean hairline which have smaller knots and they look way more natural than your regular hairline. Here is an example of that. As you can see, the wigs from superb wigs now have a very natural looking density of the hairline and the knots are hand tied as opposed to the larger thicker knots that are not pre-plucked from the regular hairlines. Although the hairline is clean on this wig, the knots are not bleached. I will bleach the knots off camera using 20 volume developer and bw powder bleach bleaching. The knots on this wig is optional. If you choose not to bleach the knots of course, you will have less damage or shedding, and it will still look natural because the knots used to create this wig are a single hand, tie knot. So before bleaching, the knots i will be removing this adjustable strap from the back of the hairline just so that it can look as natural as possible using a seam ripper. I'M going to take my time and remove that threading from the adjustable strap. Removing the adjustable strap is a huge and very important part of making your 360 wigs look as natural as possible, because no one has an adjustable strap on their head. So that is a dead giveaway. That is a wig. You want to make sure that that is completely gone, so that the front hairline and the back hairline are identical and here's how the back of the wig looks after removing the middle portion of the adjustable strap. It is ideal to remove the entire adjustable strap, but i had difficulty removing the portion on the left and right side of the wig okay. So now that i am finished bleaching the knots of the entire 360 portion of the wig, it is now time to remove some of that extra density from the hairline. This is an optional step. You do not have to remove any extra density, but i do like to customize my wigs so that they look a little bit more natural once installed to get rid of some of that extra density. I'Ll be doing the beige method of zigzag, plucking and parting, because this is a 360 wig. You want to make sure that you do everything to the back that you are doing to the front. So after i am satisfied with the density of the hairline in the front i'll be switching the wig over to the back and removing some density from the back hairline as well. And here is our custom hairline after bleaching the knots and removing some of that extra density. It is flawless and doing the same exact thing to the back of the wig i'm going to take my time and do the beige method of zigzag, plucking and parting. Ideally, for a very natural looking nape area, you want to make sure that there is no adjustable strap showing through at all and that will help the wig look a lot more natural. I only remove the middle portion of the adjustable strap, but make sure you take the extra time to remove the entire thing, and i promise you your whole entire install will look completely natural there's no way for you to get this result with an adjustable strap being There moving on to tinting the lace. This is also an optional step to customize the color of the lace, i'll be spraying, the color of my foundation along the hairline of the wig and then the color of my scalp on the inner portion of the wig. Everything that i do to the front hairline of the wig i have to do to the back so that it can be a uniformed look. My favorite part is the baby hairs, i'm just going to grab my comb and map out where i want my baby hairs to be. Instead of doing a straight line of baby hairs, you notice that i am doing a zigzag so that it can look natural. I'M going to just you know, take out the amount you do not have to have baby hairs on your wig. Your baby hairs don't have to be as long as mine. Your baby hairs don't have to be as full as mine, but this is what i chose to do for this wig. So now that the baby hairs are out, i'm just going to grab an eyebrow razor and shave them down, cut them down to the length that i am going for using a small barreled, curling iron, i'm just going to curl the baby hairs under - and here are Our natural looking wispy baby hairs, i'm obsessed, hashtag obsessed down below in the comment section. If you are too, i love it. So now i'm just going to use my scissors and cut away that extra lace be very careful not to cut into the hairline and also be very careful not to cut off any hairs. So now you see me basically just taking small sections of hair detangling. It wetting it and then putting gel on it and then trying to define these waves a little bit more. I tried not to spray water directly onto the baby hairs, but it got on there anyway, and it just defeated the purpose of me. Taking all that time to make them look so pretty, because it was straight once i installed the wig, and i was just really disappointed in that. So i just suggest you do the baby hairs last or try to keep them out of the way, so that no water will touch them at all. So after applying water and gel to each section i'll be finishing it off by applying a perm rod to the ends. So now it's time to remove the extra lace from the front hairline grabbing a pair of scissors, i'm just going to cut away the extra lace not cutting into the hairline but right in front of it grabbing a hair glosser. I'M going to spray that on the hair and loosen the perm rods and then use my fingers to finger comb through the curls okay. So now it's time for install i'm going to grab some alcohol and clean off my forehead, then i'll be grabbing scalp protector from walker's tape and applying that to my scalp grabbing, wonder lace, bond from eben i'll be spraying that on the inner portion of the hairline Of the wig and then blow drying until it is tacky grabbing the wig, i'm just going to place it on my head and it's proper placement use my fingertips to get the lace to melt into my skin, and then i will be putting on my head scarf For about 15 minutes to allow it to set after allowing the front hairline to set it's now time to do those exact same things to the back hairline i'll, be prepping the hairline first using alcohol and scalp protector and then i'll be spraying. The under portion of the lace, as well as my hair, using that spray adhesive and then blow drying for a couple of seconds until it is tacky and then placing the lace over my hairline and pressing down, then putting on my headscarf to allow it to set. I did find that this wig was a little too small for my head, so i had issues and trouble stretching the back hairline over my natural hairline in the back. So i want to point out that it is important to measure your head before purchasing a 360 wig. You want to make sure that it fits over your entire hairline so that it can be a flawless install and the wig was a little bit too small. For my head, so you also if it is a little bit too small for your head, i do suggest shaving down your hairline in the back and also using glue so that there is no slipping or moving of the lace at all in the back. So those are my two suggestions here. Is the final look, thank you so much for watching. If you have any questions, don't forget to leave them down below. In the comment section, i will have all of the information, the promo codes and direct links to the wig worn in this video down below in the description box. I did have fun with some hairstyles using this wig, so i will show you guys all of the hairstyles that i came up with in a second. If this is your first time on, my channel, don't forget to give this video a huge thumbs up and comment down below as well as subscribe before you leave, and i can't wait to see you all in my next video bye, guys, yeah, that's right! It'S based on hey


Comments
Beige Ojai: **The Customized wig worn in this video is for sale, email if interested: [email protected]
Danni John: Oh goodness she’s beautiful you applied her sooooo welll whhhhattttt
Pamela Jackson: Beautiful
Deloris Gutierrez: Very beautiful queen ❤️❤️
Danni John: Heyyy bestie
Danni John: Ong first I’m acc crying