Customization & Application|Wondergirl Hair Aliexpress 360 Lace Frontal
- Posted on 07 February, 2018
- 360 Lace Wig
- By Anonymous
Hey babes! Todays video is how I customized and installed this 360 Lace frontal wig from Aliexpress Store Wondergirl!! I have a LONGGG way to go when it comes to customization!!! Be on the look out for my review coming soon!
***WATCH IN HD***
LINK TO THE HAIR: https://www.aliexpress.com/item/Wonder...
LINK TO THE STORE: https://wondergirlofficialstore.aliexp...
MUSIC:
Ozuna - La Modelo Ft Cardi B (REMAKE - INSTRUMENTAL - KARAOKE)
https://www.youtube.com/watch?v=sdKHn4...
Let’s Stay in Touch!
IG: @TheTiaraMakia
Twitter: @TheTiaraMakia
FOR ALL BUSINESS, SPONSORSHIP OR FEATURED PRODUCT INQUIRIES PLEASE CONTACT ME AT:
-~-~~-~~~-~~-~-
Please watch: "Becoming An Actress|Getting Headshots+Taking Classes"
https://www.youtube.com/watch?v=Pcr7HO...
-~-~~-~~~-~~-~-
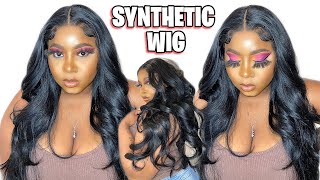
So this hair is from Wonder Girl on Aliexpress inside the Miller. It was in another little ziploc bag and inside the bag. The hair was in a box. It was really nice packaging kudos to them. For this and on the back of the box, it also has the care instructions, so I thought that was really nice. Also, then we open the box. The hair is in another little ziplock baggie and then a while I was in the bag. It was in a hairnet here. You can see that it is a 360 lace, frontal wig. It has, I think, about 4 comes to on the side, one in the front room in the back, and then you can see the middle where the tracks are. The hair is like sewn onto the middle Harris mix, so this is a 360, the lace frontal wig 150 density. I don't think it was that dense actually, but that's what they said: it's a pre plucked Brazilian straight lace, frontal wig and it's 22 inches and the vendor RL Express is wonder girl. So I am going to start by bleaching the nuts on my frontal here. I have my mixing bowl, I'm going to be used, this Clairol kalida, colors blue bleaching powder and I'm just going to put it into my mixing bowl. The developer I'm going to be using is sun care, 40 volume cream developer the consistency you want it to be. Like a pace kind of toothpaste, so if you put too much powder, add a little bit more likley. If you put too much liquid, add a little bit more powder, you just don't want the the mixture to seep through the lace and actually get on the other parts. The hair. You just want the knots to be bleached, and so here I'm taking my brush and I'm just dabbing it all along the hair ever so lightly, and I just do this all over basically the front. I don't do the back, because I really don't plan on wearing the wig up in a ponytail by just to the front where I would party or have it pulled back, and here is what it looks like so I'll. Leave that on for about 40 minutes - and I rinse it out in my sink first - I just rinse it out with like lukewarm water, and then I take some shampoo and I just washed it how I normally would wash my wigs um. I didn't have like any kind of like neutralizing shampoo. I just used a regular like Carol's, Daughter, shampoo, and then I conditioned it with a cream of nature, intuitive care or something like that. Conditioner. Okay, so I worked on this week over a series of a couple days, and so this in this clip the hair is completely dry. This is a different day and I am taking some foam mousse and I'm just about to start tweezing the hairline just to make it look a little bit more natural, I'm just using my tweezers parting, very thin layers, and I'm really not. This hair line was so weird, like you'll see at the end, even when I have it on it's, not like my hair line at all, but I don't know I just this this week gave me so many problems. I don't I don't know y'all y'all will see, but I did try to make it look a little bit more natural, so yeah next you'll see how, when I part the hair, it's completely clear. I should have got a better angle of this, but it just looks like scalp whenever it'll be on my scalp, and Here I am just cutting a couple inches off. I like to do this when I get new hair in just because it looks a little bit cleaner in these ends were a little scraggly, I'm not the best cutter, but I just like cuts. I'M often yeah. I like that, like that, so now for the application. I'M just taking some avocado oil. I braided my hair. You brought bit too cuz, it's not the best job, but taking that and rub that all over my scalp yeah and then this happened, and so I had to end up changing tops next, I'm taking rubbing alcohol on my hairline. So it can be completely clean and this tan stocking cap. This whole process took me so so long took my gut Sibley goo glued hair and I'm just tracing my hairline with a thin layer of that. Then I'm taking my blow dryer on coal, make sure you do it on cool, because if you do it on hot, the glue is never gon na dry and it's never gon na sit. Then I'm going to take some that got to be glued freezing spray and just go over that and do the same exact thing: cool setting on the blow dryer. Now this is the longest process of my life. I will probably never like to do this again unless I can have somebody do it for me once it dried, I just kind of like scoot it, some of it back. I know you guys saw that with the there's rat tail comb part and just push some of that back and then, where you see where some of it is lifted on the edge, I just apply a little bit more glue or a little bit more that got To be glued Jill to lay that down, and now I'm just going back with the blow dryer you'll, see later on how I have to modify the edges of this knits, how I laid it down with my hair line. Next, I'm just taking some NC 45. I think from Mac powder just to color on the cap, so it'll be natural and there you can see how good the knots were. Bleached against my skin. Now I'm just trimming off the back of the hair, the lace on the back of the frontal, and now I'm just lighting the wig on. So I can kind of see how the hair line lines up with the stocking cap that I like down and, as you can see, it's not really lining up. So I have to do some more work to it, but my hair line is so weird. I don't know, but the hair line on this frontal was even weirder, so yeah here is where I modify it. I cut back where my edges are really low and I just cut that part of the cap off. So I could just have my real edges out right there and now I'm just trimming off the rest of the lace and the front of the wig and try and get on so we're making a little bit of progress and I'm just making sure that it's gon Na lay how I need it to, and I also cut right there on the sides where my ear is I'll, just cut off that extra layer of lace and hair so the little a flat now to secure the wig, I'm just taking some more a thin layer. I'Ve got to be glued and I'm only putting it across the areas where the stocking cap meets my skin, so not on the areas where my edges are because I'm going to leave that part of my edges out, but just thin layers on the other parts. Take my my blow dryer on a cool setting and set that then I do the same thing that I did the last time with the freezing spray and I put the blow dry to it. Let that get a little tacky your arm. So you know this is such a long process now, I'm just easing it up to where I want it to be, and I'm just going to place it ever so gently. You don't want to just let go and press it down because think you're going to mesh the glue through and it's going to like get all over the hair. So I'm taking this thin rat tail comb and I'm just kind of pressing in between the hair. So it can just lay flat, but not the lace can stick, but not the hair. Danah just take the bull dryer and make sure that it's laying down pretty good again on a cool setting lots of blow-drying. Here you can see I'm running my fingers through it and the wick is secure. It'S not moving. Now for some customization a little bit more, I'm just parting, a thin layer to make some baby hairs. I don't cut any baby hairs. I just kind of like parted them out and got some eco styler gel. I wedid it a little bit some water and then that's it that gel I'm just gon na take my toothbrush. I like mine, to be pretty thin because when you're doing too thick, they just look so unnatural least when they're thinner and they look a little bit more natural and let's just take my toothbrush and then I also do it on the part where my actual edges Are out to make it blend my actual edges with the the wig? I take a little bit of the wig where it meets the my edges that are out, and I just do the same thing like lay it over it. So I can all look natural next, I'm taking something. That'S got to be glued. I practice with the ecostyler gel first because they got to be glued once it's there. It'S there, but it's going to be secure. The edges will stay like this for a couple days. What this got to be glued, so I want to make sure I got them right first and I just complete the whole process on the other side and yeah. This is basically how it looks. I think here I did a middle part in the rest of my video. I move it over to a side part, I'm just taking this biosilk soap therapy and I'm pinning it was literally like maybe a nickel sized amount all over my hair, just as a heat protectant, because I'm going to run the flat iron over the top and through The hair get that sleek and yeah. This is like the final look. I'M gon na go and put some makeup on, so you can kind of see how everything comes together, but this is how I apply my lace: frontal wigs. I hope you guys enjoyed this video. I hope it helped you in some way, and I hope, if you try to do this, you will have a lot easier time than I did thanks for watching my love's bye
Comments
Jelisa Sharde: Great job Makia!! I have been thinking about doing one of these videos but they seem so difficult to do.
Victorious Cruz: Beautiful!! Could you do a tutorial on makeup.. your makeup is flawless❤️✨❤️
Aaliyah Marshall: Girl this looks so good!
Esther Kumuyi: Hey. How's the hair now?
Tashawna Lyle: How was the hair overall?
Melissa Aireauna: How are you liking the wig?
Sierra Gillispie: you sound southern lol , where you from ?