360 Lace Frontal Wig Install For Beginners! Front & Back In Detail Hjweavebeauty Giveaway
- Posted on 02 August, 2018
- 360 Lace Wig
- By Anonymous
Hair in the video is 360 Lace Wig Straight 22 inches
The Hair Link http://bit.ly/2LFjuL5
Aliexpress Store http://bit.ly/2mVewea
Website https://www.hjweavebeautyhair.com
Coupon: Brean10 ($10 off on order $150)
The coupon is valid for 3 days from the day video uploaded (Only on our official website) Contact HJ WEAVE BEAUTY
Email [email protected]
Whatsapp/Tel: 0086 18588709918
Follow @hjweavebeauty on Youtube/Facebook/instagram/Twitter for more sharing Facebook https://www.facebook.com/hjweavebeauty...
Instagram https://www.instagram.com/hjweavebeaut...
Twitter https://twitter.com/HJweavebeauty
HJWeaveBeauty Giveaway Rules!
1.Subscribe @HJ Weave Beauty YouTube Channel HJ Weave Beauty Channel: https://goo.gl/nYnFaz
2.Click link to fill out the questionnaire and fill in the Email, then submit.
Link: http://bit.ly/2LK4CuY
HJWeaveBeauty Giveaway Prize!
Prize 1: 360 lace wig straight 18inch for one lucky girl.
Prize 2: $20 Coupons for one lucky girl ($20 off on any order amount)
The results will be announced one week later and will also be notified by email.
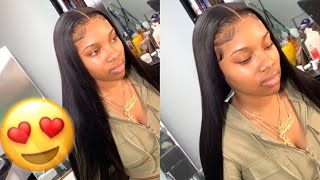
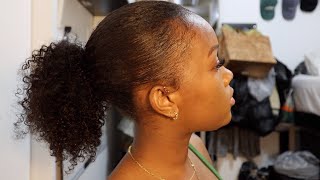
Hey everybody: this is breanna rutter and in this hair tutorial i am going to teach you how to do a 360 lace front, wig installation step-by-step for beginners. I will be giving away a 360 lace front, wig so make sure to watch this entire video to get the details. If you want to win free hair, the hair I am wearing is from HJ weave beauty from HK. We beauty hair, calm, I'm wearing their 360 lace, frontal human hair wig with pre plucked natural hairline, Brazilian straight remy, texture with 150 density, so continue to watch. So I can show you how to pull off this look now. You actually don't need a lot of products and to install my wig, I will not be using glue. I will be using hair gel, so this is how their hair or package look when I receive it, and this is how their hair looks fresh out the box. So right now I'm just smoothing the hair so that you can see how it looks through the lace and, as you can tell, this is a very full week. This is 150 percent density. Now I'm tucking the wig in with so you can see the inside of the wig and it has four combs on this wig. So that way, your wig can stay put whether you want to glue it or you don't want to glue it and, as you can see, the middle is stitched back, because this is only a 360 week. So those are the four Clips one right at the top and then there's two on the side and then there's one at the very back. So the middle is already stitched down with weft and all around its lace. So you can part it about 4 inches in front in about 2 inches in back now we're putting the wig on a mannequin head so that you can see how it looks as if it was on my head. So I'm showing you on American head how the actual wig looks and, as you can tell there's a little bit of baby hairs and back that's sticking out. So now, I'm going to use T pins to put the weight down onto my dome head. Make sure that your dome head is the exact circumference of your head. There'S some conferences, the difference, your head, 23 inches. So my zone head is 23 inches, so I pin them down with wig pins so that the wig doesn't move and now I'm spraying in the front. So, like I said, this wig is pre plucked already, as you can tell it's a little bit thinner at the very very front, but to make this look even more realistic, it's very important that you pluck your wig so that it can mimic your natural hairline. Now, if you want your wig to look exactly like your hairline, it will take you a little bit longer of time to take your time to go through your wig and pluck the hairs. So what I'm doing is I'm showing you a demonstration of how I plugged my wigs now it's very important that when you're plucking your wig, your lines of hair is very thin so that you do not cause holes in your lace. This lace is very thin in high quality. Also, this lace has been pre bleached. So that way it can look as natural as possible when you put your wig on now when you're pulling your hairs, make sure you're combing all throughout the front of the lace. I did not pluck going all the way back because, like I said it's about 4 to 5 inches of lace in front, so you're not gon na be able to go all the way far back to pluck. This is a 360 wig. So that way, you can wear it in a ponytail, so, as you can see, I'm just working my way through and I'm plucking the hairs in a very unnatural pattern. So that way there are no distinct lines. The one thing that is a dead giveaway for wigs is having very distinct lines of where the hair was plucked. So, in order to prevent that, you want to take very small sections and pluck them out as you so desire now that I've done plucking, my wig, I'm now going to use an edge brush and I'm gon na smooth ecostyler into the hairline of the week. Now the hair is already wet because I already sprayed the hair as I pluck the hairline. So this helps me to have a very flat and beautiful finish and, as you can see, this hairline looks gorgeous now, I'm just using a regular scarf a regular satin scarf and I'm just tying down the hairline until it dries now that it's dried. At this point, I'm gon na go ahead and put a little bit of heat protectant on the hair. Now keep in mind. This is real Brazilian straight remy hair. So you want to make sure that you're putting heat protectant on the hair to keep the hair lasting for a very long time. Now. Some of you don't like to put heat protectant on straight hair because you think that you don't necessarily have to, but you definitely should, if you want to make sure that your wig actually lacks. Now that I'm done cutting the lace off. I'M now going to show you how my braid pattern looks right before I put the wig on my head. As you can see, I just got some regular degler sham regular straight back cornrows, because you just want to make sure that your hair is very flat when you're actually wearing your wig for your most natural look. This is how it looks now that I've removed the lace and I'm zooming in extremely close, so you, ladies, can see how it looks the way that I like to wear my wigs. Is I like to cut my lace very regularly so, as you can see, I have so many dips and turns in my legs and that's because it makes it look very realistic to me now if you choose to cut yours in a straight line. That'S your preference! If you like that look, but I noticed that if you make the cuts in your lace very irregular, it makes your life literally undetectable. Now we're gon na go ahead and I'm gon na put it straight on my head. I'M not doing anything special, I'm just aligning it in front and I'm making sure to pull the wig all the way around my head that you can see exactly how it looks so. At this point, I've only done a few things. I'Ve plucked the hairline, and I also washed and shampoo the hair. I have done nothing else to this hair. This is how beautiful and gorgeous it looks now that I'm putting it on to see how much of a fit I have I'm noticing that I have some overhang of lace over my ears, so I'm just pulling it down to see exactly where I would put it And I'm demonstrating to you the area where I'm going to cut off a little bit of lace so now with the wig, I'm gon na go ahead and I'm going to clip the back clips together. So that way I have a tighter fit. So if you want to because Sony lasted into the way, but it already has its own band, so I'm just showing you that all I'm doing is I'm sliding it to the very back of my head. I want to make sure that this tutorial is as detailed as possible, and I will definitely be showing you how you want to install and flatten the back of your weight as well, but for now I'm just putting it on my head and sliding the clips into Place so I can see if I like this fit in. Ladies, this is how beautiful and natural the wig looks before I have put any gel down or anything to show you the finished results. Now at this point, I'm gon na go ahead and I'm going to remove that excess lace. Now, one trick to making sure you do not cut any bald patches in your legs is to make sure you're cutting it. The way that you see me doing here, you want to slide the scissors against the lace is cut it so that you don't put off any hairs that were not meant to be removed and, as you can see, I barely removed any lace. Now I'm pulling down where the actual sideburn area is so I can see if it's exactly where I want it to be before I move on to the other side. So, as you can tell I'm sliding my scissors against the lights first before I actually make snips. So that way, I don't necessarily cut any hair that doesn't to be cut and look just a very, very small amount of lace to remove. So that way it has a perfect fit around my ears. So, as you can see, this is how much of a fit it looks and for your best wigs, you always want to do a little bit of customization, even if the wig is pre pluck now I did not have to actually pluck the hair line, but, as You can see it made. It look even more realistic to me. So if you liked this video so far be sure to give me a thumbs up and also, if you've made it to this point, what I want you to do is write me. A very creative comment down below using emojis only to make a sandwich, so the taste is our most creative. Looking emoji sandwiches will get that comment hearted by me, and I will comment back so now that the front of the wig is already gelled down. I'M now going to gel down the back of my 360 wig. So, as you can see, I already cut the excess lace and now, at this point I'm applying a layer of hair gel. So that way I can stick down my wig. I am using hair gel, not hair glue, but the name of this hair gel is called, got to be glue. So if you want to know and see links to where I got this hair gel from links are always provided in the video description now, I'm spraying got to be glue. Hair spray. On top of my got to be glue, hair gel. So that way, it can help the application to be very sturdy and strong, make sure that you blow dry until it's tacky. Now, once it's tacky, that's the perfect time to stick down the back of your wig to the back of your head. You want to make sure that it's tacky, so that way your way can actually stick as you're molding it down. Please do not skip this step. This will make or break the look of your installation, so after holding it for a little bit to make sure that the lace actually gets submerged with the glue. I'M now going to use my hands and dryer so further. Stick it down to the back of my head. So that way this week goes nowhere with this installation technique. This should last you at least a week. For me, it lasts anywhere from about three to five days before I have to reapply it again, because I work out this last room for a very, very long time so be sure to get the hairspray and the hair gel to achieve this installation technique. Now, once it's fully blow-dried, I'm then going to grab my comb and I'm going to comb through the hairs. That'S cut to the back of my neck. So now, after combing, through those hairs, you can see it looks a lot more natural and you can also tell that there's a white cast at the back of my neck and it's very easy to remove that. I sprayed one of my caps with water. So that way, I can rub the hair gel firm at the base of my necks and, as you can see, this is how it looks right after I did that and with this installation technique. It should last you anywhere from three days to a week before you have to reapply any hair gel to achieve this look, so I hope you have enjoyed how to actually install it. If you have any questions about anything, I've shown you be sure to comment down below in the description box. Now, once again, I'm moving my hair around to show you a 360 look of how this 360 wig looks. After installing it, and now I'm gon na go ahead and get ready to style my hair. So, in order to show you how this hair looks with a little bit of versatility, I'm just gon na have a half up half down look for this style, so I'm using an elastic band to put the top of my hair into a ponytail. Then I'm gon na grab the tail end of the section of my holy tail and I'm just going to wrap it around itself, as I use another elastic band to actually create a messy high buck. So, as you can see, this is how the wig looks and with my 360 wig installation and of course you can choose to style your hair. However, you like, I just wanted to do a half up, half down, look so that you can see how natural this style looks now for my second style, I'm just applying a light application of hairspray. So that way, I can go ahead and add some crust to my hair and I'm calming the product through with a wide tooth comb. The type of kerlix that I like to use, our Marcel curling irons and this specific curling iron is one-inch. So if you want access to this be sure to check the links in the description box now, I'm just wrapping my hair around the curling as well to have a slightly different look at the very top of my head, making sure it's a curl in different directions. So while my curls are still warm, I ran my fingers through them so that the curls can be soft and elongated for a very beautiful style and oh by the way xjy beauty is hosting this giveaway. There are two rules to their giveaway. The first rule is, you have to subscribe to their YouTube channel. The links to their channel is, in my video description in rule number two. You have to fill out their questionnaire. The link is also in my video description winner number one who winning three sixty lace. Wig straight hair and eighteen inches in winner number two will win a $ 20 off coupon to get $ 20 off their HJ. We beauty hair order when they announce the winner. I will also post the winner on my Instagram as well so make sure you're following me on instagram at breanna rutter. Thank you so much for watching my 360 wig installation be sure to subscribe and click the bell for notifications, because I got some amazing videos that I'm gon na be dropping neck. Bye-Bye


Comments
AllthingsRica: Yasss breanna is my boo. Love her and this tutorial was very detailed. The wig itself is very beautiful, I’m just wondering how it holds color? . #Ruttergang
Elizabeth Smith: Love it
LyfeWithT: Hopefully I win cause a 360 wig is bomb
HJ Weave Beauty: Congratulations to the two lucky winners for HJ Weave Beauty prizes after random selection. First prize (360 lace wig straight 18inch): Her YouTube @Jolecia Edwards https://www.youtube.com/user/Chick21Hot Second prize($20 Coupon): Her YouTube @Shaina Dowdy https://www.youtube.com/channel/UCP8J... Congratulations! Thank you for your participation. Follow HJ Weave Beauty to get monthly giveaway activity infomation!
Homsi Nad: Omggg so BEAUTIFUL...please will be so happy to win the giveaway opportunity
amour_ love: BEAUTIFUL
mk_ Coach_: Woooowwww breanna u are making me pray to win the goveaway badly