360 Degree Lace Frontal Wig Install + No Baby Hairs + South African Youtuber
- Posted on 01 June, 2020
- 360 Lace Wig
- By Anonymous
Hey there my loves welcome back to my channel for another awesome video where I install a 360 degree lace wig for the VERY FIRST TIME and nail it!! Enjoy the video and comment down below if you have any questions for me!!
Previous videos
HOW TO FIX OVER BLEACHED KNOTS ON A LACE WIG| STEP BY STEP PROCEDURE
TWO STRAND TWIST ON MY 2 YEAR OLD SON
REALISTIC TODDLERS BOYS HAIR CARE
HAIR FEATURED IN THIS VIDEO:
instagram.com/KyeWhair.co
Music in video:
I do not own the rights to the music featured in this video.
Music credits below
DEAF KEV - Invincible [NCS Release]
▽ Connect with NCS
Twitch http://twitch.tv/nocopyrightsounds
Spotify http://spoti.fi/NCS
SoundCloud http://soundcloud.com/nocopyrightsound...
Facebook http://facebook.com/NoCopyrightSounds
Twitter http://twitter.com/NCSounds
Google+ http://google.com/+nocopyrightsounds
Instagram http://instagram.com/nocopyrightsounds...
▽ Follow DEAF KEV
SoundCloud https://soundcloud.com/atm-dubstep
Facebook https://www.facebook.com/ATMDubstep
YouTube https://www.youtube.com/user/ATMDubste...
Jimmysquare - Just One Last Dream, Please
★ Follow Jimmysquare
SoundCloud - https://soundcloud.com/jimmysquare
► Music by: LAKEY INSPIRED
● Track Name: "Golden Hour"
● SUBSCRIBE to the LAKEY INSPIRED YouTube channel HERE - https://www.youtube.com/channel/UCOmy...
● Follow LAKEY INSPIRED on SoundCloud HERE - https://soundcloud.com/lakeyinspired
● Follow LAKEY INSPIRED on Instagram HERE - https://www.instagram.com/lakeyinspire...
● Follow LAKEY INSPIRED on Spotify HERE - https://open.spotify.com/artist/3zDGj...
►The Background Image Is From: https://unsplash.com.
● Unsplash commercial use license: https://unsplash.com/license
CONNECT WITH ME!
-----------------------------------------------
INSTAGRAM: https://www.instagram.com/thatgirls_an...
FACEBOOK: https://www.facebook.com/ThatGirlsAnni...
EMAIL FOR BUSINESS INQUIRIES: [email protected]
-----------------------------------------------
FAQ*
* HOW OLD ARE YOU? 26 Years young! My birthday is on the 21st of September!
*WHAT'S YOUR SIGN? I am a proud Virgo!
* WHERE DO YOU LIVE? South Africa!
* WHERE DO YOU GET YOUR MUSIC? The Vlog Star app!
* WHAT DO YOU EDIT YOUR VIDEOS WITH? Vlog Star and Video Show!
* WHAT DO YOU USE TO EDIT CHANNEL ART AND THUMBNAILS? I use Picsart!
* IS YOUTUBE YOUR FULL TIME JOB? I would love for it to be, i do have other sources of income!
* WHAT RELIGION ARE YOU? I am a Christian and Proud!
ABOUT ANNIE:
I would like to extend you a warm welcome to my channel where i share my best self care tips, hair care tips, healthcare tips and many more!! including story times that will hopefully bring some laughter and smiles to my viewers! i am not an expert, just a mom of 1 who absolutely loves taking care of herself! i would absolutely appreciate it if you would subscribe and come along on this Youtube journey with me!
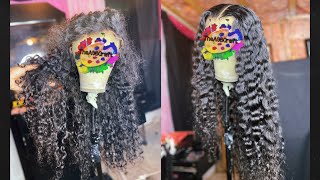
Hi my love's welcome back to my channel today. I will be installing this 360 degrees wavy wig bike here we're here. This wig is absolutely gorgeous. I am in love with it. It has to come attachments in the front and one comb attachments at the back. As you will see, and then it has adjustable straps at the back and yeah guys, basically I'm just showing you guys the little straps and initially I thought I was going to use the trap that the straps to make the hair fit on tighter. And then I decided otherwise later on in the video first things. First, ladies, we need that younger wig cap, okay, to protect our hair, not that I have much since I cut my hair, but I'm just gon na place the wig on my head and ensure that it is tight enough and it really is - and I'm just checking Where at the space is for my ears, guys cuz, this is a 360 degree days wig and then just ensuring and adjusting it to ensure that, as you can see, I love this way because it has like a widow below speak. I have a widow's peak you, so I'm happy to see that the hairline is adjusted to my liking and I'm just changing the back as well just to ensure that it's tight enough but, like I said I in trouble not using the adjustable straps anyways, and so I defend myself from loving the hair solving and then obviously I'm going in. I was gon na cut it first, but actually I want to mark the center of my forehead, the beginning of the widow's peak and in my what is it called I'll, probably write it down in the comment section but my size, my size, because when I do Place the glue I wanted to be in those exact same places, just more and more, you know fitted install Here. I am yo. I couldn't find my scissors yeah. They are and I'm just gon na go ahead and cut the lace of the wig. As you can see, I cut the front and I left the back and I actually should cut it all, but you know what this is my first time doing a 360 degree install. I just wanted to make sure I was super super careful and here I'm just ensuring that I am placing the wig, which should be an whoa. Listen guys, look at that. I haven't even placed any glue yet honey, the the knots are bleached and if you guys want to see how I Beach my knots, I'm gon na link down that video below I'm just making sure that the ears are are fitting correctly guys. You do not want your way to be uncomfortable, especially another 360 degree. You guys are gon na see it's gon na it's gon na. Take me like three tries to cut the lace around the ears so that it fits as comfortably as possible. This is actually my second time trying to ensure like it is done correctly like this is a luxury wig, so I'm gon na be using it again, so I'm gon na. I need to make sure that the wig is cut in a manner that really fits comfortably. Yeah and okay - I guess third time's, the charm yo third time's, the charm guys. This is my first time doing this and so far so good and yeah. Now I have customized a to my liking and it's fitting right just making sure that my my wig is in the center and everything is where the hell. It should be. Now that we are satisfied with the positioning of our wig, we're gon na go ahead and start the gluing process and that's to be y'all better. Sponsor me, I'm using all your damn products, I'm going to do first with the guts to be blue in the black, because it is actually I'm looking for my rat tail comb right here. The got the black got to be dude is clear. Okay, it dries clear. So does the yellow, but you know what officer you have to like: literally try it for a while to get it like that or use a minimal amount. So, first of all I go in with the black got to be dude and I'm just taking a little small amount and then I'm going in with my q-tip guys. Can you see I'm removing the drawing that I made with my eyebrow pencil? You don't want that. Obviously so, wherever I place the glue, I'm basically connecting the dots guys if y'all ever had those books, those coloring in books where you make than the one two one three and you connect the dots and your color in this is exactly what I'm doing so, I'm Placing the clue way I originally had marked - and Here I am blow-drying it until it gets semi dry up this year about 75 % dry and then I'm gon na go in with the yellow gots to be smooth, or I think I actually went in with a Freeze spray for the front of my head, because honesty is not really a problem area for me, so I'm not gon na really go in. Oh actually, you won't. He do it. I actually quit with a little bit guys. A little bit goes a long way of the yellow gods to be nude and then we're gon na do the same. You'Re gon na try it for a couple of minutes and then we're gon na go in with the free spray dry that for about 15 seconds and then you're gon na start placing the glue the wig down. So I realized that my natural hair was no unruly on the side. So I went in with a black gots to be blue, just to really push the hair back so that it really lays as flat as possible underneath my cap, because if you guys are avid leg wearers like I am, you are aware that the ear tabs are The most difficult to glue down because they tend to lift, so you want to make sure that this absolutely nothing in your way. I'Ve got sideburns and I have very unruly type 40 baby hairs, so I have to always make sure that they are controlled out of the way. At this point, the glue that I placed on my head, which is the free spray, is semi dry. I'M going to go ahead and place down my wig just ensuring that I get none of the baby hair stuck in that glue. It'S a mess, just be careful carefully place it down. I'M using all my damn fingers, they're all the things that I can use, I'm going to use it. So what I do is hold it down. First, and and just let it sit like that for a while, and then I use my fingers make sure to not tight touch the glue itself, because it becomes really sticky, and it's really just not neat. Now I'm gon na go in with my rat tail comb and my hair drying and then I'm just pressing down on the lace, and you can see guys I'm removing some of the pieces of that hair. The the baby hairs in the front that got stuck in the glue a bear. You don't want that in the glue it just doesn't look seamless and then I'm just using my rat tail comb pressing down as I go, removing any hairs, I've gotten stuck and yeah. It'S just a repetitive process from this moment forward. Now I'm going back and with a little bit of Goss to be glued and gluing down the little pieces in the front that didn't completely glue down all the way and then pressing it down with my hairdryer to ensure that it dries in place. And now we are going to attack the demon, that is the ear tabs, guys, listen, I'm just marking where to put the glue, because I just don't want to go outside the line, and then this just means more cleaning up to do and over here guys I Go in with a little bit more gel got to be gel. Okay, what the white chili don't go as hard, but when I put in that the yellow the other one yo I went in that you can see it's white white that I went all the way in with that gel just to ensure that when it lays it Lays I've already sprayed the free spray over here guys, I'm just fast-forwarding, but I did the three steps, the first second and third application, and then you guys see I'm going into my rat tail comb same damn process. But when I do on one side, I'm going to do on the other side, and now I'm going in with my scarf to just tie down the area that I've glued just to ensure that it dries down properly. So now I'm back and I'm doing the back of my ears, okay, guys what the back of the ears! Let me tell you the mistake that I did so that you guys don't make the same mistake. You don't need! All of that. You don't need all of the glue that we use in the front and we're going to use at the back. You don't need it at all, simply go and with the gods to be glued extreme free spray, and that is enough to hold the area behind the ears. It'Ll save you a lot of time, paying an energy guys but anyways. I did this tutorial so that I can give you guys the best tips and give you some advice on mistakes that I made so that you don't make them too so yeah, I'm gon na. Let you watch what I did over here, but honestly. I think, for the other ear, I just use the free spray, because I just realized I yo it's the same. I don't really need that much of a hold when you really pulling your hair up to put it up in a bun or whatever. The point of tension is the front and the back. It'S not really the side and besides, when your ear is in its this natural position, you really honestly cannot see that, ladies at the back of those years and then somebody's gon na be whispering in your damn ear, like the yang Yang Twins, okay guys. So now I have to do both sides, and now I am going to go and with my scarf and I'm going to tie down my hair once again just to ensure that it dries down perfectly, I'm just making sure that it's good to down completely over there. Hey guys, we are back now and we are at the back. Okay, we are back and we're at the back. I went in as you can see. With my eyebrow pencil, I came to March the back for my little sister because I actually needed her help with the bag like. I cannot see the back of my head: I'm not some creature from men in black okay, some alien, so she's gon na cut the lace at the back for me and then she's gon na glue down where I made the markings and then I'm gon na help. Her to hold down the hair while it dry so yeah, that's basically what you're gon na do in the back. I did go ahead and we went in with the black got to beat out the yellow card 2d gel and the extreme free spray for the optimum cold. Okay, because I explained to you guys the point of tension when you try to manipulate the hair as the front and the back so make sure that it is glued down yo. You don't want to be embarrassed in this video, okay, guys once she's carefully placed down the glue, I'm just turning around to show you guys she's, blow-drying and I'm holding down the lazy. Oh teamwork makes the dream work and guys. The back is gon na be a little messier than the front, but that's okay. It'S blue its soluble. Okay. I just need a little face, cloth or a little ear buds or some water to clean that up. Just like heating up the French getting enough bad and now that she's done, I'm gon na go in with two Dems: Co Co, because I was not trying to be cuz. I'M gon na sleep with this, like it was literally at five o'clock. The Sun is going down. I was tired. It took me a whole three hours to do this, for you guys so that you guys can spend less time than that so yeah. Now I'm done I'm finished and I'm done I'm going to bed and we are bad guys. I'M just gon na take off my scarf guys and then I am going to show you the parameter of my head honestly. I think it came out pretty amazing, pretty good and I haven't even styled it yet don't forget to leave something Evod at the back guys. It makes it look a little bit more natural, I'm going in with my spray bottle. It has a mixture of water and conditioner in it guys and I'm gon na go ahead and brush out any tangles I might have formulated and then I'm going to be my perfect touch curling and then we're just gon na scrunch that to the file the curls. Oh I'm in love, I'm in love. So what is 360 lace wig if you're not gon na, wear it in a bun? You might as well just view the front right. So I'm going for a messy one. I'M gon na have a lot a lot of little strands, sneaking out guys. It'S gon na look, absolutely beautiful. So right now, I'm just removing the strands just to see what type of style I want it to be in um yeah, I'm just gon na get. You guys watch what I do and then I'll comment comments a way. I feel that by a two okay guys, so I'm gon na go ahead and tie the front section just to get it out of out of the way. Now that I've got the hair. Looking the way that I wanted to look in the front and then when I do the back, I'm just going to join the two sections together and because I was too scared to disturb the back like that. I'M just gon na go ahead and stand up and flip my head over and making sure me moving my little give outs out, and you know my spray bottle spring water and then adding that mousse there and, as you can see guys, I can pretty much get The hair today as sad as I want to, but I wanted to look a little messy, so yeah, I'm just now joining the front and the back. I did take the leave-in that I took out back into the pony, but you know what I'm just gon na pull them out and it's not going to create a big train smash. So yeah and you can y'all, can see my little goobers a little upset over there. He wanted some cartoons. Do you know when you're certain that you put something somewhere and you literally cannot find it anymore? And you know it's in the exact parameter when you're sitting? That'S me right now, looking for this, damn freaking clip so now that my bun is clipped. What I'm gon na do is just release some strands just to give it a messy look, make it look a little bit more natural and then I'm taking back the little pieces that I had previously taken out in the beginning, and now that I've got all my Pieces out and I'm happy, I am going to use some moose on them just to try and tame them and release that little natural wave that the hair has to it. And now I'm just gon na go in with my guards to dude in the black and the color black and I'm going to lay down my sideburns and that's pretty much it guys if you guys enjoyed this video, please be sure to LIKE comment and subscribe to My channel share this video if you care and don't forget to click on the notification bow so that you're notified when I post a brand new video hi. My love's thank you for watching this video be sure to like comment and subscribe and click on the notification bar so be sure notified. When I post a brand new video


Comments
Thatgirls_Annie: Happy Sunday you All! Wonderful week to everyone who is watching this video!! Just a reminder to kindly like , comment and subscribe to my channel! And click on the notification bell to be notified of new videos! All of this is completely free and will help me on my YouTube journey! Thank you so much for the support and I appreciate you all!❤️