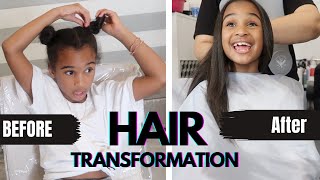
Diy Small Knotless Braids For Beginners With Easy Crochet Method & Parting Tips!
- Posted on 14 March, 2022
- 360 Lace Wig
- By Anonymous
Hey loves I used this mirror to help me part and it changed the game for me! In this video I share with you how this mirror helps to part and how to easily install smaller knotless braids as a beginner or newbie.
MIRROR FOR PARTING:
MIRROR FOR PARTING WITH LIGHTS:
HAIR USED:
30 Inch Braiding Hair Pre-Stretched ( 30” 8PCS, 99J
from amazon: https://amzn.to/3CFGYH0
(I used like 3 packs. Lots of hair was left over from this bundle)
PRODUCTS USED:
Blow Dryer Brush: https://silkoutsystem.com/collections/...
(Be sure to use my coupon code " NOLAV10" for 10% off! )
Silkout System Heat Protectant: https://silkoutsystem.com/collections/...
(Be sure to use my coupon code " NOLAV10" for 10% off! )
Sulfur 8 for dandruff: https://amzn.to/3DzruE1
Just for me grip glaze: https://amzn.to/3zZOBXf
Hair gel and foam( black owned) on amazon: https://amzn.to/3xUYbZz
Gummy gel: https://amzn.to/3mMKd8m
Edge brush: https://amzn.to/3jfd6cR
Full list here: https://www.amazon.com/shop/nolaviva?l...
00:00 Intro
00:12 Setup and products used
00:48 Prepping my hair (blow dry)
01:30 Parting
07:09 Close Up Install
09:46 Crimp/wavy ends
10:48 3 week later final results
If you have any other questions let me know! I hope this was helpful for my fellow beginners! Please give this video a thumbs up if it was. Thanks for watching.
***Follow Me On Social Media***:
Instagram:
https://www.instagram.com/nolaviva/
Amazon Live:
Tiktok:
https://www.tiktok.com/@nolavamazonfin...
***My Website***:
FTC: This video is not sponsored. Links are affiliate links.
Business Inquiries:
Thanks For Watching!
So, let's jump straight into the video, so this is going to be my setup for doing my own braids at home and what i'm going to go ahead and use. Is this braid gel, as well as this grip glaze, that is from amazon as well as this braiding, hair and i'll? Have that linked in the description below this right? Here is a blow dryer brush i'll? Have it linked in the description - and this right here is a three-sided mirror. So i love this right here because it helps you to see different angles of your head. So this is definitely a must-have for my diy babes out there um. This is from amazon again, and it will be linked in the description so to start out, i'm going to wet my hair and i'm going to detangle it with the brush off okay. So then, we're going to move straight into the heat protectant when i do want to officially blow dry my hair. This is from silk out systems, so i will link that in the description as well, pretty much everything you see in this video will be linked in the description, but i'm going to turn the blow dryer on and i'm going to just go ahead and blow dry. My hair straight so now i'm going to move into parting. So this is my second time doing my own knotless braids ever and i wanted to do smaller, knotless braids this time, so i'm starting at the back of my head and i'm going to try to do smaller sections when it comes to parting. Now i'm going to apply my good and old, faithful, sulfur 8 for my dandruff me so now i'm just going to go ahead and apply some gel and i like to make sure the parts are very straight once the gel is on there. Then i go ahead and start braiding and what i'm going to do is i'm just going to braid like halfway down. This is basically going to make sure when i like crochet in the extensions that the hair is nice and secure, so i'm going to go ahead and speed through this process so that you guys can just see you know what i'm doing to part my own hair. So that may help any of you other beginners or you know just newbies out there um now. I do want to say that the reason why i like to do this versus i'm just like going in and putting the extensions once i finish the one little section is because i like to make sure i'm getting like really decent parting, because the first time when I did my own atlas braids. What ended up happening was the parting was like very off and it was gon na. I pretty much couldn't go back and fix any parts because i had put all these braids in so when i do it this way. If i need to go in and adjust something, then i can easily do that case in point. As you can see right here this, this is not even so. I basically was able to easily go back and fix it and basically make it nice and straight so this is like the next row, but i was just wanting to show you guys. That'S why i like to do it this way. So here are the two rows that are done at the back then after i do that i like to go ahead and do the middle part of my head. So the one that's like going to be round um, i don't know i just like to get that part out of the way for some reason, but yeah that mirror definitely is extremely helpful. Even with this you. So when i get to this part, i like to just go ahead and level it up from the back section, so i'll, just literally follow it to the front. So this time around, i decided to leave out the front row because i wanted to make sure i did my baby edges first, because i got ta have my baby edges and i wanted to make sure they were thick enough. I'M using this gummy gel, which is amazing, it's a really really good, gel um and again that'll be linked in the description um but yeah. I like doing this, so i can make sure my edges is nice and full, and then i go in and do the whole front row. So here are my parts. I think they look really good for someone who is, you know a beginner when it comes to like doing their hair, or at least not like you know, a expert or anything of that nature, because i've done other things, but when it comes to knotless braids. This is my second time ever doing my own knotless braids again they're not perfect, but they are very good in my opinion, and i think that that mirror definitely has helped me um. It does take me forever because i'm filming and i'm a perfectionist and i'm slow. So i can't even tell you guys how long this really took um, but i did want to also just show you from a different video, a close-up of how i'm putting them in so i crochet in the hair, basically just slide the needle through attach the hair And then pull through one side and then for this, like for the smaller braids. I just took one piece of hair from one side and then i just go ahead like to basically to make that a third piece and then i basically just go ahead and start braiding. So when the braids are smaller, you smaller, you can certainly get away with this, but if you have bigger braids, then you will need to actually split the hair differently. You want to grab hair from both sides to make it thicker for the third piece, and then you can go ahead and start braiding. The main thing you want to do is just try to make sure you cover up your little braid in the beginning after you braid down halfway use the grip glaze to go ahead and smooth out the rest of your hair. I wanted to help you babes as much as i possibly could here. So this is the size that i went with for my smaller knotless braids. Some of them were a little bit bigger, so i'm a little bit smaller because it wasn't perfect, but i didn't measure it so you guys can see about where i was trying to stay within sizing. Since i got my hair from amazon, it came with eight packs of hair and i believe i used six at the most. I know i still right now have two packs of hair left at home um and i feel like one of the packs i didn't even use all of it. So five to six packs, i believe, is what was used. So i wasn't able to finish my hair in time to show you guys the final results once they're refreshed, because i went to miami to get a breast augmentation and i did film this and for anybody who's interested. I will have a vlog on that later, but um. This is three weeks later, so i did want to just go ahead and show you guys how i did the ends of my hair and then also just to show you. You know three weeks after i refreshed it, so i'm just using some boiling water first braid, i braided the ends in like four different sections and then i dipped it in the boiling hot water, and i do have a towel underneath me. So don't don't just like sit this on your lap girl, your lap and you'll burn a hole to your lap. So, as you can see, here's the towel once i did that, and i only leave it for like 10 seconds. You don't have to leave it in there for long, but once i do that i'll just go ahead and take it out and dry it off and then go ahead and undo the braid and, as you can see, we got some pretty um crimps. I guess you'll call these crimps, so i just want to do something a little different rather than the curls from the last time, and i was very much happy with how they came out but make sure you braid tight, so you can get some nice pretty defined. Curls, not curls, but like crimps like these, so yeah here are the final results. Again. This is after three weeks once i actually kind of refreshed it just so i could show you guys what it you know was looking like so yeah, that is the parts um one thing to keep in mind is yeah when you're braiding at the root. Try your best to cover up the mini braid and, as far as parting goes try not to stress about it too much because a lot of times people don't even really see the middle of your head, like that. So just don't beat yourself up be patient with yourself and in time it will get better and better and better. If you found this video helpful be sure to give it a thumbs up and if you want to subscribe, i will be posting lifestyle, fashion and beauty content, so not just hair stuff. But thank you so much for watching and i hope to see in the next video bye. You
Comments
Andrea Hudgins-Miles: Love these going to try these on myself! Hope they come out as beautiful as yours did!
Jordan Riley: So cute!! Def. trying this out next :)
Daisy Davis: This looks so good! How long did it take?
A. Renee McLain: Thanks for sharing!!! ❤️
jjoyous jay: New Sub! Enjoyed this video so much decided to see what you had going on your channel.. Blessings Heading over to Amazon and jump on that 3-way mirror...
LIFE WITH SCHI: Sis these are cute I need you to come do mine I’m too lazy !!
amarachi: i’m definitely going to try these!! i came here from tiktok haha
Lyric Barnes: How many braids did you have on each row?
YoogahSistarz Ft.EricaBlackmon: Thank you so much for sharing I was wondering why type of camera are you using to record your videos??
Channel Mia: Did you add to the braids while doing each strand or did you braid down with the first hair you put with the crochet needle?
Taylor Yyaj: Waittt what happened to red