Most Natural 360 Lace Wig | Detailed Installation Tutorial Ft Premium Lace Wigs
- Posted on 14 February, 2018
- 360 Lace Wig
- By Anonymous
A detailed step by step tutorial on how I personally like to install my lace wig. This unit is from premium lace wigs. All information on this hair will be given below. Please give this video a like, as well as share and subscribe. ENJOY!
HAIR INFORMATION
-Deep curly 360 lace wig brazillian human hair (PW1335) http://www.premiumlacewig.com/deep-cur...
-Hair length- 14 inches
-Hair Density - 130%
-Direct link to website http://www.premiumlacewig.com/
PREVIOUS VIDEOS
-Anti valentine's day makeup tutorial https://youtu.be/0VXVFkhHlxU
-Wine Tasting vlog https://youtu.be/y5gM77fIN68
-KKW beauty review https://youtu.be/TK7GW2j57T8
-African print haul/lookbook https://youtu.be/-XLAle8A6d4
-How to make your foundation last all day https://youtu.be/9CpBNBHw2-o
-Back to school makeup routine https://youtu.be/a7zX8F-5g9Q
-Get to know me tag https://youtu.be/KCSA-_tCpWs
CONNECT WITH ME
-Instagram https://www.instagram.com/kayce_dinobi...
-Snapchat https://www.snapchat.com/add/kayce_din...
-Facebook https://www.facebook.com/kelechi.ozodi...
-Like my fan page on facebook, all information on new youtube videos are posted there - kayce dinobi
FOR BUSINESS/COLLABS
Email: [email protected]
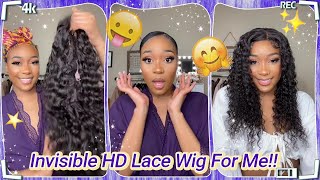
Hello guys welcome back to my channel. Let'S see you guys again so in today's video I'm going to be doing something very different upward to be doing a lace week tutorial I'm going to be teaching you guys how I installed this beautiful hair and if it's your first time coming to my channel. Thank you so much you're very welcome. Please grab a chair and relax if you are a returning, subscriber or viewer. Thank you so much for coming back to me and your loyalty and all your love. So I am not even going to waste time with this video. So let me just stop talking is from premiumness weeks calm and it came in this box right here. This is their deep wave right. I cannot even remember. I think this is their deep wave 360 last week and this hair is 14 inches. This is not a first impression video. I have had this hair for about a month plus now and yeah my thoughts so far we did one month. I love this hair, it is amazing, it is affordable and the quality is so good and I was really really happy. The only thing I'll said I don't like is it kind of like sheds, like modern normal every hand? Was you must know that once know one or two strands must come out, but this hair actually shed sometimes, and it kind of pisses me off, but then still it was a photo booth. So you cannot like get like a hundred percent. So that was just what I kept in mind and yeah. It'S really something you can overlook like it's, not that serious or anything. So so far, that's like my only problem. I will leave the link to their website in the description box below, so you guys can check it out and I'll need to direct link to this hair also, and it came in yeah there. It is. We heard him in this cute little carry-on bag and, besides that, he came with a lot of goodies if you guys like who does not like with these okay, the air came with instructions on how to take care of, and also like shoot or some options on. The other kind of hair dye suit on their website. Besides that, I got not one but two week caps, although I was kind of sad because they're like the brown, is kind of too light for me. That'S why I used a black wig cap for installing this hair, because I actually do prefer black so but like there was a time I washed the black wig, the black wig cap, and then I have to use this. So I did was after like putting this on my head. I went in with my bronzer people use Foundation Board. I I cannot waste my foundation like that, like I can't so, because I have this huge bronzer, which I don't think I'm good to finish anytime soon. I use this instead and I just rub that all over the lace area, d-dang hope you guys care what I'm saying. So, besides the wig cap, it also came with an elastic band which I did not actually need for this week. I have another week that really needs this and it's really good to come in handy. He also gave me this tooth comb also and visiting things you need for installing and customizing this hair. He came with two hair clips, which were actually very, very important to me, and I used it a lot in this video and, besides that he came with a set of bobby pins. I was like so happy when I saw all these goodies and it made me feel like the hair was so worth it well, the hair is actually up for the boo actually actually affordable. This is the finished look of the hair. I hope you guys like it. Another going to go straight into how I install this hair. So if you want to know how please do keep on watching and I'll see you in my next so guys this week is a 360 last week, so I'll just be turning it inside up. For you guys, so in a 360 last week the lace surrounds the perimeter of the head and in the middle you have the normal wakeup design. So, as you can see, this hair comes with two hooks at the front. Oh sorry, three hooks three hooks at the front and one at the back. He also comes with adjustable hooks to secure the week, so I've already cut off the excess lace and I'll plot the week. I'Ve plot the edges of the week and basically customized it in the best way that fits make it. So I'm just going to be putting it on now. So when I'm done the week should kind of look like this a little bit something like this and I do prefer a side part. So I'm going to drag this pattern here to the side and the week should look something like this. But if you want to see in the middle, this is how it's going to look. If the part is in the middle. So then, you cool, so I'm just going to be turning it to the side again and I'll, be tracking it back just a bit and I'll be using the two hair clips that came in to week and I'll just be securing the hair backwards. Like so now drag it from just a bit, so I can get the exact position that I want and I'll just hold it down just to see if everything looks good and I'm liking how it looks this way, so I'm going to drag it back again. Next, I'm going to be taking my gut to be hair glue and out of applying this around the perimeter of my forehead. My hairdryer and I put in like the normal air, do not take it to the hot air like the heat because use it to dry out the glue just until it begins to get. You need to be tacky so now that the glue is tacky, I'm just going to gently drag the head to the front. I'M pleased the lace directly on the area where I have to glue I'm just going to drag the sides and I'm giving my thumb's here. Like this, and I'm just going to use the rest of my fingers to Pat the lease to the glue and I'm going to wipe off the excess glue on my forehead. So next I'm going to take a sock and yes, a sock, because this has that stretch that I need. So it's good to secure my head properly, I don't think is no more scruff. Can do that, so you can take any old pair of socks. You have lying around the house and you just want to take that and wrap it around your head, so just secure to glue even more and tie it to the back as tight as you can usually do this until the lots of circulating to my brain. That'S how tight I make mine that usually I get a headache guys like I'm, not even kidding, but if you have like it's curved, I can do this, then by all means, but I just rather use a sock or the hose, and I'm going to take my Comb and I'm just going to press it down. You have to do this like you're fighting it truly, because you don't want your hair going anywhere just going to leave that for about five to seven minutes. You can leave it for ten if you like, and I'm going to come back and then take it off. Okay guys. So I think that has stayed on my head long enough, like I'm actually starting to get a headache. So I'm going to be taking the sock off and by the time it comes out, it's good. This happens every small time. So let me take the sock off like this is literally like. I am pulling I'm actually talking this hair and it is not going anywhere, and so I'm going to be removing the clips from the back and once again I'll be going with my hair dryer, just to make sure that it's really secure okay. So next, I'm just going to be cleaning up. That part is to tail of my yeah so so far so good. This is what it looks like now. We are going to be customizing it, and that means I'm just going to be cleaning the place out with concealer and then three my edges. I know that so I'm going back with my clips and once again I'm going to take the hair back and just clip and clip so I'm going to be cleaning out this part here with some concealer mac studio, finish concealer! Well, you can use anything like that. I don't even know why I'm using this concealer, because this is not cheap, but literally you can use anything, that's your skin. It has to be your skin tone guys. So I'm just going to take this brush and I'm just going to clean up the part fixing up this areas. As you can see, I don't know if you can see, but then the lace doesn't really match my skin, so we are going to be fixing that up with some powder and I'm using my classic compact powder, and this is the shade medium light. Oh, you can bleach the lace, like some people bleach their lace and it works for them. But I don't know if thing about bleaching, I cannot risk my hair, so I wan na do this and wash it off and I'm washing my wig. I do not go near bleach at all, so this works for me and it's easier for me, so you can try it out or you can bleach your hair whatever you want to do. Just do what makes you happy. So I don't know if you guys consider lacy starting to look a little bit more natural and it's looking like the hair is actually coming out from my scalp okay. So next I'm going to be good, it's my edges! Now I don't always do my edges. Only do it when I'm actually queen ow well like on a normal day. I just leave my hair like this and I'm done, but for the sake of this video, I am going to be teaching you guys and when I got to her actions, tiny hairs. Yeah get there and then I cut it with a pair of scissors. So this is what I do just being on tiny hairs to the front. So now we have some loose hairs at the front, pull back in with my gut to be goo I'll, just be put it out on my finger and dropping it down at the front load guys that I am NOT dragging it down just yet. I am just putting it so I'll be going in with this toothbrush that is obviously very well used and from the roots down I'll start out, just that brushing the hair and giving it like a nice curve. Also going in with my tooth comb I'll just be giving it a nice curve to the side. I think I just really do okay, so this site. I think this should be not for me, because my hair is going to cover up the rest. Now I'm going to meet the other side, so I'm taking the brush and I'm just pushing it down and for me the curl as I go, so I'm going to release the hair again and comb it. But what seems like the hundredth time. So this is how the hair looks. Finally, the part everything looks so good and makes the hair look so natural, and it just was my hair for tonight. This is a very natural looking hair finished. Look. The front looks amazing. I love how perfect out his hair is like I've straightened his head. I'Ve curled his hair, straighten it again, curl it again, wash it like how many times and it's still like intact. Let us zoom it straight and the moment I wash it like. The clouds return like because I washed it so it can be clean and fresh for like this tutorial, so it was true. Initially after washing it, the curls came back and became so voluminous, and then I just love how it looks you guys like this video. It was so fun to make. Oh, my god me and my goofy self do give it a thumbs up and please and please and please share this video as much as you can don't forget - to hit that subscribe button down below check out my other videos and if you have any questions whatsoever About this hair - or I don't know any installation questions or any anything else you want to see on my channel, please do leave a comment down below. Thank you. So much for watching and I'll see you in my next video bye,


Comments
Angel Clement: Beautiful