How To Slay A 360 High Bun/ Ponytail+ Make It Look Natural Start To Finish│Wowebony.Com
- Posted on 24 September, 2017
- 360 Lace Wig
- By Anonymous
Hey loves! ♥ Become a Beige-ian by SUBSCRIBING here ▼
https://www.youtube.com/user/Mahoghany...
NEW VIDEOS POSTED EVERY FRIDAAAAY!
TURN ON POST NOTIFICATIONS
LACE FRONTAL 101 TUTORIALS:
https://www.youtube.com/watchv=l3q6_e3...
DISCOUNT CODE: Beige ($10 off)
Below is the description you need to put down below the videos
150% density Indian Remy Hair Pre-Plucked 360 Lace Wigs Yaki Straight [360YS01]
Link to the wig: https://www.wowebony.com/150-density-i...
The wig was received from https://www.wowebony.com/
Length: 20 inches
Color: natural color
Size: Medium
Hair Density: 150% wig density
The wig cap inside is added adjustable straps. You can wear it without using glue, tape or other adhesives .
Natural hairline and with baby hairs around perimeter. Looks very natural.
Promotion :
1. 20% OFF Factory Direct Sales Price All Lace, Wigs Hair Bundles
2. Extreme deals every day, 35% OFF
top knot tutorial
Follow Wowebony:
Facebook: http://www.facebook.com/wowebony
Instagram: https://www.instagram.com/wowebonyhair...
Pinterest: https://www.pinterest.com/Wowebony/
Youtube: https://www.youtube.com/WowEbony
Tumblr: http://wowebony.tumblr.com/
Twitter: https://twitter.com/wowebonyhair
----------------------------------------------------------------------------------------
I purchased these lenses from:
http://www.visionmarketplace.com/beige...
P R O M O C O D E:
BEIGE
L E N S E S:
Solotica Hidrocor "Mel"
--------------------------------------------------------------------------------------------
B O R E D? Check out some of my Story Time videos!
♥ FIRST DATE RULES DO's & DON'TS!
https://www.youtube.com/watchv=AjQCmn3...
♥ RICH GIRL HACKS, HOW TO LOOK RICH ON A BUDGET
https://www.youtube.com/playlist?list=...
♥ AFFORDABLE WIGS:
https://www.youtube.com/playlistlist=P...-
♥ HOW TO SLAY YOUR LACE FRONTALS & WIGS
https://www.youtube.com/playlist?list=...
♥ STYLE & FASHION LOOKBOOKS:
https://www.youtube.com/playlistlist=P...
♥ 90's HAIR, MAKE UP, CLOTHING TRANSFORMATIONS
https://www.youtube.com/playlist?list=...
♥ ALTER EGO TRANSFORMATION!
https://www.youtube.com/watchv=_oIRDw1...
♥ MAKEUP VIDEOS:
https://www.youtube.com/playlist?list=...
♥ TRANSFORMATION MAKEUP & HAIR VIDEOS
https://www.youtube.com/playlist?list=...
♥ STORY TIME & VLOGS/LIFESTYLE
https://www.youtube.com/playlist?list=...
♥ MY BOYFRIEND WAS ON AMERICA's MOST WANTED STORYTIME!
https://www.youtube.com/playlistlist=P...
F A Q's
Which camera was used in this video?
Which camera do I use for selfies?
Which editing software do I use?
Windows Movie Maker, IMovie and Final Cut Pro X
**I do not own the rights to any of the background music being played in this video. The background music is for entertainment purposes only. Here's the music playlist, check out the amazing Artists below ▼
1.) Vibes - RENA
https://app.hellothematic.com/#/link/9...
2.) Golden Empire - Alex Down
https://app.hellothematic.com/#/link/D...
3.) Hearts - Hive Riots
https://app.hellothematic.com/#/link/7...
Thanks for Watching!
Contact me: ▼
https://beigemedia.wixsite.com/beigeoj...
L E T S B E F R I E N D S: ▼
INSTAGRAM: BEIGE OJAI
TWITTER: BEIGE OJAI
FACEBOOK: BEIGE OJAI
SNAPCHAT: BEIGE OJAI
BEIGE OJAI
P.O. BOX 520
LANHAM, MARYLAND 20703
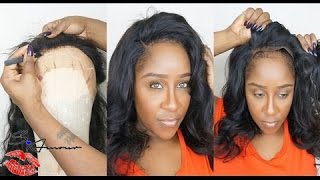
With you Megan palm tree, hey guys, so I was sent this wig from Wow evany calm. We first open up your package. Of course you received your wig. You receive an instructional hair care guide, a wig cap and elastic band, a needle thread and hair clips. The wig that I was sent is the 360 lace wig. I will have all of the specs and the link for this hair down below in the description box. So please check that out. It is a yaki texture. As you can see, it is 150 percent density. I did get a medium sized and the construction of this wig. There are three combs in the front one comb in the back and also an adjustable strap in the back. This hair is pre plucked in the front. As you can see, the hairline already looks pretty natural, but I am going to go in with my tweezers and I'm gon na squeeze a little bit around the hairline as well as the back you can see. The back of the hair is very full in Vic and density, and I want it to look similar to the front, so I'm just gon na begin to brush the hair back spray, the hair with some water and then begin to squeeze the hair. I do have a very in-depth tutorial on how I customized frontals. I will put the link down below in the description box if you're interested in seeing that krei. Now I'm flipping the wig upside down and, as you can see, the back of the wig is very, very, very thick in density and I don't know about y'all, but the back of my hair is not very thick and is read like this, so I just want To make it uniform too, by making the back of the hair I'm gon na pluck some of that hair to make it, I guess blend in with the front hairline a little bit better. So I'm just gon na take my tweezers spray with water brush it and then I'm going to start tweezing away. Some of that thickness in the back. The back of the wig does come with baby hairs. As you can see, I am gon na add the elastic band to the way. So I'm just going to start by taking a measuring tape and from the top left side of my ear, I'm going to measure it to the top right side of my ear and as you can see, it is about 10 inches. So I'm going to subtract 4 from that 10, which gives me 6 and I'm gon na cut 6 inches of the elastic band. Now I feel like this band is a little bit too thick, so I'm just going to cut that in half and then begin sewing. The elastic bands to the wig after plucking the hairline of the wig - I did take the extra step to customize it by bleaching. The knots I do have a very full, in-depth frontal, bleaching, tutorial or customizing your frontal tutorial. I will have that link down below in the description box. For you to check out. I did go ahead and Flatiron this hair, and this is the straightest that I was able to get it now, I'm going to go ahead and use a clip and begin to cut the lace from around the hairline. I'M just going to follow the natural shape of the hairline and get as close to it as I possibly can, without cutting off any of the knots of hair. So most wigs are not one size fits all. You do have to take the extra steps to customize them and a lot of wigs, especially 360 wigs have very long sideburns and because the sideburns are a little bit long for my hairline. I'M just going to take it and part it where I want to cut it and then I'm gon na grab my scissors and cut off that extra bit of sideburns. I feel like it looks a lot more natural win, some of your hair. It'S coming out on the side, especially the sideburns, as you can see, please pardon these kitchen naps in the back. I did not realize my hair was so peasy this morning, so I'm just gon na grab my got to be ultra glue, Joe and I'm applying a thin layer to the back of my hairline. Then I'm gon na grab my blow dryer and I'm gon na blow dry it until it's sticky after I feel it being sticky. I'M gon na grab that comb in the back of the wig and I'm going to apply that comb to the back of my cornrows. Then I'm going to bring the wig down and press it into the sticky gel that I just you know, apply down there. I'M gon na grab the bottom of my comb and press it down and to ensue that got to be ultra glue gel pretty much. I am not using a mirror, so I cannot physically see what I'm doing, I'm just trying to fill my way through this video. So you know I did end up getting some of the hairs down plastered to my skin. Please ignore that. I didn't have a mirror, but just make sure that you have a mirror when you're doing this or you get somebody to help you when you are cutting the lace in the back of your wig. It is important to leave some of that lace. On too. You know don't cut off all the lace in the back. That also helps the wig to adhere down to your skin better in the back. So, moving on to the front, I'm going to do the same thing by applying in the dots, be ultra glue, gel around my front hairline, I'm going to blow-dry it and then I'm just going to apply to where I wanted to be positioned. I did want to also mention that I know that you guys saw that I applied the fat portion of the wick first and then I put my headscarf on for about 20 minutes before putting altar glue gel on the front, I feel like when you set the Back first and then you go ahead and set the front. You have more control over where the wig is positioned. So if, when you take off your headscarf, you notice some white residue around your hairline. All you have to do is use some oil or a little bit of water and the residue goes away. They basically will turn clear all right. So, let's begin styling. I just want to part the middle of my head and then I'm going to part a section on both sides of that part flipping my hair over and brushing with a paddle brush. I am also going to take a pomade to make sure that the hair - it's are smooth, as I put it in a ponytail at the top. So now I'm gon na grab a small portion of that ponytail and I'm going to begin wrapping it at the base. Now, taking the rest of the ponytail, I'm going to wrap it into a bun using a razor comb, I'm going to razor away some of that length in the front to give me bangs and I'm gon na use my curling iron to curl. Some of that hair away from my face - and this is the final look - thank you so much for watching. Please let me know what you think about this hair down below in the comment section, we'll love to hear your thoughts make sure to hit that subscribe button. If you have not already and turn your post notifications so that you could be notified of my next upload, I know I upload very randomly and sporadically so turn on your hosts notifications, so that you can be notified of all of my uploads and I hope to See you all in my next one bye, guys
Comments
Kya Sinclair: Looks gorgeous!!!
Dadrian Campbell: sooooo natural. I love it.
Form Of Eve: you're perfection even if you think your not! <3
Valerie Coleman: Hi Super Cute. Love the hair silky texture look. Cute box it came in.
Nikki Thompson: Hey Beige... As always, great video. What are your thoughts about the wig? Would you recommend that your subscribers purchase it? I’m so exhausted with Wig companies being inconsistent. Also, I saw a lot of visible tracks. How is it holding up thus far? Thanks!
Wigs2WaistLength: I tried to watch the hair but was fixated on the makeup. Everything came out great<3
Liah St. Hil: This came out so well! Will you be selling more than one unit?
Angela Bracey: Ms.Beige, love You and the 360 bun updo love.
Tee & Nya: i need to save money for a 360 its hard asf as a teen man
Aleesha Ali: How do you take the hair off at the end of the night, cus you've got it glued on?
Aushawn France: The makeup but i needed this video
minime diamond: yass beige slaying again bt cn we tlk bout the eye makeup uh its to die for <3
Misty Day Blog: Thanks for showing it outside.
Navadra Williams: Just out having a great time n NC for my big dinner party for my 21st and my phone rang to inform me to one of the best YouTubers I've seen since love her I give u infinity I wanna keep watching....
Tamia Wilson: Where did you get the contacts?
Laila Frazier: Omg where did you get your top from??
BigBaddaboom: Wish we were sisters
Shanté: Cute
Angel Adele: Go head gurrrrrrl!!
MICKI .G: YEP :-)
Chrissy Onye: Notification gang
T2 Rawww: Hey beige