How To Diy/Crochet A Ventilated Closure For Knotless Braids With Swiss Lace Faster With Best Result
- Posted on 25 April, 2022
- 360 Lace Wig
- By Anonymous
Hey Love,
I share with y'all on how to make this easy ventilated closure for your knotlessbraids for those of you who find it very difficult to ventilate a whole closure before braiding. I hope you enjoyed it...
PLEASE DON'T FORGET TO LIKE, SHARE, COMMENT AND SUBSCRIBE
VIDEOS YOU WOULD LIKE:
Detailed 360 Lace frontal wig:
Step by step: Hiw to DIY a 360 lace wig ventilation:
DIY Lace frontal wig/Crochet wig:
How to fake a lace closure using a latch hook:
LET'S STAY CONNECTED:
Instagram: https://Instagram.com/roxtstyle
Email: [email protected]
PS: Don't experiment what you have not experienced
Love y'all
#laceclosureforbraids
#knotlessbraids
#swisslaceclosure
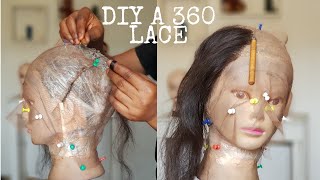
Probably from the title of this video, you guys already know what this video should be all about a braided lace closure. So hey guys, welcome back to my channel guess who's back on. It'S you! Your girl is falling back a little bit all so i'm done resting. So i'll be following you guys back to back for your videos from now henceforth so i've sewn down my swiss lace on this recap and i'm about to do like a closure for this braided wig. So i'm actually the one making this braids on the wii cap. So i just want to help out with the closure. So then i'll be going in with my lamb, tiny crochet hook and i'll be using my braiding hair to braid this down so i'll just go ahead, um to pin down my lace to secure it down. On my mannequin and then you can see the lines on this lace, so i'll just be going through these lines. The leads downwards okay. So what i do is, i put my latch hook through the lace and i pick two strands of hairs. So i face the latch upwards, so we can pass through the lace and i and i take it out gently from the lace and then i give it a simple route. Okay, so i'll be repeating the steps this step for beginners that will be having because it's going to be like a beginner's tutorial. Okay, so i put the hook through the lace, and i pick two strands of hair - pass it through the lace while the latch which is facing upwards, and then i give it a single note and that's it so for best results of this ventilation for the braided. We we are going to be um, we are going to follow like a patterned ventilation, so you see this line that leads upwards and the line elites downwards. So what i do is i ventilate on a hole and i skip one hole. I ventilate on one and i skip so this is it for the first line so for each line of the ventilation, we are going to begin like three layers, so for the second layer. Now i'm going to skip a whole line, the lids upwards now i'll be going to the third line and then i'm going to delete. I skip a hole. You know this liner leads downward for you to know that what you're ventilating is correct. The horizontal and vertical line tallies okay, so while we are skipping the whole line, the lids upwards, the line that leads downwards - we're also skipping the whole line, so we are following it accordingly, i think i'm going to show you guys and what i mean by that When we start for the next box for this braided closure, so now we are going to the third layer. We skip a whole line again and then move until it opens. We are done for the third layers, then the best thing to do for you to have four lines of the box grid is for you to take a tip and then usually okay. So, like i said, i went a little hole and then i skipped another hole. So this is the part where i'm going to be showing you guys what it looks like when you ventilate and then so this is it it's facing downwards and this ventilation italics. Okay, the tile is tallest while it's facing downwards and italics while it's facing upwards. So then we are done with our fox box for the braided week. I'Ll be adding three more lines to this, giving us the second box and then here we'll add six lines and then six more lines that will lead to the first part, so i'm actually generating on the sixth line. But then let me make this clear. So you guys can understand what i mean. This is the first course, and then these are third box. You guys so now i'm done ventilating the four lines for our graded closure. So i'll just go ahead and show you guys how i ventilate each box for the braided wing. So while i ventilate each box and i'm done with it so i'll just go ahead and give it a quick break. But then this is not actually the braid. That will be making use of for use before breathing edge, we're going to use each braids that i've done here and then braid the main braiding width with the attachments or the braiding hair. So i'm just braiding downwards upwards: okay, and i'm giving this just two lines, because i'm supposed to give these like i'm going to. I was supposed to ventilate on three lines to complete each box, so i ended up ventilating those two lines because i got tired on the way. Okay, so then you can see how the front stall is, after i'm done, ventilating two lines. So what you do next is you you go in with my god forget you understand what i mean: okay, so i'm trying to close this box yeah, so i'm ventilating on the line that leads to the other end of it. So i'm just going to little all the way up all the way up. So this is you guys yay. We are actually done with this with this braided closure yeah, and this is what it looking like a big thank you to you all for watching up until now. I hope this video was helpful. If it's worse, please don't forget to hit the subscribe button. Thanks to my old and my new subscribers, i love you all. Please leave a comment below. Let me know if you like this video. Thank you so much bye,
Comments
GODSWILL PETERS: This is extremely beautiful
Dr X: Love from india ☺️