How I "Re-Create" A 360 Lace Wig | Hairline Tweeze + Cap Ear Tab Fitting - Prettyluxhair
- Posted on 02 May, 2021
- 360 Lace Wig
- By Anonymous
How I re-create a natural hairline and make a 360 lace wig cap fit from ear to ear tabs.
If you like the wig in today's video it can be purchased here:
The wig is a human hair silky straight 360 lace wig (direct link: https://www.prettyluxhair.com/products... ) that Comes with swiss lace that is very undetectable. A Pre-plucked hairline and lace color transparent or brown. The length I'm wearing is 22 inches. Other length options are available on their website. Enjoy extra savings on this wig by using DISCOUNT " Marie" at checkout!
Tweezer set https://amzn.to/3gXc04C
Canvas Head for wig customization https://amzn.to/2ScFrFg
Shea Moisture Hair mousse https://amzn.to/3gQEgFY
Purple Shampoo https://amzn.to/2PI1wux
Timestamps:
Intro 0:00
First Look & Wig Details 00:34
What is a 360 Lace Cap 1:11
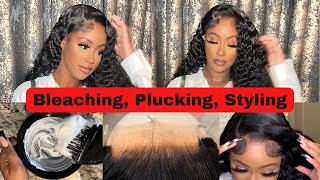
How To Measure Bleach & Developer 2:05
How To get rid of brassy tones from knots 3:08
How To Tweeze/Pluck Hairline on a wig 3:57
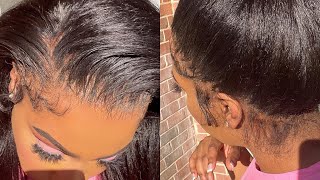
How To create soft baby hairs 5:28
How To cut ear tabs on a wig to fit 6:56
The Completed Look! 8:35
Stay Updated! Follow Me Here:
My Website: https://mspreciousmarie.com/
BeautyByMarie Vlogs https://www.youtube.com/BeautyByMarie
Instagram: https://www.instagram.com/mspreciousma...
CUSTOM WIGS: https://www.secretkreations.com
Business Collaborations Email: [email protected]
Send me a video request: [email protected]
*Hair or products shared are my OWN personal and honest experience. This video may contain sponsored content and affiliate links which I get a small percentage that helps invest back in my channel to continue to bring great content! Thank you for your support!*
The wig in today's video comes from pretty luxe hair. I will be sure to put a discount code and a link below the video, so be sure to check that description box. The hair that i'm working with today is absolutely gorgeous. This wig comes with a slightly pre-plucked hairline. The texture of the hair is a straight texture, and this is the way it would look once you wash it, so it does have like a slight wave to it. So today's video i'm also going to show you my 20 21 updated plucking tutorial on how to tweeze out the hairline. This is what the hairline looks like straight out the box. I have not done anything to the hairline of this wig. It looks pretty good. I absolutely love the way it looks. However, i want to make it more personalized, so today, i'm going to show you every step that i take to make my lace wigs, look very natural and realistic. I am choosing to do this on a 360 lace wig today, because a lot of you said that you do not know how to get the wig cap to fit your head because of the construction of the cap. Now, if you take a look at the 360 lace wig, you can see it's like a circular type of construction. It has the combs the adjustable straps and also the cap. Construction can come in a size 21 to a 23, just like every other wig. However, a lot of people have a hard time, applying this wig from ear to ear. So today, i'm going to show you my secret and the way i customize a 360 lace wig to fit perfectly so yeah we're going to get into all of that. Now. This wig does also come with the stretch cap in the center. This right here is what the stretch cap look like. So if you need more flexibility with your wig, this gives a little bit not too much but enough. The first thing i like to do with my wigs is bleach the knots this is a process that you need to do first before you do anything else to your wig. Now i do have a detailed tutorial on this, so i'm not going to go very into detail because i just updated my 2021 bleaching tutorial. I will pop it out right here to you guys. However, i will give you a tip on a developer and bleach mixture, because a lot of people want to know how much to use. So i use one scoop of powder and then i use the scoop and measure out the developer inside and i will do one cup and a half of developer. The key is to get the consistency, nice and smooth. You don't want it too thick and you don't want it too watery. You want to make sure that your consistency is going to be perfect enough just to bleach the knots and not transfer onto the hair. If you go and watch my updated bleaching tutorial, there are more tips in that video on how to prevent over bleaching the hair. So i'm gon na go ahead and apply the bleach all over the knots on the inside of the cap. Only this is the only area you want to apply that bleach. Now, when you are bleaching a lot of times, you're going to make a mistake and the hair is going to go, yellow or it's going to go orange i like to use the matrix total results. Brass all shampoo, when i tell you that this product will kill any brassiness or yellow tones in those knots, it completely works. It works so much better than any other product that i have tried. I will be sure to link it below in the description box, so make sure you use this particular one. It worked so well. This is what i mean when your knots can turn yellowish depending on what color you take them to. So basically, you just apply the shampoo all over the nuts and just let it sit for at least 5-10 minutes the longer you let it sit the more round the knots are going to turn. Just keep that in mind. Now, let's move into tweezing the hairline. That is important step. I'M going to use the shea moisture, weaving wig, hair mousse and push the hairline back now. In my older times, i would have used a hot comb. However, i want to make sure that the hair is held in place. The first thing i'm going to do is trim away the hairline, the baby hairs um. So if you don't want baby hairs, you don't have to do this, but the difference. What i'm going to do this time is twirl them and then pin them so that they can have a slight curl to them and with the hair mousse on there, it's going to help with that. Next, i'm going to separate a small section in the front because i'm not going to touch this right now, i'm going to start in the back of the hairline, because this wig does come with a pre-plucked hairline, i'm not going to start at the front. I'M going to start behind that hairline, so i won't overly thin it out. So i'm just going to begin pulling out some hairs and you want to make sure your tweezers are sharp. When i say sharp, i mean not old tweezers. You want to get you some fresh tweezers. I will link mine below in the description box or just ones that i like in general, so my reasoning behind recreating the hairline on any wig, even when the wig is pre-plucked, is because a lot of wigs do not look natural when applied. You want your wig to look natural when it is applied rather than when it's on the mannequin. So in order to get that celebrity natural, realistic, look, you need to personalize that hairline a little bit alright. So, let's move into um, just the hairline itself and the baby hairs. So i let that sit for the amount of time it took me to tweeze out that hair and i am going to go back and tweak some more, but i just want to start here. First, so i can kind of see what i'm working with now. As you can see the baby hair, because i pinned it, it has a slight bend curve, curl, whatever you want to call it to it. So what i'm going to do, because in 2021 we don't want no hard, thick baby hairs. We want natural wispy baby hairs, i'm going to go ahead and tweeze out this baby hair area. Now, a lot of people may be apprehensive about doing that, thinking that they might pull out too much hair. However, you need to tweeze that area in order to get it to lay flat and look very natural. So, after a few minutes of tweezing, this is what it looked like compared to the other side. So just looking at it, i can tell i still need to go in more. So that's what i'm going to do and i'll be right back. Another updated tip. I like to do prior to putting the hot comb to the wig is to go ahead and add some foundation powder that matches my scalp color all over the knots on the inside. Now, when you do, this is going to add texture to that hairline, and it's also going to help the hairline look more natural. When you put the hot comb to it, it's going to just melt that powder, so it won't look ashy. You don't have to worry about that so yeah. This is an updated tip that i like to do prior to application. Now that the hairline is complete, as you can see, it looks a lot more natural. It lays more flat, let's move into sizing and making this wig fit. So the first thing i'm going to do is take that hot comb and push the hair at the ear area back so that i can see what i'm doing so. We want to make sure that this 360 lace wig fits around the ear area, so i'm going to show you in detail how i trim that area. So you see this line here where it's like a seam. This is where your ear normally falls on every wig. Okay, that's why that seam is there and with the 360 wig, it's a bit tricky because, like i said, the cap instruction is more of a circular type of cap construction. So there's really no area for your ear, so i'm going to show you how to cut it properly so that you won't have to worry about that anymore and it will fit so you want to get some scissors. You want to start right here at the edge and create a triangle type of cut around that seam. So, as you can see, yes, i'm going into that hairline. However, i'm not taking out much hair and i'm not disturbing this construction of the cap either, and it's really just that simple. As you can see, you don't disturb the cap and the hair, you may lose a little bit. You may lose a lot just depending on how much hair is around that ear area, but it's nothing to be concerned about i'ma turn the cap inside out and show you another angle. So if you was cutting from the inside of course, move that hair out the way you don't want to cut the hair. So you go up in a triangle around that seam and at the edge of the hairline in the front, and as you can see, this is what it looks like that simple. You guys all right. So this is what the end result look like. After doing all of the customization to the wig, as you can see, wow that looks so good. You guys and, as you can also see the ear tab area fits perfectly around the ear. So the wig now goes around that ear very well, and you can do that same technique with all of your lace, wigs. I am so blown away at how good this turned out all right, and so this is what it looks like after i glued it down. You don't have to glue a 360 wig down if you don't want to, but i would recommend if you do glue it down to not ruin your results by making sure your application is very clean, be sure to check out this video that just popped out right Here - and it will give you all the details on how to get a clean natural, realistic application with your hairline, and because this is a 360 lace wig, you can part it anywhere on the lace. You can also pull this hair into a ponytail. You can pull it into a half up, half down, ponytail, be sure to check my channel. I have so many videos showing how to style a 360 lights wig. If you are interested so yeah, i will be sure to put this wig down below in the description box, make sure to check there. There will be a discount down there, also and yeah. I hope you guys enjoyed the video. Thank you so much for watching thumbs up and subscribe. If you are new - and i will see you back in my next video, so you
Comments
Misslattie’s locs And Life: This was VERY HELPFUL to me with regards to cutting the ear tabs! You’re awesome! Thank you for sharing
Tammie F. Taylor: Love the more realistic baby hair. Let's hope this catches on !
Deb Deb Virgil: Gorgeous you make it look so easy unfortunately, everytime I follow you step-by-step I still can't get it but I will definitely keep trying thank you so much!
R North: Sis I love the way you present pro level details in a straightforward manner. You demystify techniques to make it all look simple and easy Your vids leave me in awe. tfs
Raven T: I'm just getting into wigs and this was one of the most helpful videos I've seen
UNEEK BEAUTI: Honey, let me say You Slayed this unit. I love the tip you gave about cutting that lace around the ear. The lace around the ear is hard for me to perfect.♀️
Mignon Carter: Thank you so much for this very informative video. I have been trying to learn to pluck my wigs, and I have been struggling. I also liked the tip about cutting the lace around the ears. You are always so helpful and so beautiful.
Beauty by Jay Morris: Thanks Marie, this very helpful, you did this very well, now I can lay those tabs down , have a great Sunday #precioussquad
Jennifer Parham: You always be coming through with the tips and I’m here for it
Crystal Amos: The hair unit looks good mama, and I did purchase the matrix total results after your previous tutorial a month ago baaaby this product does the job THANKS For the info and ladies if you are reading my comment this product does work better than any other.
Mammie Summers: Love the install and all the helpful details. Beautiful!
Chan Stan: Off topic, your nails are so cute the install came out really well
Sheri Blake: I love pretty lux wigs saving up my coins to buy great job sis
Mindy S.: Watching your video is like sitting in a class! Simple a teaching channel!
tiffanyjackson521: Very detailed and helpful as usual you’re so pretty and I learn so much from watching your tutorials I wish I could subscribe a million times there’s no way you don’t have 1M subs #PreciousSquad #LikeCommentSubscribe
fancybeauty: I hope you have more wigs on your site soon. ☺️
Kimberly Kyles: Marie hands down TALENT
Jilly Beanz: Looks great! Thanks for the tutorial
Ladaijia Beasley: This is very helpful look so good , what kind of comb is that ?
Felicia A: Boom !! There you have it a flawless install !!
E Rich: Love it ❤
Jo: Your work is Just amazing
Esther Sowell: I wear 360 units very helpful not as good as you I'm getting better watching your videos love the unit checking it out
Angelia Brown: Love the video. Do you know any product that will lay down my baby hairs on my lace hair wigs like the got2b glue. I’ve tried but it irritates my forehead really bad any suggestions?
DISPATCHER92 DISPATCHER92: YES TEACH BABY GIRL ❤️
Patricia Young: So you mentioned that you dont have to glue the wig down, so how do the tabs around the ears work without glueing it down? I prefer not to use glue but I dont know what to do with the tabs.♀️
Gabrielle: bon lundi matin Marie! merci beaucoup pour un autre informatif( thanks for another informative) tutorial! I'm learning or at least tryin lol, so much from you; the blue shampoo, is great. Please do another tutorial on a full lace wig. Merci beaucoup
Jasmine W: Gorgeous
Pamela T: Hi Marie. Can you please show how to wear a 360 lace wig without a part In the front Everyone. wears a part,, so you know that’s it’s a wig. Thanks for all your knowledge.
Jennifer Brooks: I must have missed it. Did you glue the wig down?
Crystal Hairston: I abhor ear tabs...however I want to cut them but I don't want the wig to look crazy
Starstamp1: Dear Ms PreciousMarie. Please do the hair plucking in slow motion. If your a beginner it’s hard to see what your doing on fast forward. Are you grabbing one strand at a time or a few? Are you plucking straight or jagged. The two most important things bleaching and plucking you don’t show from start to finish. It’s almost like when someone gives you a recipe and leaves out that one ingredient that secret that makes the dish. Thank you
UNEEK BEAUTI: Have you ever had wigs that you can't get to stick no matter what?
Hair by Cyn 256: I'm the 3rd view today
Tammie F. Taylor: BTW, the link for the purple shampoo takes us to the conditioner, not the shampoo. I got the conditioner today because I used the link and was confused. Lol Also there is a small 1.7 oz bottle of the shampoo for $7 on Amazon in case someone wants to sample it.