Customized 360 Lace Frontal Wig Tutorial
- Posted on 28 November, 2016
- 360 Lace Wig
- By Anonymous
Hey Guys I'm back with a tutorial on How to: Make a wig using a 360 lace frontal. I show you how to customize from start to finish. I will be using some hair from Ali Moda Hair an Aliexpress vendor! The Link to this hair is listed below. Hope you all enjoy. If you have any questions please leave them below :) Thank You all so much for watching ! Ya'll are my ROCKS!
SashaFierce411❤️
How to: Bleach the knots on 360 Lace Frontal
Review on Ali Moda Hair
-Everything except the hair can be found in store or online at Sallysbeauty.com or you local Beauty Supply Story
Dome cap (Dry fit version)-http://www.sallybeauty.com//smooth-fit...
Ali Moda Hair
https://www.aliexpress.com/store/92181...
(1) 16'- 360 lace frontal (1b)
https://www.aliexpress.com/store/produ...
(1each)18', 20', 22 , 24' Bundle (1b)
https://www.aliexpress.com/store/produ...
bundles with closure:
https://www.aliexpress.com/store/produ...
bundles with 360 lace frontal:
https://www.aliexpress.com/store/produ...
-----------------------------------------------------------------------------------------------------------
B O O K M E:
Need a Makeup Artist or Hair Stylist? Book me ➡️ email me at [email protected] or contact me though any of my social networks.
-----------------------------------------------------------------------------------------------------------
S O C I A L M E D I A
~Instagram:
www.instagram.com/iamsashafierce411
~Facebook:
www. Facebook.com/sashamason
~Snap Chat
SashaFierce411
----------------------------------------------------------------------------------------------------------------------------------------------------------------------------------------------------------------------
B U S I N E S S I N Q U I E R I E S
For product review or business opportunities please contact me at [email protected]
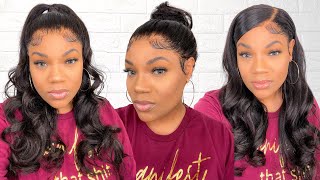
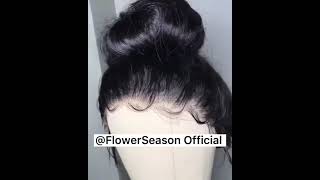
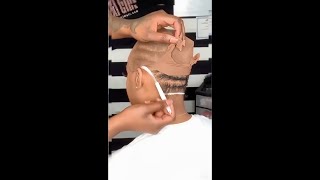
Hey guys, I'm back and I'm gon na share with you how I make my wigs when I using a 360 lace frontal. So, as you seen in my last video, I did reach the 360 lace frontal. She came out beautifully if you guys want to know how to bleach the knots on the 360 lace front, I'll just go ahead and check out the video listed below. So I already applied the dry-fit dome cap to the wig head. I am going to be listing that below I'm just going to be lining up the actual 360 hairline with the end of the dome cap. Now it looks like the hair is falling into the doll heads face trusts. This doll head is pretty small headed compared to my big head, so it is gon na run over slightly. Don'T worry about that. Just make sure that the dome cap fit to before now this gap in the back is going to be non-existent. Once you go ahead and actually sew all of it down, so I'm going to go ahead, double knock! That string and I'm just going to sew through the bottom and then we're going to create a double knot there. So it's just basically putting the string through the opening - that's left through the string, so it's creating like this giant knot and just double secures make sure everything is going to stay in place. Now you don't have to do this all the way around the head, but I like to do this on the first two stitches and then just completely stitch. All the way around now be careful when stitching, because you don't want it to tug. It is the stretchy cap, so it'll, you know gather if you pull it too hard, or you have like one area like this right now. If you see how I'm putting that through there - and it has such a large area to get through, it - can create this tugging effect. Now, if I were to pull on that with with all of my pressure, it would just create this like little cooling effect and then make the wig cap a lot smaller than it is so be careful when doing that now I am going underhand. Don'T worry about going over under itis. Fine, then going under allows you to look a lot flatter so now I'm going to start adding the bundles of hair. Now a few tips before adding the bundles of hair. Now some people get confused about hair placement. These areas are basically your guidelines. You do not want to go past these with hair and you do not want to stop before you have filled these areas. We hair for the first two bundles. I will be doubling up the West now you do want to apply the lower weft directly on top of where the hair starts on the 360 frontal. So, as you can see, I'm connecting the 360 frontal to the actual weft. I don't want there to be any um like space between. I want you to be able to put this in a pony and not see any of the lace. Now don't worry about it being too bulky in the back just because we're only doubling up the first couple of bundles once we get up to the top, we will start singling them now. I am using a fold-over method, so I know this tends to look a little bit bulkier, but if you're worried about that go ahead and cut your webs, I personally don't like to cut my West unless I really have to this just helps prevent shedding. So I mean, if you don't have to cut your website if you're, okay, with the fold-over method, then go ahead and use a fold over method, um guys just a little disclaimer. I know you guys are probably looking like damn girl. Can you put some leg Jerkins on those ashy ass hands? Well, girl! I cannot. I cannot grip the needle if my hands are slippery and I just got done the bleaching, this lace frontal so yeah. Now, as you can see, once I get up into the corner, I am going to reach what the hair ends. So what you're going to do is start um folding over like you're, going to fold the hair over and work your way back to the other side, now you're, just gon na lift it up just a little bit um. I don't really have a clip of that, but I will show you towards the end what I'm talking about now, as you can see, I'm like having a really hard time pulling it through, just because I doubled it, and these needles are always so hard for me To like pull through, I don't know why um but yeah just make sure that you're um threading is kind of close to each other. Just so you make sure everything is secure. Don'T do it like. I sew down the 360 frontals that will not hold and it won't look cute. So once you get over to the side and there's not any more hair left to fold over you're just go ahead and cut off the web. Now be gentle when you do this, because you don't want to cut into the other hair and create like little um like an extra beard, looking theme so just be careful when cutting the weft off the hair. Now I'm going to do the 22 inch it's going to be exactly the same way as well as a 20. I can see that the hair is getting higher onto the wig cap and we're kind of closing up towards the crown. Now, once you get to the top of the crown where the 360 and the last weft meet, you want to combine those two. So you want to go head and sew through the weft and then connect it through the 360 frontal, and you want to close up that gap girl. I am legit dying over this Ashi myth. I cannot deal with it right now, not even joking. I wish there was like an editing tool for that now sewing. Those two together is just going to make sure that the 360 frontal and the wefts are secured together, and it's just going to close up the wig and make it complete. Now don't worry about seeing the stitching this isn't going to show at all and also the reason why I said to make sure you're just singling the less up top it's just because it gets a little bit bulky and you don't want to look like you. Have a helmet on make sure you double knot, the end of the string you're going to turn the wig inside out now I am using a Styrofoam a little wig head, so I do have all these little like little pieces inside so just clean those out unless You'Re using lengthy hard one you're just going to cut off the excess of the wig cap from the inside, now be careful when doing this, because you don't want to cut off any of the stitching and make any of the bundles unravel from a 360 frontal. So be careful, I like these wig caps. I also like the netted wig caps. I couldn't find any and my local beauty supply store. So I use a dome cap. Oh um. This is a final look of how the wig came out, she's so gorgeous. I do have a full video on the review of the hair that I am using, but I am wanting to customize the front. This wig already comes with some bay hairs, but I'm going to pull out some hairs around the perimeter of the face, so I could make some more and I'm just going to grab like a little eyebrow razor, nothing major. You can grab like a spray bottle and wet up the hair on the perimeter. Now, I'm just going to cut the hair frame the face and then afterwards I'll show you how I get rid of some of the density around the baby hairs. Just because my natural baby hairs are not like very dense at all, so when a wig has too much density in the front, it tends to look a little Wiggy on me. So I like to cut the baby hairs around the face and then go ahead and, like tweeze out some of the density from the actual baby hairs that I just created. Now. I just wanted to share with you guys these razors and how well they work for cutting around the perimeter of the hair compared to like professional razors or something. If you didn't want to go ahead and purchase those, they do really well and they do not leave a blunt cut. So I like them a lot because, when you're doing your baby hairs, you do not want to cut like any blunt cuts, because you're just gon na make it look like it's just gon na look like really fake. Of course, your natural baby hairs are not like super blunt cut or thick, so you do want to make sure that the ends are a lot thinner, make sure you're getting those sideburns as well. You don't want those thickest sideburns so now that I've created those baby hairs. I am gon na thin the density out and just get some tweezers and start plucking away on the hairline. This is just going to create a more realistic hairline. You know your real hair line. Isn'T super super super thick. It usually is very thin in the front until it gradually turns to like a thick head of hair. It usually doesn't start thick right off of the back, so I mean some women can get away with it and it looks okay on them, but for the most part I like to thin out my hairline just because it looks really really Wiggy on me. If I go now, I'd rather pull out more than not pull out enough just because once I put it onto my scalp in my the color of my scalp blends, in with the lace, you won't be able to see at all now, as you can see, there's A big difference between the tweezed area in the non tweezed area, as you continue to tweeze, you might um feel like. Oh my gosh. I take it out too much hair, but trust me. It is not too much hair um once you put it on, and you see the difference that it's made you're going to be happy that you did it so just continue to tweeze it out and just make those baby hairs very very like then I don't want Them full like they are now. This does take some time, so just be patient with it and make sure you're not um poking too hard or pulling too hard. If you do not want to rip the lace, you should also be able to tell where the hairline is supposed to stop by the ear tab on here. So, as you can see on this corner, I do have the ear tab held down with the wig pin. So just be aware of that, as you can see, I got rid of a lot of the density from the hairline, so it looks really really natural right now believe it or not. I even still had to go back in and get rid of some of the density from the wig, because it just didn't look as natural as I wanted now. This is a final product after I installed the wig. I just used some guts to be glue. I did not glue this unit down or sew it down. I do have a full initial review with me wearing this wig. This is hair from a LaMotta hair. It is an le expressed vendor. So if you guys want to know more or see more on this, video of me wearing the wig go ahead and click on the video right here. I do want to thank you guys for watching, don't forget to Like comment subscribe. Thank you guys. I love you and I'll, see you in my next video bye.

Comments
Donna: I love your tutorials, this is very detailed , are you supposed to "flip" the wedts when sewing it in the wig cap? Do you know why some people do that when stitching? Thank you in advance for you're response
Nonotreally: Hi! Can I ask, it is easier to move and tie up the hair when the wefts are cut or is it the same regardless of it being doubled up or done in singles?
realhwifeofchi1: great turtorial! thank you for this
Prakan Panheam: love your video, it's easy way to understand
hfx ytut: Thanks for sharing this beautiful video,you are so nice,I like your videos, I purchased the wonderful product from newigstyle..com last week
Marjorie Camelia: l have learnd a lot.thank yuo sis.marjorie camelia from curacao.
As Lived By Gee: A Millennial Mom Series: Did you sew the front of the frontal in the center? The dips && curves should be the hairline. It looks backward
Nick Wyne: Very beautiful video,last month I received the same one from newigstyle..com
Shawna Hines: I don't have those or areas on my frontal