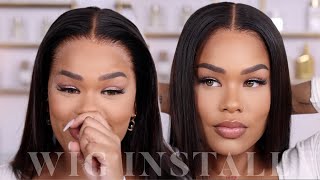
360 Lace Frontal Wig Install Securing The Back Without Glue Youth Beauty Hair
- Posted on 13 February, 2019
- 360 Lace Wig
- By Anonymous
hey Loves new video on this 360 Lace Frontal Wig , this is how I install Securing the back without glue on m beautiful client
HAIR DETAILS :
the detailed company's info has been left down below, pls check it!
USE Code “FABB“ Get 25% OFF
Direct link to wig:
https://www.youthbeauty.com/tsmadisonh...
Hair Color: Natrual color
Length: 20 inch
Cap Construction: 360 Lace Frontal WIG
Texture:Straight
Density: 180%
Hairline: Pre plucked hairline
Cap Size: Medium
Lace Color:Medium Brown
360 Lace frontal wig Water Wave wig:
https://www.youthbeauty.com/water-wave...
Super Sales Hair Weft&Wig :
https://www.youthbeauty.com/super-sale...
Link of our website:
Youtube Channel:
https://www.youtube.com/channel/UCSucf...
Instagram:@youthbeautyboutique
https://www.instagram.com/youthbeautyb...
Facebook: Youth Beauty Hair Co., Ltd
https://www.facebook.com/YouthBeautyHa...
Hey you guys, it's Caroline, so I got this hair from Youth Beauty here and I'm going to be doing a wig install on my beautiful client. Not you me! So let's just get started alright, so I already went ahead, I'm pretty out here or back now, I'm using it got to beat glue job in a black tube and I'm using that to slick down her edges. I'M going to be doing the podcast Matic. I am using a tan stocking cap. I'M going to apply that to her head is just protect her edges and pretend like ice cap underneath the wig I'm using my got ta be sprayed so spray that and hold it down after that Depot on the dryer. For about 10 to 15 minutes to let her dry and now she's completely dry, okay, the wig and I'm using today is a 360 wig and I do want 10 stockings to be in the back of the cap so to hold a cap in place, I'm just Using my thread and needle and I'm sewing the back of the captures to make sure that it doesn't comes off before I put the wig alright, like I said, the wig that I'm using today was provided by youth Beauty here. Okay, this is the packaging. The way came in actually love these cool O'Hare bags. Ok, the wig is 3/16 lace, frontal wig, and this is it. This is how you look inside. It comes with four homes inside two on the sides, one in the front and one in the back. It does comes with two adjustable scribes in the back of it: okay and then it also comes with the mesh in the middle, where to sew the rest of the cap on the way there comes with baby. Here you can see all around, it has a nice little baby here it also came creep cloth and the texture is like a silky tech for relaxed hair texture, the back of it. They come with a little bit of baby hair too, and the texture is really nice. This is a 20 inches lace, frontal 360 wig, alright. So before applying a wig, I'm just going to attend her stockings with some foundation that matches your skin tone. I am using a little bit of alcohol to get the extra foundation of her skin just to make sure that the glue sticks well. If the foundation is on to her skin before you apply the glue, the glue will not stick or it will not hold as well. So I always go in with some alcohol and I just use it on a cotton ball and just I'm wipes the foundation of her skin all right. So I already went in here and tinta the lace on the wig, also the same exact color that I used for the stocking just to make sure that the lace also matches her skin tone. Also, I did customize this wig a little bit. She said she did not want her hair line to be to pluck out too thin huh, so I twisted out just a tiny bit, but that wig already came free plug. So I didn't do much of a plucking because she didn't want her hair line to be 10 okay, so I already customized it before it's time to put it on now, I'm just positioning a wig making sure that it fits her hair, making sure that it's properly On a hair line before I go ahead and just it before it's time to put the glue, so I'm pushing her way back now because it's time for me to apply the glue now, as always, I'm using my ghost bone glue that I always always use. I do three layers of it. I apply the first layer, let it dry apply the second layer. Let it dry apply the third layer. The glue goes on white and then it dries clear. So I do that three times and let it dry before, if time for me to stick the weight onto the ghoul now for this particular application. I did the middle part first, which is the top of her hairline, and I put the weight down before I went in and I did the side parts now. Once I stick the wig down, I usually pulled the extra lace in the front and I always always ask my clients to assist me importing the extra lace just to hold the wig in place until the glue dry completely. Then I take my small tooth comb and I just comb through the lace in the front just to make sure that the lace is flat as possible and the hair is not chromo up together on the glue. So I just do this part to make sure that the lace is secure in the front all right. Now that I have the middle place, she killed down now, I'm going to secure the size, and I want to be using that exact same steps with the ghost ground glue. I'M gon na do three layers on both side. Let it dries Claire's ones. I have three layers on then: I'm going to stick both sides down all right now that I have both sides down and the front is nice and secure I'm going to go ahead and cut off the extra lace in the front. I do use a eyebrow razor shaving stick and I cut off the extra lace in the front and I use my scissors to go around the ears to shape around the ears and make sure that the least is probably properly around her ears that it fits her Ear tabs nicely all right now, for the back of this wig, I tell my client I'm for the 360. I'M ho I usually just sold the wake down in the back. I don't glue it down, because the twist 16 usually comes with adjustable straps in the back. So for the glue to hold back there in order for the glue to hold back there in the back of the person here that it has to be all lace in the back. This is now a full lace. Wig it's a 360 wig, so the whole wig is not just all lace and then it has the adjustable straps in the back so that just the bushcraft because of the thickness up there, just that was Christ. It stops the weights from really sticking and holding total glue when you put it there now, when you do put it there, it does give a hole, but it's not a lasting hold. It doesn't hold as long as the front will pull. So I always suggest in my client instead of using the glue back there, just the sole, the wig in the back, and this still gets it a nice hole if you wan na do like a low ponytail or a nice little quick updo. So this is what I'm doing. I just put out the rope in the back, and I use my thread and needle on my braids that I usually pull back there and I just saw the wig there and after slowing it down. This is how it looks once I slow it down and get the hair all situated in the back. This is how the wig looks so now she is ready for salary. Now, I'm just going your hair and making her some baby hair in the front. I'M taking out the first hairline and I'm using my razor and I'm cutting it shorter just to make it a little bit more realistic. Then I'm going in with my Nairobi moves. This is my Holy Grail. I always always use it. I'M going to put that on hairline and I'm going to use that to slick down her baby here after that, I'm going to use my Sendak script and tied the baby hair down in the front and then imma pull her under the dryer. I let her sit for about 10 minutes and then I'm ready to style her our after ten minutes of her running a dryer I took her off and I took the cynic script solvent. This is how the baby, here it looks laying down before I comb it out. You can see how nice it looks. Hair line looks really nice and looks natural. I'M going to show you guys the back of it. This is how the back look pull up in a the hi little bun. This is how the back look after I've sewn it. Okay, now I'm just using my comb and I'm coming out the baby here just to make the baby here look more relaxed and it's not looking at hard forehead. I'M just going to use my hot comb and comb it out just a little bit, I'm just to lay the front. Oh I'm better, and then I'm gon na use my flat iron and flat iron, the back and that's pretty much it for this week. You guys can see as a part the hair roll you can see how natural the parting space looks and look at the hairline. The hairline is pre plunk. It just looks beautiful on her. This wig is actually a Gorger hair. Texture is not, as silky is more like relaxed, hair texture, it doesn't have too much shine to it and it looks really really nice and natural, but that's pretty much it for this video, okay, umm. I will leave all the links in the description box. If you guys want to check out this wig from youth Beauty, hair, alright, this is pretty much the finished look. She did want to put it in a ponytail after we slick it, she wanted to go home with her ponytail. So that's what we did. We went ahead and I put it in a ponytail for her. Thank you guys so much for watching. As always, I would catch you all in my next video bye. My way back with the demon, you find your way back.
Comments
Caroline Fabb TV: USE Code “FABB“ Get 25% OFF Direct link to wig: https://www.youthbeauty.com/tsmadisonhinton-360-lace-front-wig-straight-p-16.html Hair Color: Natrual color Length: 20 inch Cap Construction: 360 Lace Frontal WIG Texture:Straight Density: 180% Hairline: Pre plucked hairline Cap Size: Medium Lace Color:Medium Brown
GMarie: Beautiful. ❤
Ms Hunni: Simply Gorgeous ❤ Where are you located? I'd love for you to do my lacefront
Deborah M: Beautiful! I do the same thing I sew my wig down in the back because glue of any kind does not work! The back always llifts. Thanks great video.
lisa g: Beautiful!! It looks nice on her love it
Deidre Rilry: you are really an amazing hair stylist love it
Simone- DO IT NOW OR NEVER!: I'm coming to get my hair done in the Summer. #Perfection
Barbara H: Beautiful job.
Sherly Smith: Amazing
Faithfully_Melanie: I wish that I could have you do my wig for me
TN Zem: Where are you located? For bookings
Arshasta Malone: Good job
Chxrry: Hi anti Caroline can you say hi to anti Naomi okay :)