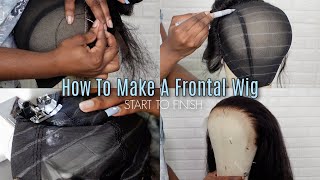
Diy: Easy Ash Blonde Bob Wig With Dark Roots For Woc
WELCOME BACK TO MY CHANNEL!
BLONDE CAN BE INTIMIDATING, ESPECIALLY FOR WOC, BUT IT DOESN'T HAVE TO BE!
I wanted to share a tutorial on how I accomplished this Ash Blonde bob with dark roots from a previous video I posted! I hope you enjoy! The products used are listed below!
HERE'S A FULL, EXTREMELY DETAILED VIDEO OF HOW I INSTALL THIS ASH BLONDE BOB WIG!
https://www.youtube.com/watch?v=H2uOa7...
2 boxes of Wella Toner in T27 (this bob is 14 inches, if you're doing longer hair, you will need more toner)
1 box of Revlon Color Silk in 51 Light Brown
1 bottle of 20 vol developer
1 pair of gloves
INTERACT WITH ME ON SOCIAL MEDIA!
INSTAGRAM: MOCHAMEECH
TWITTER: MOCHAMEECH
SNAPCHAT: MEECHNICOLE
BUSINESS INQUIRIES & BRANDS PLEASE EMAIL
I do not own the rights to this music
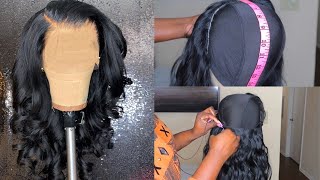
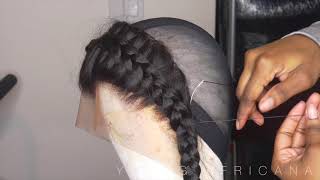
Hey guys, it's me ch welcome back to my channel, so, as you guys can see by the title today, we're gon na be making this ash for a week. So, let's just hop right into this video so for this video you're, obviously you're gon na need your blonde 6:13 wig. Now all we have to here because I'm making these for other people, so I'm just gon na knock both those out right now. Obviously, I'm only gon na show one in this video you're also gon na need 20 volume. Developer you're gon na need well a color charm, toner and t27. You guys this is not the hair color. This is toner. Okay, t27 you're also going to need a red line in 51, which is light, brown and you're gon na need a pair of gloves, obviously and you're gon na need clips and a brush and a bowl. Now you can also use this to mix your toner and your developer in so, for starters, we're gon na take our six 13-week and we are going to pin it down on our mannequin with some t pins, and i use several t pins to pin this unit Down and excuse my mannequin, that's my ride-or-die! That'S my boob! We have been through everything together, y'all! That'S why it's all beat up so yeah we're gon na go ahead and pin these down to secure the week so that it doesn't move as we're applying our color. Ok, so now we're going to take that revlon in light brown and we are going to mix that together the contents from that box and once it gets the right consistency, you guys we are going to go ahead and we are going to apply that on that Lace on the very front part we're going to start off, but you guys before that. Please do not forget to put on your gloves and grab you some clips so that you can clip the hair out of the way as you go. So now we are just going to take this clip or you can use a comb or you can use your application brush. It doesn't really matter, but we're going to part the hair and then we're going to apply just a tad bit of that color and we're probably only going to go. I would say about no more than an inch up on the hair in probably even three quarters of an inch. We just wanted to look like the hair. Color is growing out. We don't want it to look like an ombre or anything like that, so we're gon na part it and we're going to apply just a little bit of color. Okay. So now that we are finished with the entire front hairline and we're done sectioning through the entire front of the hair, and you guys it's super important - to make small parts when you're sectioning through the front of the hair. Because you want to make sure that you can part this unit anywhere and that it will have this brown hair color so make sure that you're making small enough parts that you can get all of the roots in the front of the wig. But this part that I'm doing right here is super important you guys, because if you don't color the back part of the wig where the roots are, then it's gon na look really crazy. When you call me or when the wind blows, it's just going to be straight 6:13 hair, so you want to make sure that you get the back too now the back doesn't have to be as perfect as the front, but you still want to make sure that You get it pretty good now. This part right here is completely optional, but I honestly feel like this is really what makes the week so bomb. You guys I'm gon na take a couple of random pieces and I'm also gon na do balayage on some pieces, which you don't have to do all that you guys you can just completely bypass this part if you want to, but I'm gon na add that light Brown hair to several random pieces throughout the front of this week, and I'm doing that because it's gon na add some depth and some dimension and it's gon na kind of give us like a low light effect within our ash blonde wig. So again, this is completely optional, but I kind of feel like this is really what makes the week and also when you start to apply that light brown color, it's gon na come out and it's gon na look so dark. You guys do not freak out. That is not gon na, be how dark the hair color is once you shampoo it out of your wig okay, so right here, I'm just going in with that t27. I just put it in the applicator bottle and I mixed it with that 20 volume developer always read the directions on your on your products. So Wella requires two parts of developer to every one bottle so put that in that bottle, we're gon na mix it up and we're gon na apply it all over the entire wig, where there's just strictly 6:13. Here you don't want to add it to the roots of the hair, where the light brown is even though toner doesn't really change the color per se. It just tones it so we're just gon na add that all over the 6:13 here a few moments later. Okay, so now that our wig is finished processing, you guys, I wonder head and I shampooed it out, and I conditioned it - please always shampoo twice and conditioned your units or even your real hair after you have finished doing any kind of chemical process. You guys. That'S super important for the longevity of the hair, and now I'm gon na go in with some heat protectant and my blow-dryer, and I'm going to blow-dry this little baby until we get ready to style her okay. So this part, where I'm applying I'm actually not gon na talk you all through this part of the video, because I already have like a 30 minute video, that's in depth of how I applied this week, so I'm gon na, let you guys enjoy the rest of The video please, let me know if you have any comments or questions or concerns in the comments below, and I will see you all next time. Okay, yeah, I will see you on the next video. I love you guys do not forget to Like comment and subscribe. Peace,

Comments
Onicca Robinson: Fantastic Job!!!
QueenBri TV: Gorgeous
Angie Dior: Hi do u accept recommendation from ur clients to make the wigs they want ? And u got skills girl.
Nicole Wallace: Hi, how long did you let it sit before washing?
alexis thomas: did you stain your lace ?
just tryna lose weight: Hey if you said it already I'm dumb and missed it lol but do you have a link for this wig?
Sara Sangare: Is this unit still available ?
PRETTYBROWN4U Reacts: I’m trying to order it also I just need link
Karmaa Baby: How can I order this ?
Jameca Hutchinson: Where is the wig from
Jess A: I don’t know if you said this but how long was the hair