Bob Wig Install | Amazon Wigs| Makeda Thomas
BOB WIG INSTALL | AMAZON WIGS| Makeda Thomas
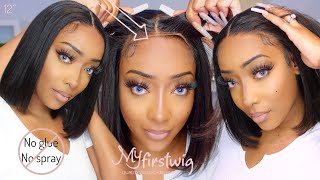
HEY GUYSSS! In today's video I show you from start to finish how I slayed this bob wig install. I hope you guys enjoyed today's video ✨
For Business Inquires ONLY- Email: [email protected]
Hair Link: Bob Wig Human Hair 4×4 Blunt Cut Bob Wig Human Hair Lace Front Closure Bob Wig Brazilian Short Bob Wigs for Black Women 150% Density Natural Color (8inch) https://www.amazon.com/dp/B0952LNQK1/r...
Hair Details:
Type: 4x4 Closure
Type: Brazilian Straight Bob
Type: Human Hair
Length: 8 inches
Density: 150%
Color: Natural Black Color
Price: Under $55
Products Used:
L'Oreal Quick Blue Bleach
Clairol Pure White 40 Volume Developer
Shimmer Lights Shampoo
TRESemme Moisture Rich Conditioner
She is Bomb- Hair Wax Stick
Got2b Glued Styling Glue
Got2b Glued Blasting Freeze Spray
Wig Cap
Elastic Band
Rat Tail Comb
Blow Dryer
Hot Comb
Flat Iron
[NONE of the products used in this video are sponsored. These are all honest opinions of my own & all products I bought with my own coins.]
[EXCEPT FOR THE WIG, THAT WAS SENT TO ME BY THE COMPANY. (Still my honest opinion of the hair)]
Feel free to comment down below if you have any additional questions :)
For Business Inquires ONLY: [email protected]
Join the Glow Gang Family by clicking that sexy link down below:
https://www.youtube.com/channel/UCqoLW...
Keep up with the Glow Momma:
Instagram: @iamleosfinest
Link: https://www.instagram.com/iamleosfines...
TikTok: @iamleosfinest
Link: https://www.tiktok.com/@iamleosfinest?...
Hey guys welcome back to my channel and in today's video i'm going to be showing you guys how i slayed this start to finish bob wig install. So if you are interested just keep on watching so today, i'm working with this amazon company called amusel. Hopefully i didn't butcher that but i'll make sure to leave everything in the description box down below, but this is their bob wig. It is human hair, it is a 4x4 closure, it is 150 density, the color is natural black and it is eight inches, and this is their brazilian straight short bob. So this is what it looks like fresh out of the packaging, and this is what the lace looks like before i get into customizing it. So it comes with the combs all around the perimeter of the hair and elastic bands to adjust on your head, and this is what the lace looks like compared to my skin before i bleach it. So i'm gon na go in with my quick blue and some 40 volume developer, you're, also going to need a bleaching brush and a bleaching bowl and you're going to need some gloves just to ensure you don't get bleach on your hands. I only had one don't be like me, get two gloves, but when bleach gets on your hand it burns, so be careful. So you want it to be a thick consistency, but not too thick that it doesn't penetrate the knots but not too thin that it bleeds through the knot. So that was that at normal speed and now i'm just speeding up showing you guys, i'm applying a little bit of pressure just to make sure that i really get those thoughts in all right. So we're going to let this sit for no more than 40 minutes. But you're going to check the hair every 10 minutes just to ensure that it is bleaching to the way that you like once it's done bleaching i'm gon na shampoo it with some shimmer lights, purple shampoo to stop the bleaching process and then i'm gon na go In with my conditioner just to soften up, bring it back to life after i just went through all that bleaching, but this is what it's looking like and i love the results. So now we're gon na get into customizing the closure and i'm trying out this arrogant method, because i don't know it just really does something. So. First, i'm working at one side, i'm working on one side at a time for you guys, so i'm just taking out my potential baby hairs, and this is me at normal speed, plucking the hair and then you're gon na see. I sped it up just to show you guys you wan na pluck enough, but you don't wan na over, pluck it's best to just pluck enough and then put it on your head and see if it needs any more plucking, because it is very easy to over. Pluck and you don't want that to happen because then it looks like your lace is balding and that's just not cool, so you can just watch this process and i'll be back when it's ready for the next, when it's time for the next steps. Okay, so next i'm going to go on my blow dryer and kind of try to dry up this hair a bit before i start flat, ironing it at first, i started off on low heat, but that was just taking too long and i got impatient so i Went with some medium heat and started blow drying it out, you don't want to blow dry it bone straight, just enough where it's not like dripping and super damp, because you are applying heat to it so that little bit of dampness will dry that up. So i pretty much flat ironed the whole wig. I just wanted to show on the camera how i flat ironed the closure section, so you just want to section it off. First, you want to flat iron it, and then you want to go in with your wax. Your little hair wax and you want to get those roots because you want the top of the hair to be flat as possible flat as humanly possible. So once you go in with that, your wax you're gon na go in with your hot comb and press out those roots, and i'm telling you your wig will be laid and slayed do not play okay. So once i'm done with that, we're gon na get into the next steps alrighty. So it is now the next day and i'm getting ready to install this wig. So i want to cut off those stick flaps that are on the side, because you don't want to lay those down on your closure because it'll be noticeable on your wig and we don't need that. So this is what i'm working with underneath my bonnet and we're just gon na brush away those flyaways and those edges only along the perimeter of where the lace will be laying. So i'm just gon na put a little bit of that's to be gel on there and i'm gon na blow dry it down and then once i'm done with that we're gon na get into the wig cap. So i don't really do the bald cap method really because i don't plan on keeping this wig on for long. I only kept it on for one day, but i reapplied every time i put it on. I wore it for like a week, but i don't like to sleep within my units unless i have to so i'm going in with a foundation that matches my complexion perfectly and then i am just going to put that same foundation on the wig cap and just Look at that: okay, look at my skin over there and then we're going to use some guts to be spray and we're going to spray it on that wig and we are going to blow dry it just to make sure that the makeup doesn't transfer and all That stuff just avoid a mess. So this is what the wig looks like just when i plop it on my head. It hasn't been glued down or anything like that, and it is looking snazzy and ready to rock and roll dude. So once i'm done with that, i'm going to go in with my guts to be gel and i'm gon na put one thick layer of that gel along where the lace will be laying and then i'm gon na blow dry it and wait for it to get Tacky and then that's when i'm gon na put the lay the wig down, so i don't use lace glue unless i plan on wearing my unit for a very very long time. But if you just want something quick and easy, then i suggest the glass to be gel because it's not as much of a hassle as lace glue. So once i am done with that - and she is nicely melted - i'm just gon na comb out the you know because it gets a little crusty right there, we're just gon na comb it out. Just you know, because it was laid so we're gon na comb it out and then once i'm done with, that we are gon na cut the lace off. So i like to go in with a eyebrow eraser to cut it off just to get that jagged. Look! So it's not just a straight line across that jacket. Look really helps it to look natural but be careful because i've cut myself on my face before it is not easy, so make sure you're careful and then i'm going to go in with my scissors and cut off the excess lace and i'm going to go in With my guts to be spray just to melt down anything that lifted during the cut down process and then once i'm done with that, i'm going to go in to the edges. So the edges is like a whole different ball game. It is hard that could be like a whole different video, because edges can make or break your look. But i tried so please don't clock me in the comments, because your girl is, you know, she's a beginner at wigs she's getting better, but we still have some improvements to go. You know so this is what i meant by don't over pluck when you're customizing the unit, because you can always go back and plug some more when it's actually on your head. So you can see what it looks like. So we're going to do a second meltdown. We'Re going to spray some glass display in between the edges and the hairline, and we're going to tie that down for 10 minutes and then after 10 minutes yo junk should be melted to your scalp. It should look like it's growing out your head. Just look at that, okay and then i try to go in with another arrogant, hay method by curling up my edges, but yeah. This is my first time we're really just trying to finesse it and wing it, but yeah. So you can just watch that and i'll be back alrighty you guys - and this is the end of this bob wig tutorial. I hope you guys enjoyed it. If you did please be sure to give this video a big fat juicy thumbs up comment down below. If you have any more questions and give this video a thumbs up and subscribe and hit the notification bell, so you can get a notification every time i post a new tutorial because we're coming out with the hair videos like okay, but i love you guys stay Sexy glow gang, you already know and i'll see you in my next video peace out girl scouts


Comments
Karlene Ennis: Love it wanted to buy the hair but had to see the results first