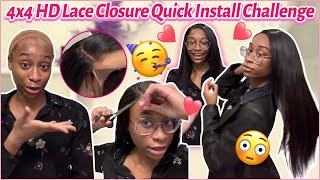
How To: Blunt Cut Bob + Brown Roots On Blonde (613) Hair! Ft. Ywigs.Com
Hey guys, let me know what you guys think of this bob, xoxo!
------------------------------------------------------------------------------------------------
HAIR DETAILS:
Blonde Straight Closure (4x4) 10 inches with Bundles 12 14 inches.
Direct link to the hair:
https://www.ywigs.com/7a-grade-3-bundl...
Use my coupon "Whit" to save $$$ when check out.
Ywigs Official website: www.ywigs.com
Connect with Ywigs:
http://www.instagram.com/ywigstore
https://www.facebook.com/Ywigstore/
Snapchat: Ywigs Hair
OTHER VIDEOS YOU MAY LIKE!:
UNICORN OMBRE HAIR:
https://www.youtube.com/watch?v=M-pk95...
TINTING YOUR LACE FRONTAL:
https://www.youtube.com/watch?v=00D8D...
HOW TO MAKE A WIG:
https://www.youtube.com/watch?v=-uqNC...
HOW TO WAND CURL YOUR HAIR:
https://www.youtube.com/watch?v=cNCF4...
K E E P U P W I T H M E :
INSTAGRAM: @whitfabby
SNAPCHAT: @whitware
CONTACT/BUSINESS INQUIRIES: [email protected]
#bluntcut #bob #613hair
Hey guys, what's up it's a girl with a V for those of you who don't know, and if you don't know now, you know it's up and welcome back to my channel. So in today's video you guys can see. I am a blunt cut Barbie. I did this super blunt blonde bob for you guys and I'm so super excited to show you guys how I achieved this look. So I received a 12 inch, a 14 inch and a 10 inch lace closure. The bundles are really thick they're, really soft. In this package also came a wig cap, which is really nice too. The closure is a 4 by 4 lace closure. It is not pre pluck so you're gon na have to do that yourself. If you choose to, and obviously because it's transparent, the knots do not need to be bleached for this look, you guys will see. I'M gon na show you guys how I plucked my knots, how I colored the roots and how I created this wig and also how I cut it. So I was going for a little bit above the shoulders and like this I get like UK lives um. So that's the look I was going for with this. I really really like this hair. It'S super flowy, as you guys can see super bouncy. It gets the job done. The closure took the dye really well. The only thing you guys will see in the video I had to add in about a quarter to half a bundle on my own 6:13 hair, because, as I was making the way, I realized two bundles was not enough for me. If you have a bigger head like me, you might find this problem. So just keep that in mind. You should get 3 bundles just to be on the safe side, but without for the raziel. Thank you guys so much for watching. Don'T forget to comment like and subscribe and you guys will see me in the next field. Alright. So the first thing that I do is I collect the front of the lace closure. Some of you might be using a friend so to do this so either or I do this so that my hairline Killick is natural as possible. Like I said earlier, because this is a transparent lace closure, you will not need to be bleaching any. The only thing you need to do, which is optional, is tint leaf, so it matches your skin color to properly pluck my knot, I basically just go in and make little sections at the front of the lace closure and then pluck backwards. I make about three to four sections so that I can make sure that it's just not only the front - that's cluck, but also a little bit towards the middle. So once I've done, I'm gon na move on to adding, in my roots and my roots, I'm using these two colors BIOS water called honey, brown and mocha, but with a mixing brush from the hair store, I mixed the two colors in a plastic container and mix Them around so that I can get the perfect Brown for my preference, and I also recommend doing Australian test. Just you can make sure the color you've created is the color you want. I know that this is gon na create kind of like a medium brown and that's what I'm going for so now, I'm gon na start sectioning off my closure and I'm gon na apply the color just to the roots. I feel about an inch because I don't want super deep roots, but it is totally up to you, you're gon na section throughout the whole closure and just apply it to the roots. Only like I said making sure that you cover all areas so that you're left with have no blood all right, you guys. So this is the finished product I'm about to let it sit for about 15 minutes and I'm gon na rinse it out and move on to making my way all right. You guys so to make this way. I'M gon na be using the quick weave method, which is basically just gluing, the checks on so a cap. Okay, I do not have the patience to so. Every check on the only thing that you do need to sew on is the actual lace closure, which I am doing here and then I'm just gon na glue the tracks on this takes me probably about half an hour to do it's really fast. I mean anything. I definitely recommend it if you're in a rush or if you're, someone who changes their wigs frequently so now it's time for the cutting part, which scares a lot of people and to be honest, too, is scary. If it's your first time or the first few times doing it, what I always recommend is placing the way cap towards the middle of the hair. If you place it too close to the front, it will be too short in the back. You have to treat it as if it's on a real head and place it where your actual hairline start. So what I do is I go through the sharpest scissors I have. I don't always use hair scissors and I literally just make my makeup mark. I take a piece of hair. I cut that okay, this is the life and rest of the hair. It'S gon na be, and I go throughout the whole head and cut every piece of hair down and there you have it. You are done and once you are finished with this, you can straighten it to see if you miss any end and then cut away any stray hairs. Now we are on to the last step, which is applying our unit. So, as you guys can see here, I just have on a sheer weight cap and I'm just adding a little bit of powder closer to my skin color to the front of the way cap. I know it's not gon na be a full lace run tool. So I'm only doing it to the middle afterwards, I'm gon na get the wig and I'm gon na apply it today using got to be glue, the gel and the yellow bottle. I will not be using a real blue today, just because it is a lace closure, and I do want to take this off and on as I can all right, you guys. So this is the final look after I have taken off my head side. I'Ve straightened it again and I flattened it out super super flat. I did go back in and snip snip a little more because I wanted it to be a little bit shorter, but this is the look I really like it. I think it's gon na be a vibe and I love bobs because they show out your full outfit like long. Hair is great, but it can get really distracting if you have a bomb outfit. So I'm excited to take some pics with this hair and they will all be posted on my Instagram, so make sure you guys follow me, at wit, fabbi, to see all my popular picks. Thank you guys so much for watching this video and we'll see me in the next one.

Comments
Lisa O: YASSSSS THIS IS THE BLONDE BOB THAT I WANT. Thank you
Krystal Shardae: Did you tone the hair ? If so, what did you use
Tyler Charnelle: What brown dye did you use !!
Shanyia Alize: What brown dye did you use?
LOVELYGETGLAM: Luv the look. Any shedding with this hair?!
Jay L .: did you tone this hair?
Afia Belle: Love this look! What’s the lashes called ??
Dereon Michelle: Really kute
Maiya Spears: Makeup routine ?
Meloni Jones: Pretty but those lashes