Watch Until End !| Very Detailed Bald Cap Method !|Half Up Half Down Bob| Beauty Forever Hair Amazon
Hey lovely's,
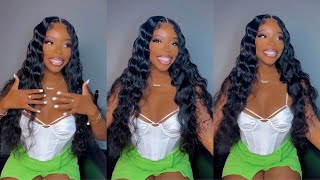
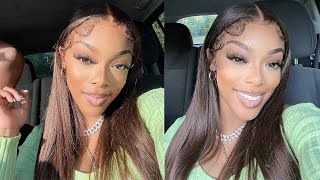
sorry for the long wait but I had to come back with some new heat ! Today I'm doing a wig install with a 14' transparent lace wig from Beauty Forever Hair Amazon. This wig came with a wig cap, elastic band and the wig. the wig is big head friendly and would be perfect for light - brown skin complections, for my dark skin ladies this wig might be a little bit ashy for you. I did pluck this wig even though it did come prep lucked, I dyed the wig jet black using Revlon ColorSilk and I bleached the knots. This install took me about 4 hours to film but I had to stick through it but it came out fire! Comment down below and tell me how you like this install.
-------------------------------------------------------------------------------------------------------------------
6% Discount Code: Beauty006
HAIR DETAILS:
Our Website : https://amzn.to/2KJs3jT
+ link to the same hair on the video :https://amzn.to/3gKX5aZ
+ link to Beauty Forever Hair Amazon Store: https://amzn.to/2KJs3jT
Hot sale for Beauty Forever hair:
Bob wig: https://amzn.to/2NwFWqU
Body wave wig: https://amzn.to/2J7ECGR
Malaysian deep wave:https://amzn.to/2KWch8F
Malaysian curly hair:https://amzn.to/2JkzxKe
Malaysian loose deep wave:https://amzn.to/2xzIsSp
Brazilian body wave:https://amzn.to/2KAmlAM
How to contact Amazon Beauty Forever Hair ?
Email: [email protected]
Phone number :(256)8266745
Whatsapp:+8615893771660
INSTAGRAM: https://www.instagram.com/beautyforeve...
IG: @beauty_forever_hair https://goo.gl/jiNuEN
FB@Beauty forever hair https://goo.gl/2W9juN
Email: [email protected]
Instagram : Hairbytyanna_
Personal Instagram : tyannablake_
Snapchat : thickk_chinna
Hey y'all, i'm back with another video, so i got this wig from beauty forever here on amazon, and this is how the box came, and this is what came into the box. I got a stocking cap, elastic band and the wig okay and that's how fedex dropped off the box just like that. It was all crushed up and messed up, but it's okay, because the wig was perfect, the wig came pre-plucked and the knots weren't bleach. I don't think those baby hairs came extremely long, but it was okay because i worked with it anyways and yes, the the lace is very, very, very transparent and you get a lot of parting space as well, and it's just constructed, like any other wig that you Get from amazon or any other company, hey y'all, welcome back to my channel so today, y'all know already i'm doing a install with this wig from beauty forever. Here they sent me a 14 inch wig, which already explained previously so um. I did dye this with black jet black, because y'all know i don't wear you know the natural color brown, hair and also um. I did bleach the knots as you can see, and i i and i did pluck the um the hairline, so it will be easy. It would look more natural, sorry, all my eyes of water, so it would look more natural because i plucked it, and this is a transparent lace. So you know how transparent lace is if you're lighter than me, you know, will blend into your skin. I seen on my previous video for beauty forever um. A lot of ladies were asking like: was the lace transparent or do you think it would fit for um a playlist, a pale complexion or a lighter skin tone? Well, this one! Yes, it will because it's like very, very light, it's very light and it's super thin, so y'all know this lace is about to melt. So today, i'm doing something different usually already come with my hair um with the stocking cap on um. But it's not. He had molded on, but i decided well, you know to do it on camera, because a lot of people were asking me. How do i put on my stocking cap, so my hair was already braided, it's freshly, washed, braided and um. I slipped my edges back with the um, with the got to be gel, so what you can use for your stocking cap or your ball cap method. You can either use the got to be three spray or you can use whatever glue you use, but i use bolt hold the got to be spring spray. It takes a little bit longer, but if you're trying to stay away from the glue then go with this option, but you'll have to like spray it on here and let it dry. But but i usually use the bold hold or glue to adhere my stocking cap because it just goes by faster and um. It dries faster and i don't have to you know, sit here and wait. Wait 10 minutes for it to dry it just as soon as i put it on it dries within like less than five minutes. So today, i'm gon na do the bold hold method, but on my next video i'm going to do this method, the got2b spray method. Okay, so what you do, is you take your so what you do you take you take your bold hold all right and then let me get my mirror all right. So you take your bold hold and then you go in front of your hairline. You don't want to go directly on your hairline, so i'm going to put mine like right there. My hairline is right. There also. I have a widow's peak right here, but you know it's not going to affect my withers little's peak and then i go down and then i'll go this way, because that's where my hairline is that's how it's shaped and then i go like that. I already cut out the ear what you want to do you cut out the air and i already sewed them back down on this cap. Okay, so you do that and i think glamazonte was the one who made this method and everybody just was like. Oh okay, we bout to hop on so this is how my hairline is shaped. No lie. You just have to wear this. You know hairline shape it's literally a box like it's like that, so we're gon na. Let the glue dry for like two minutes, wait until it gets clear and it gets sticky and then you're gon na see when it gets clear, because it's gon na get clear. Okay, it's not gon na, be this color. It'S gon na be like a color close to your skin tone so and another thing with your stocking cap method, i do use a ball cap that is my skin, my skin tone or close to my skin tone. So you know i don't really have to do all that makeup and all of that just get um just get a stocking cap. That is your skin tone. All right, so y'all see it's going clear. You see it's going clear all right and with this wig y'all. This is not like one of those wigs that when you get like it will say, 13 by 4, 13 by 6 and then you'll get like the 13 by 6 in here and then at the sides. It'S only like two inches y'all look at how much parting space they give you all of that is parting space, like all of it part in space, so you get like like y'all know that style right. I want to do it but um, since these companies are like sending me short, hair gon na have to buy this wig on my own. So you know that style with the uh with the the rubber bands - and it's just like a roll like like this, like that and like that, and it goes up into that ponytail. This would be perfect for that. Maybe i'll insert a picture. Don'T quote me on that? I might insert a picture of what i'm talking about, but this kind of wig would be perfect for that style and i've been searching for a wig that has, you know the full 13x6. I think this is a 13x6. If it's not, then it's 13x4, i'm not sure, but it's a lot of parting space like a lot, so i was searching for a wig less like this, because i want to do that style, but i just couldn't find a wig like this. You know what i mean all right, y'all, so i'm taking my hot comb and i'm gon na comb. These hairs back, i know y'all, probably y'all, can't see it but i'll show y'all later on and i'm going to cut around the hairline all right. So i put the makeup on just like that, and now i'm going to just tighten the straps in the back just because um i, like my wig kind of smoke on my head and this wig is kind of big for me. Even though i got a huge noggin, but it's kind of big for me, though, and i like to cut the clips out of the wig - i just don't like you know the clips in the back. It serves no purpose for me because i don't use the clips and a lot of times for the adjustable straps in the back, it's kind of like in my way, so i'm just going to tighten this wig up a bit and even like now. It'S not even tight enough for me. You see it's like kind of big. So now, i'm gon na take this off again, i'm gon na tighten it even more. Okay, that's a little bit better, but it's still big as hell, and i'm gon na cut this off right here, it's kind of like affecting my um, my lashes, so uh yeah. This is huge: okay, okay! So what we're gon na do now is we're going to um see. This is the way this is how long it is it's kind of on the like light, thin side. I don't like my hair like this, but i'm gon na do a style that y'all gon na love - okay, so okay yeah, this wig try to push this up push this this way all right. Let me see cool all right so now, y'all know what i'm about to do. You know you got ta clean off your hairline with uh some alcohol, i'm just using a cotton pad um, i'm using alcohol on a cotton pad, i'm using 70 alcohol because i do not have 91 or 99 alcohol. But it's better to use that, and i am using my bold hold as usual, and i'm gon na do three layers of glue because i want the maximum hold. I want my ponytail to stay intact, okay for a couple of days, and it has been intact because i still have my hair, like this. I'Ve done this video. I filmed this video about like a week ago and my hair is still in place and it still looks good, so do the three layers to get that maximum hold that will last for a while. So we're gon na put this down you're gon na push that in okay, take this and push this in, and now we're gon na just pull on this type. Okay! So we're just gon na pull on this tight. What i'm gon na do is i'm gon na. Take this and i'm gon na tie, i see a slave by jordan. Do it so i'm just gon na do it too, and you can get these elastic bands on amazon um, but corona that was going on. Walmart didn't have any of these, so i had to order like the big roll from amazon, because walmart was like really out of stock, so i'm gon na do now is um. I'M gon na mold, my hair up, but first i'm going to take out my baby ears. Okay, so we're gon na use this. I don't know what my lace is kind of crappy, maybe uh. So i'm just going to do my baby hairs like how i usually do it um. I did it first because i want to see how the style would go in a way um. I know other people they do their baby hairs last, but no not me. I like to do it to begin with, because it just looks better in my opinion, and i think i can get a feel of the hairstyle when i do the baby hairs first and i'm doing the same baby hairs like how i usually do it um in Every one of my videos: it's just the same technique, i guess just a different style and you want to push back the lace a little bit just so you can see if there's any excess lace that needs to be cut, because when you do the baby hairs, If there is lace that isn't glued down properly, it will interfere with. You know the motion that you're trying to push the baby hairs into okay y'all. So i'm back okay, so i i did this side because i'm trying to figure out how i'm gon na do this, but i figured it out. Okay, so we're gon na. Do the baby hairs on this side. Okay, i'm gon na burst those back push this back too. Okay, now we're gon na cut this okay. Hopefully i can cut that too short. Okay, so, like that, okay, we're gon na bring this okay, so we're gon na push these baby hairs. This way, i'm just going to push them down, i'm not really going to do yet. I just want them to lay down for when i do this, you want to push this back. Okay. This video is taking me longer than i expected because i've never done this style before for one for two, these uh the front things kind of set me back a bit, but it's okay, all right and then for your work to be neat, you need to make Sure that these are the same size, okay, that's good uh, and you want to make sure that the back of your half a pack down is flat and out the way um. But i was extremely frustrated with this hair. So i'm not even gon na lie to you like it. It was very hard for me to do on camera. I think if i was to do it off camera, which i did finish it off camera, it would have been. You know more, neither the first time but me trying to stay in frame and trying to look into the mirror at the same time and trying to do everything that i needed to do to make sure this hairstyle was neat, it wasn't, it wasn't working out, but Being recorded so i'm just going to take the hot comb and just push those side hairs up, and you can tell that, like one side of my hair looks better than the other side, because i could see the left side, but on the right side over there. I just felt like it was just it was just not working for me, um and also another thing. The wig was really really big. So on this side right here on the left side, it was smooth, but on the right side it was just like it was like crumpling up because it was so big. So that's why i had my mom help me out towards the end to really sew down the back of that wig, because if i didn't this hairstyle wouldn't have worked, because it was just so big, but it came out good it. The end result was good, so we're just going to use our hot comb and just push those hairs back, and you want to make sure that you do super neat parts, because when you do neat parts, the hairstyle will look better and i'm using got to be Spray i'm using mousse, i'm using the care care, wax stick and i'm using a hot comb just to slick that up into a ponytail, okay y'all. So i'm gon na take this track right here and i'm going to wrap it around this ponytail. Like you see how the ponytail is like little, i don't want. I don't want a little ponytail. I want a long ponytail, so it can like fall and cover over this. So what i'm gon na do i'm trying to work fast because time is working against me. It'S been hours since i've been filming this video um. So i'm trying to get it done and i am using bonding glue to glue this hair around my ponytail. Why am i using bonding glue because it will make the hair more flat? It will lay more neater and i don't like bobby pins. I really don't like bobby pins in my wig and being that this is a wig. You don't want to poke holes into your lace because remember right there, where the ponytail is, is all lace. You don't want to put no hole in your lace girl. You just spent a lot of money on your wig and then you're going to poke holes in it no ma'am, and that elasti band did help my lace melt right into my skin, but for future references. When you do do this style um, you would have to push the ponytail a little bit back and that's where i had messed up at. I put the ponytail too much to the front and that's why the hair wasn't falling properly like how i wanted it to so. When you try this style or when you do it on someone else, push the ponytail back a little bit more because right there it was not the right placement and it was just not. It was just not working out for me. So that's why i had to redo the style and when you do use the balding glue, do not bond the hair. On the hair, like on the hair. That'S on the wig. You need to bond the hair on the the ponytail holder that you use to put the hair in a ponytail. Hopefully you guys understand what i'm saying. Okay, so i finally got it up. Finally, okay, so now i'm about to cut this and i'm about to cut this here, so i'm going to take the scissor, i'm just going to cut that there, i'm just going to cut this here or whatever, because i am so annoyed, oh my god. Okay! So now i'm about to cut this to save you more time. Have someone help you with the back of your hair and even the sides? If you know you can't, if you don't trust your judgment with cutting your own hair, have somebody help you? Because i had somebody help me with mine, because it was just not working out for me at all. I could only see the front and also because this wig came with extremely long baby hairs the front of those two things in the front it just wouldn't it wasn't coming together, but i kind of made it work and i kind of made it blend in with The longer pieces i'm gon na try to pin this in the middle, so this can stay sturdy. Okay, y'all, i should have put in my contacts - do okay y'all. So this is the end of the video um. If i fix it - and i don't come back um yeah, this is in the video i might fix it. I might not. I might just leave it like this, i'm not sure, but um yeah, you guys. So this is the end of the video. I do have to tweak it a little bit, but i'm not gon na. Do it on camera um or i might do it on camera. Y'All might see it. It'S not might not even be the outro. I don't know so um yeah. This is the end of the video, and this is how it came out. It didn't came out. It didn't come out how i wanted it to because i've been working on this for about three hours now and i need a break. So uh yeah, you guys so follow beauty forever. Here, oh yes - and this is from amazon, this is the amazon hair review. Okay, follow me on instagram at i'm here by tiana underscore and also follow my personal at tiana blake underscore okay, i'll leave everything down in the description box. Tell me how you guys, like this style, i like it, i just have to fix it and then, when my mom come home from work i'll, let her you know, tweak it a bit. I like it. I don't know how i'm feeling this i don't know. If i'm feeling it, i do do it over, i might put these up back into the ponytail, so yeah y'all. Let me know how y'all like this. Okay y'all. So i finished my hair and i did it over it's more needed now and i thought it cut shorter. My mom helped me cut the back. As you know, i can't see the back of my head, so this is the finished product. Is that cute call this girl next door hairstyle and yeah? So if you like this video, please give me a thumbs up and please press that post notification button. So you will be notified every time. I post the video and also comment down below and tell me how you like this hair and this hair. They come in 14 inches for you all, that's gon na ask me again: yes, it came with 14 inches and i did diet jet black and i did pluck put the hairline and i did bleach the knots and it did come in a transparent lace. Okay, so i would leave everything down below so yep give me a thumbs up, and i see you guys next time, bye.

Comments
Tyanna Blake: Hey y’all, I was having problems uploading this video but it’s up now , please comment, like and subscribe. Thank you all for watching
Silky Saks: Wow you did a great job bleaching the knots and plucking the hairline. Great job laying this wig down. Love the half up half down way you styled this wig.
Tee Shauntel: Love this hairstyle I’m about to try it this weekend
The Jolliest Rancher: I HAVE THE SAME HAIRLINE. OMGGGGG the glue shape is a game changer thank you
Merry Matthews: I love it thank you for doing it on camera
Lakeisha: This is so neat and cute!
Alexandria K Jones: yess this is cute‼️, reminds me of the 90s, can u do some vids on 90s and early 2000s hairstyles using a lace fromt wig
Destiny Ny: You’re so underrated!!! Just discovered you’re channel love it !!!!!
Brittina B: love this!
Merry Matthews: I love it thank you for doing the video
Dess The Aquarius: Lavender is definitely your color
Char Marie: Where did you get your flat iron from?
Kedisha P.: I love this
Braniyah Harden: Yesss girl it’s is cute
Christina Williams: I'm here from your Amazon review!!
_ prettymiaa: U look so annoyed but the hairstyle soo cute thoo
yeahitsann: Super cute hairstyle
Doll Vizcaino: NO SE VIO COMO TE PUSISTE EL LACE ATRAS
Hair2LongHair2RealStyleonStyleonStyle: *Blake - (1) WHAT IS THE PRICE OF THIS UNIT? (2) WHAT IS THE DENSITY OF THIS UNIT? (3 ) WHAT IS THE NAME AND PRICE OF THE SWEET LOOKING HOT COMB YOU'RE USING?*
Queen Thomas: Oh períod .
Monique Ferguson: U kinda look like ari