Watch Me Slay This 613 Blonde Lace Front Wig✨|Arabella Hair
╲ ************** ≡ Arabella Hair ≡ ************** ╱
HAIR INFO:
Arabella Hair:#613 blonde Straight 13x4 Inch Lace Frontal Wig in 24”
Hair in the video: https://bit.ly/327ogI3
Use Coupon: AYTB15 to get 15% OFF
#ArabellaHair website: https://bit.ly/2T3vqH1
#613 wig on Arabella: https://bit.ly/327ogI3
360 Wig on Arabella: https://bit.ly/2DwY4N1
Arabella Transparent Lace Wig:https://bit.ly/3fh86zS
Arabella Color wig: https://bit.ly/2ObgQM1
Arabella Bob Wig:https://bit.ly/2CqiYg0
Contact us:
Arabella hair E-mail: [email protected]
Arabella Hair WhatsApp: +8617746999290
Arabella Hair YTB: https://bit.ly/2Wd0e8X
Arabella Promoter Group:https://www.facebook.com/groups/881943...
Arabella hair FB: https://www.facebook.com/Arabellahairn...
ᐧ
Welcome to IAmBeautifulHustler TV
Be sure to SUBSCRIBE & Turn ON Your Bells✨
TO PURCHASE MY HAIR & PRODUCTS FROM MY BRAND: (TheBeautifulHustlerBrand )
Use Link Below ⤵️
WWW.iBhSlays.com✨
We Ship Internationally ✈️
TO CONNECT WITH ME ✨
Personal IG: Iambeautifulhustler
Business Instagram:_Beautifulhustler & @thebeautifulhustlerbrand
Twitter:_Beautifulhustl
YouTube: IAmBeautifulHustlerTV
CONTACT ME✨
☎️ 786-571-1313
Email : [email protected]
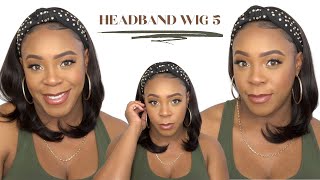
Hey beauties and welcome back to I'm be for hustling TV has been a minute, but I am back with another tutorial and today's our hair is provided by Arabella. Here they sell, but is six thirteen twenty four inch straight wig and I'm sure you need a few little goodies that came in this box. Some cars some will gifts. They gave me a little package of a little stuff that I always need edge crush nice little pearls. You know Clips tweezers and a little cute little headband thingy. You know everything that you need plus a little extra inside of your box and I'm gon na go ahead and show you this 24-inch six, thirteen wig that they sent over to me and I'll be doing a regular blonde install this wig does have you know the Last event and and start kids, so you can do a glue, this installation or if you still want to just have it it's just secured. You can still keep that banding and, of course, glue down your wig emphasize that it will be a gluten installation and as far as the style, it is like a little linked. Look with the two top ponytails or whatever like that. So you pretty much see the look that I'm going for at the beginning of this video. So do you want to see how I created this look just go ahead and stay tuned to this video and just a quick reminder if you are new to my channel. Just make sure you go ahead and click that subscribe button and turn on your bells, because we have more tutorials coming and you do not want to miss out so stay tuned to this video guys and thank you for tuning in so the first thing you want To do is, go ahead and create your box have cleaner hair in line, and I'm gon na take my Ruby, kisses foundation and apply her foundation color on the inside of that lace, and I'm not gon na focus on getting on top of that lace. Right now, because I could do that later on in this video, but my main focus right now is just give the lace on the inside and then once I get into the whole melting process and the final step, I will add more foundation as needed. But right now I'm just gon na add it on the inside of that lace and on that cap as well, and then I will begin to apply my layers of my beautiful hustle, a smelly, heesu and everyone has been asking. When will all my products restock and everything is on its way, I will have a Reese update towards the end of this month, because I'm gon na wait for everything to come in. I don't want to just open up. You know the products and everything is not here so once everything is here, I will restock and I will do three restock dates so make sure you guys have your notifications turned on here on YouTube and also on my Instagram pages. If you do follow me that way, you do not miss. My next three weeks tops that I will be doing so. Yeah stay tuned for that and fortunately, like I mentioned, I will be using my beautiful hostel, a smell adhesive and I'm just taking my edge across and just spreading the glue out for our installation today. I do use four layers so once I get all four of my layers on there, I will begin my melting process so now that I have all of my layers applied, I'm gon na go ahead and begin to pull that lace down right into that glue and I'M gon na have her hold Eastside as I blow dry that it took place, and then I will go ahead and tie down that lace and begin to sew down the back of that way. While the last man is on there, hairlines is getting their first step. The first round of that lace, melting in when sewing down the back of you, you just want to make it like a nice little part across the way towards the back. You want to feel for that last braid and that way you can stretched our way down and just go ahead and you know so it so the way is one lane flatness security, and then you know, when I fly up, you have one or two ways you Can stretch the way and cut off the extra way that's in the back, but most of the time most of my clients, who are I'm doing they like to leave the extra lace in the back as well, especially you know, sometimes cousin other way does come big. Sometimes, but as long as it's secure, you should be fine, but if people prefer to cut the extra wig off you can it's just pretty much on their preference. Some people don't like to cut all of their wig all because they may end up want to glue the back down eventually, but you know to each his own. So just do what you know what they prefer. You know or whatever a thought. As far as you know, this part, but I'm just going to quickly so across the way, we're just secure it down to that last braid. So now that that is all done, I went ahead a soul there, I'm just gon na go on with my scissors and ways off the extra lace tuck down. Whatever else is slipping and then I will get into the styling portion of this video now for the stuff that I'm doing you want to go ahead and start off by parting um the way down the center. That way, you can really um make sure that the sessions will be even because that middle part, pretty much is like the guideline for everything to be symmetrical for this style. So I'm gon na go ahead and get that middle part sectioned off and I'm just gon na use my wax stick and comb it out just to make it nice and smooth, and once I get this nice and straight and smooth, I will begin to part off My BOB sections so will be a total of four equal parts at the top that I'm going to link and connect together. So I'm just going to go ahead and part that off section off the front of the way from the back of the wig so make sure that all tracks are covered towards the back. How come that out and then I will begin to part off my first section here on the right side of the head. Now, I'm going to show you pretty much in detail what I did on the right and just briefly show you the same process on the left side of the head. Just so I'm just not too much repetition, but I'm just taking a rectangle section on once. I get all of that around that parting area, nice and smooth. I will park that section right there that I've just a rubber band off into two sections, to make a total of two squares versus one full rectangle, and I will go ahead and rubberband those pieces. And then I will do the same thing to the other side. As well, and also for this look, we did pull out two little pieces in the front like the little bangs look, so you will see me pull that out as well, and also I am gon na tie down her hairline again with elastic band. To get this super super melted into her skin, which he would see later on in his video, but right now, I'm just focusing on everything. That'S around the part that I'm going to actually rubberband and link together. Just make sure you get everything pressed out nice and neat, and I'm just going to comb that section out a little bit just to make sure that when I do to the points they're rubber bands sections, it will be nice and smooth and once it's hot combed Out nice and pretty well, I will go ahead and split it and begin to rubberband it and because this hair is blonde, I am going to use clear rubber barons. I don't really like the black rubber band. Look for this look. I just wanted to make it nice in me and undetectable as possible, so I did use clear rubber bands, as I mentioned for this part, if you want to use black ribbons, it's on you, but I already prefer to use a clear one special, because the hair Is blond - and I don't really like to see the black rubber band on this part, but I put on a little section for that front. Bang piece and you know to the restrict front pieces and I'm just going to take another clear of advantages. Go ahead and we're bending this side as well, and I'm going to repeat the same exact steps to the other side of the head. So now that I have all four, such as complete, I'm gon na go ahead and begin to connect the front with the back. But I'm gon na do that in a criss cross and I just take a little bit of holding spray and spread on that stray hair, just to make sure that it lays nice and mean so. I can connect the two ponytails together and I'm going to do that again once again, with a clear rubber band store is undetectable and I'm gon na repeat the same thing to the other side. And then I would do like the whole wraparound portion to cover that clear, rubber band, even though it's really not visible, but you know I just like to do that to make the style extremely neat and cute. So all I did was just take those two pieces and crisscross and you know secure them with a rubber band, and now I'm going to take some holding spray and do the wraparound part just uh. You know get the style a more complete look versus just leaving and how it is like this and um once I do that, I will spray holding spray on that hairline to get it super, melted in and then tie that lace down once again. So it's completely melted into her skin to the team because um it just gives it that extra extra like melt, looks so I'm just gon na do like I mentioned you know, do the wrap around a lot around a do the wrap around around the rubberband? Oh, my gosh sounds like a tongue twister and then secure with the holding spray and repeat the same thing on the other side as well, and while that last event is melting. That on an item just want to take, my annotations people take their, and I went ahead and press their hair up. Nice, and straight here, is what it looks like super soft and nice, and I'm gon na go ahead and remove that elastic, and the final thing that I would have to do is just kind of raise it a little front pieces just a little bit shorter. Coming out, and once I take my concealer and conceal, those parts is going to make this look pop so much more, but it is so important to conceal the part, because you will see a major major difference like right now. The parts are not concealed, but you can still see them, but it's not as visible as it will be once I can see the parts so just stay tuned for when I can sell that partner with the parts up, and it will make a major difference, it Will make this style top ten times more and make it look? Ten times is meaner. I'M telling you guys like concern. The part is everything, especially on color hair, because the lace is usually transparent, and you know, of course it's not gon na match the skin color. No matter how much fun they should put underneath, so I just like to go and increase their that thing out. So here I am and taking a concealer and how you see it is before now watch how it looks once I going with a concealer and defining is going to pop so much more, but I hope you guys enjoyed this tutorial in this style. Stay tuned for the finishing look and the finishing move videos, a recording of the final looks so I hope you guys learn something from this video today. Thank you guys for tuning in and stay tuned for more videos. Don'T forget to subscribe. You


Comments
Finest Relaxation: I love it!! I love to see you apply colored wigs
Breeciii Bre: So pretty
Judior: shae for 613 hair what are you suppose to do to the knots?? nothing ?
Muffy Y: What's your site for glue
deseraymiles87:
Rena Terrylonge: Should have washed the wig with pp purple shampoo, personally I hate the yellow tone but good work regardless