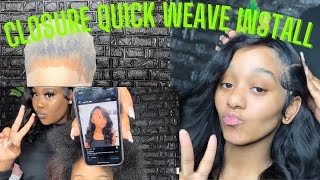
How To Make Your Own Lace Closure | Full Quickweave Bob Wig Tutorial
Hey Beauties!
In this video I demonstrate how to make your own lace closure and how to make a Quickweave Bob wig. This video is very detailed so enjoy and be sure to rate comment and subscribe. As always I over appreciate your love and support!
Things I used in this Video:
Closure-
12 in bundle (Braziliana Virgin hair)
Scissors
30 sec Bonding Glue
Small piece of plastic (dollar store table cloth)
Swiss Lace from your local beauty supply store
Razor blade
Blow dryer
Flat iron
Got 2 b glued Hairspray
Quickweave Wig-
3 bundles of Brazilian/Virgin hair (two 12inch and one 14 inch)
C shape needle
Thread
30 sec Bonding Glue
Gots 2 B Hairspray
Rat tail comb
Rake comb
Duckbill clips
Jaw clips
Razor comb
Shears
Clipper
1 inch flat iron
2 inch flat iron
1 1/2 in curling iron
Black color hairspray
Hair polish/gloss spray
Atlanta Hair Appointment or to purchase a wig Book Here-
Follow me on Instagram-
http://www.instagram.com/hairbyveelo
Snap Chat:
Just_Veelo
For Business Inquiries Email me:
Well, hello, everyone! This is Victoria Lowe, better known as hair by V Lowe and thanks for stopping by my channel, if you're new, welcome and if you're, not new thanks for stopping back by today, I'm gon na be doing a much-anticipated video. You guys I am finally putting up the DIY lace closure tutorial in my last bob video. I did a quick when Bob wig and I had a closure piece on it, and everyone was asking: where do you get that piece? How do I make that piece? And yes, you guys, I made it myself and today, I'm gon na be showing you how you can make one too okay, so I'm gon na remove the lace from the pack and what I'm gon na do is cut off a small rectangular piece along the edge. Next, I'm gon na grab me a razor. A double-sided Oracle razor be very careful guys when doing this, and I'm gon na take my hair and split the track in, and I'm only using half of this bundle to achieve this closure. Now I'm going to take a piece of the track and I'm going to go around the lace in a horseshoe pattern and I'm going to be leaving a half of an inch around the perimeter so that I can have enough room to sew my closure down. So now I'm going to take a piece of track. I'M gon na put some glue on it and I'm gon na cut each track into small pieces about half an inch in size and I'm going to lay them right directly behind each other. This buzzer is very similar to the invisible part. The only difference is it's an invisible part release now you're going to do the same exact thing to the other side, lining a trap directly behind one another. Now, you're going to start laying your tracks in a circular motion, we don't want to leave the circle too big, because we don't want our closure to be so obvious. We want it to be small enough to just stick the closure right on me now. It'S time to make the closure we're going to take a piece of the track and we're going to start by rolling it as tight as possible into a circle. Make sure that the circle is not bigger than the circle on your closure. You now I'm going to take the metal piece of the comb and find the center of my closure and take my flat iron and press it flat. Now, I'm going to take the little piece that we made in City in the center of our closure right here. I'M just putting some extra glue on the closure so that our tracks do not fall off when donut is be sure not to put anything on the parting and there you have it. We have now completed our own lace closure piece. Now it is time to construct our quickly. I said quickly wink because it's just like a quick leave. I put down a shower cap and now I'm putting on a mesh net and I'm gon na glue it so quickly we're young. What you see me doing here is sewing our closure down all around the perimeter so that it doesn't come off the loop. So now I'm going to start placing the tracks on my wig try. Placement is very important because we want our work to be full in certain areas and not as full in others, so I'm going to start placing the tracks up the back straight across leading up to the left-hand side of the wig. Only right now you do not want to place tracks on the right hand, side or the front of the wheel. This is the section that's going to give us the body and the flair for the top in the front of our week. So now you see me placing the tracks up the right-hand side of our way straight across leading into a half shape ale. Now that we're at the front of the wig we're going to continue that L shape until closing, and then you have it. We have completed constructing our wig now it's time to pull the plastic out of the inside place, the wig back on the mannequin and click. Let'S not forget to remove the netting behind the lace before I cut the hair so give an accurate cut. I just want to go ahead and put all of the lays out with rock back so right here. What you see me doing is tweaking the closure, I'm using my big barrel, curling iron, so just flatten the closure as much as possible. I'M also using some guys to be glue and spray so get onto the side, ways on taxes, just to move it out a little bit more and also I'm gon na be taking my little rat cell phone, placing it over the part and getting some black hairspray To tie any other blemishes that goes for any hairspray marks or any real marketing crazy. Anything like that. Now I'm establishing my guy in the back with my razor and I'm cutting the Bob at a 45-degree angle in the back now, what you see me doing is cleaning at the Bob with a clipper for the one at the bar, I'm chosen to cut wishes, because I want more fullness. Emily now put the one with my Flatiron and I'm just gon na give the Bob a slight bump along the back and the left side. Now I'm going to take a medium to large-sized flatiron and I'm going to start making a big C and I'm also going to be directing the hair. After I make the Big C with my comb to the back. What this does is create layers for extra volume and height, and also just that extra curvature of the bangs. I want to go ahead and use my big barrel, curling iron. I believe this is a one and a half inch. So now I'm just coming the hair back and watching the layers fall so effortless and beautiful and feathery and flawless all of the above and then I'm gon na. Take my comb. Take some guys to be glue spray and set it in a place. You know whatever your desired look is after you get that set it in place with the spray, and why not? We have our DIY lace, closure, Bob wig, quick weave when I think of Bob's, I think a sexy ladylike dainty flirty effortless. Oh my gosh! All of the above, but I would really like to take this time out to thank each and every one of you for viewing my tutorial. If you would like to purchase this bob, the link will be in the description box below, if you're in the Atlanta area and would like to book an appointment with me. That will be on the same link as a link that you would purchase a week. That will also be in the description box below if you're on Instagram. Please follow me up here by lilo and thanks again you guys for watching. I love you all right.

Comments
janey vincent: Keep them coming your illustration is everything ..Thank you for showing us your secret ..New stub♀️♀️♀️
Katrina Battles: Wow Ms Victoria you knocked this out of the park with this tutorial...simply gorgeous turn out
Erniefare Sullivan: Love this simply yet detailed and beautifully done. Thank you for sharing!
ZagMomma: Your work is great you definitely have a God given talent, because everyone is not that good with their hands.
Mekaa Christopher: Thank u so much for your amazing channel
A Walker: This looks lovely do you mind sharing the kind of hair you used?
ENHANCEMENT CREATIONS WOOLADY: I love it... Omg, you so talented
Keslie Peterson: New sub love your work
Bertrell Green: Straight BEAST!!
PRECIOUS OPARAUGO: I wish you could do a tutorial on how you did the logo