How To Slay A Side Part Bob Wig | Start To Finish!! Ft. Syukee Hair (Beautybytommie)
Hello everyone, welcome back! Today I'm showing you all how I got this gorgeous side part bob using Syukee Hair on Aliexpress from start to finish! This video shows how I colored the hair, made the wig, cut & and styled it, and how it's holding up. I hope it is helpful to you and as always if you have any questions then please leave them in the comment section below! Links to Syukee Hair on Aliexpress are below!!
Store Link: http://syukee.aliexpress.com
Check them out of Instagram: @SyukeeHair
3 Bundles Link: https://www.aliexpress.com/store/produ...
4 Bundles Link: https://www.aliexpress.com/store/produ...
3 Bundles With Closure Link : https://www.aliexpress.com/store/produ...
_____________________________________________
Previous Video: https://youtu.be/d2bNi-o7958
_
❀ I N S T A G R A M➜ www.instagram.com/crwned.queen
❀ I N S T A G R A M➜ www.instagram.com/YT.tommiemarie
❀ T W I T T E R➜ www.twitter.com/beautybytommie
❀ S N A P C H A T➜ @callmedvddy
❀F A C E B O O K➜ BeautybyTommie
❀P E R I S C O P E➜BeautybyTommie
__
T E C H S T U F F
Camera: iPhone 6 or Toshiba Camileo x400
Editor: Final Cut Pro
_
All Business Inquiries Please Email Me: [email protected]
Interested in Collabing with Me? Send an email to the address above :)
Must have at least 10K subs & 800-1000 views on most recent videos!
Featured Music (if any):
Music Provided by Sync Sync - Need copyright free music for your videos? Sign up here: bit.ly/1NItNJP
__
Hey! My name is Tommie and I love all things beauty, fashion, and lifestyle. I enjoy creating these videos for you all and it makes me soo happy when you guys "like" my videos and leave tons of comments. I love to hear what you have to say and I reply to everyone who's enabled comment responses. Just wanted to you all to know that I am just a normal person like you!
-~-~~-~~~-~~-~-
Please watch: "MOVING INTO MY NEW PLACE!! | ROOM MAKEOVER VLOG 2017"
https://www.youtube.com/watch?v=ZEfk6n...
-~-~~-~~~-~~-~-
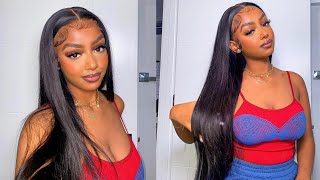
Okay, so the hair I'm using is by a company called tsuki hair on Aliexpress having a really cute box. I got three bundles of strike, hair, I'm not sure the links, I would definitely put them on the screen for you guys, but yeah. The Wilkes were very nice um, they look pretty good. The hair was had a very kind of light luster to it. This is the closure and it looks nice. I believe this is like a four by four and these are glimpse of feet. Bundles stretched out. So it looks really nice. Initially, I felt the hair was really nice, no smell. You know anything like that super soft, so let's go ahead and get into the dyeing and bleaching of the ear. So, for starters to dye the closure, I use 40 volume developer or lighten the closure. I should say I use 40 volume developer now it's actually running out, so I did the exact same process that you're seeing I did it to the bundles as well, but I ended up running out and it wasn't enough to fully cover the bundles. So it didn't take well on the bundles that I noticed so. The closure took really well because I was able to fully saturate the hair in the closure, but not the bundle. So I left that developer on for more than two hours in this process. With the developer only take so long - and I was like you know what no I watch the rest of the developer out of the bundles and I waited and I went and got some bleach and developer bleaching more developer and you'll see what I'm going to do To that, but this is the club, the color that the closure came out to be, I love it and that's only with developer, but for the bundles. I did something different, so I got missing a lot of colors. Whatever you call it, I put three scoops up on the powder bleach in there and then I did three. You know scoops of the developer. This time I got 30. I wish I got 40. Like I live about 40 volume developer. I don't have time to be playing, though you know just do your three scoop speech scoop it together and do this I normally don't wear gloves the girl. I got boots on my hands and then burning stinging I had putting some gloves on. All I did is what I normally do. I go ahead and I start bleaching. I just start putting the bleach all over the hair. I make sure to go through the bundles, because those fees those pieces will not be covered so make sure that you're thorough in your bleaching. I repeated this process on every single one of the bundles and then I combed it in combed it through. It make sure that I really should be all of that bleach within the hair to make your process faster. You can cover it with aluminum foil. I did this for all the bundles after that was done. I bleached you're, not smart closure with those products that you just saw if you're sitting on that left arm for like 20 minutes, and these are the bundles I just having painting everywhere, they literally drawing all over my room. So after that was done, I went ahead to making my wig. These are everything that I use. You can clean shot this if you need to boom now we'll save for the elastic. If you do not go to Hobby Lobby and buy elastic, you can go to Dollar Tree and get these and take the knot out and use that for your elastic. Okay guys. I just want to go over quickly and tell you what I'm going to do so. Normally, when I sew down a closure, I have it like in between these two wands, like in the middle. So that way, that's like the middle of my head, but also my mannequin head, has tape wrapped around it to the exact circumference of my own head. So yeah, that's how I know that all my wigs will fit with. That being said, I have the part. I have the closure slightly kind of off-center, maybe by like the interest own, because I want a deep side, part on my right side, just going to go ahead and sew this side down so the other side down. And then I'm going to sew the back, because you want these two sides to be like super flat and then do the back last and I don't sew anything on the front. Everything'S just going to be what it is and yeah. Then we're going to start sewing on the buckles okay. Now I'm going to start sewing on the tracks in the back. I start like right along this line. Well I'll start like right below this line here now you see this fabric. On top of the elastic like there's elastic inside, I only saw through the fabric. I don't sew to the elastic, is kind of difficult to make sure that you don't filter the elastic, but that's just the way I like to do it and yeah I'm it's really not that hard. So I just sew through the fabric on the top, and then I do like about this band of mine, the nape of my neck. I guess that's what you call. I do like the first track kind of small. I don't like go out wide. I start off small and then I gradually just keep getting water until I'm at the edge of the cap on both sides. So I like to use T pins to hold the track in place so that way it doesn't move. So, as I keep going voting the tracks back and forth, i put t pin a t pin at the edge of the track so that way I don't have any issues with the track falling to me having to hold the tracks completely put in one bundle. So all this is one bundle the longest length. I have quite a bit to go like I said, since it is gon na be like a right side, a right part thing. I have more space on this side, then, on this side, bundle number two is all done so it actually, I feel, like the first bundle, had a lot more hair on it. I don't know, maybe it's just me the way I put them, but I did start at spacing them out a lot more now, like maybe a inch now versus like one finger. I'Ve done like two over here. I didn't. I decided not to take the track like back to the edge because it's running out of space and I want to make sure that the last rep goes smoothly around the closure. So I folded it over like right here. So I'm probably just going to be kind of focusing on covering that middle section so that it's not so large now so now, I'm on the last bundle. Okay, I want to let you guys know that I just cut the hair. I cut it and I'm going to go back and put one more track. I didn't want the reason why I cut it is because I didn't want to come back over here, because it's only space for one more track, so I stopped it there. I'M going to finish sewing this line and then I'm going to do the last track and then the wig will be finished. Okay, so I finished the wig and I wasn't feeling it long and I pretty much already knew that I wanted to do a bob. So the first things I did was, I start adjusting my part. How would it be like hmm how much how deep will actually want my part and then, after you know doing that in adjust and get to our? I thought it was a good look. I went ahead and sprayed some water on that part of the hair to kind of calm it down. These are actually, even though it's straight hair, it kind of does have a bit of a way to it, which I mean some of you may really like that. If you want to change your hair, but simply me not so immediately, I just went in and started cutting the hair. I chop it off with some regular scissors. I didn't want to start off with cutting shears yet because I'm cutting off literally trunk a big chunk at one time. So I use my regular ordinary scissors to do that first because, but I don't have time to be cutting King start piece, Lucky's just snap. It off I cut until I found a lint that I was comfortable with and I was like. Okay, I can work with the Eocene you trying to pose the hair, and then I went in with my little shears and I started cutting the hair, also winning with a little thinning cone to kind of take some of the bulk out of the hair. Now, in the video you're only seeing one step of me cutting the hair, which I've actually cooked the hair several times, I'm just kind of takes a while before you say: okay, this is perfect, so I just continue to cut and even up both sides and I'm, Like okay, not the lens, let's cut some more because this is not necessarily right right now, so I just cut until I was pleased with it and then I started cheering the entire hair. You know pulling out the bangs and everything to make sure that I liked you so after this point I was pretty much happy with the length you know I had cut it pretty evenly sounds like okay, it looks pretty decent, so I started to flutter on the Hair to kind of bump it at the end - and I wasn't gon na show you guys the entire process with me flat on my hair. So I just fast forward like a 20 speed, but anyway, I wonder also let you guys know that I did end up like thinning the hair out a lot more because it was just off camera because I took it off put on our mannequin head. But I also kept putting back on my head. Just was a pretty long process to get to the point the finished hair, but this is just what the hair looks like after I had Flatiron did. It was kind of bulky to me and I was like I wasn't feeling that so I ended up thinning it out more. Like I said so yeah I just use my thinning comb or whatever you call it and that's what I did to achieve what I got, but just to show you guys. This is what the wig looked like after I had finished with that one day, so it took me two more days to get comfortable with my wig and like the way that I have styled hello, everyone Tommy here once again and I wanted to update you guys On this Sookie hair that you saw me install do the whole process of um. I want to show you the end result. So this is the final product of all the styling that I've done awesome. I don't know why do I pick up there? Okay, one? What happened styling my hair was with this gel um. You see, I did add some little fake baby hairs to the closure. I'M these baby hairs. They may look a little too dramatic for some of you all and it's had a little too dramatic. For me, my entire purpose for putting the baby hairs in the front where so I wouldn't have to put any of my own hair for leave out my hair. Isn'T this bright um, so I didn't want to have leave out and everything. So I just went ahead and did the little fake baby hairs, which you know most closures, do not come with the baby hair. So that was just something that I wanted to do. You know make it look natural because you still have the straight line of the closure. I felt like that looks so Wiggy, and this makes it look a little more natural. So that's why I did that took some hairs from from the closure. I cut them really short and I use some got to be got to be glued styling gel. I got the yellow Connell child, put a little image of it on screen, so you guys can see, because it's right, I can literally grab it, but I have to get up. It was just too much. Okay, I'm the original specs of the hair was that Brazilian straight hair got our 12 inch closure 16 inch bundle, 18 inch bundle and 20 inch bundle. You were to buy the hair at the lens that I previously had to hear you play like $ 137 with 40 cents. You know on la express on their site for the exact length that I got the original hair lengths in. But let's say: if you go with something shorter, that you could cut into a bob and said yourself so money you would pay $ 96, we'll see be a 10 inch closure in 3. 12 inch bundles definitely only pay $ 96 and 64 cent, which i think is a great deal under $ 100. You know the hair is gon na last the texture. It was straight when it arrived, but when I washed the hair there definitely was a slight wave to the hair, wasn't like a body wave hair, but there definitely was a wage to the hair or is a wave to the hair. The length the lids were the correct limbs like they didn't scare me on the limbs. They definitely were what they said. They were, but obviously I've cut the hair because I don't know I wasn't feeling I wasn't feeling the hair with the color at that length. I was like no much long lengths for this color. I just didn't like it. I'M shedding the hair doesn't really shed that much. It does shed, but not drastically. You know strand here there. Nothing super duper extreme, nothing extreme. I don't want to mess up the hair because I just curled it um. It takes well to heat. I do want to mention that, like it does handle heat styling rather well, I pretty much only heat style, this hair and it it works pretty. It was pretty decent, I feel like the closure is the best part, though, like I like to check like the feel of the closure, is so great, like the closure. Just feels amazing, okay, tangling um, I will say I get mouth tangling in the back in the back. I get mad when I visit left angle right there, but I don't know I did this hair is slightly drier than what it was when I first got it because I did bleach it to get the color that you're seeing right now psycho for a to in Between like a 2 and a 4, I'm gon na call it it's much brighter in the Sun, and the closure definitely is a lot brighter than the vendee bundles um, because I did use like kaleidoscope for the bundles and I use developer only for the closure. So there is slight color difference, but it blends in really nice, together. Shipping, ok shipping was seriously was honestly, so freaking quick. The hair was shipped out on the 21st of September and it arrived you guys. It'S arrived, the 23rd Italy, that's what two three days, but that's nothing like that was so quick. I was blown away service um my service, my experience with the UM with the PR person who contacted me. She was really sweet and um. I had no issues with her there. We didn't have a disagreement on anything. She was cool with me, no waiting longer to upload the video like. I wasn't just gon na upload. The video soon forgot it. I wanted to wait a little bit and she was fine with that. So I had a good experience with the customer service person who I spoke with. I think her name was cherry. She was super sweet. So overall I am 11 to her. I will say they: her did get slightly drier after me, um bleached it, but I did not be conditioned the hair after I bleached it. I just like malli conditioned and was like I'm ready to make this unit, which I did, but I will go back and maybe like uh, maybe after a week or so I will go back and wash it because I you see, got to be glue gel underneath The like front part of the closure, and oh my gosh, ah oh my gosh, this stuff stays on your hair forever. Until you sweat, it's only just sweat. The glue is like okay, I'm how that you later like I'll, meet you up later. That'S how the glue is either you sweat, but while you everything this glue lasted like two days under my hair before it lifts dating. Even when I went to bed the second day, it was really stuck on literally was not gon na Bob. The hair try to do anything until the glue when it slipped up on his own. So I was happy that I woke up the next day and the wig was like he's to come off because I don't know what I was gon na. Do you laugh because I would literally have to like put water on the closure and like rub that in to get the glue to unstick, but I'm happy that you know the magical, sweat particles secreted from my scalp and was like. I got you so yeah. I also use the glue to kind of lay this part of the hair down as well. You can see how it's smooth that is a got CityJet glue, um the edges, these little baby hairs baby hairs. Are they got to be glue when I do want the wig stick longer? I will put it underneath where my um, underneath, where the closure is right here and over here and telling you it will last all day, probably three to four days. If you don't sweat, a lot, then, probably would definitely last longer for you overall, the hair is pretty good quality. I'M like I said I have no issues with it. Mouth shedding a little tangling in the back area. But besides that, no other issues. I definitely recommend if you're gon na do a bob like I did a bob. I would definitely get two bundles or get shorter lengths. So overall, I am very pleased with the hair on. It was really good to me. I'M happy that it did. It turned out the way that I wanted. The bob is exactly where I want it to be what I was going for. So I'm super happy about that. If you guys want to see, I Bob styling video that I will definitely do one for you. Just click. The card over here and let me know - and I will try to get that put together for you guys also you guys really like this hair bye, Sookie hair on Aliexpress and I will leave links to their site down below and I will put the links to The deal that I got and I'll put the links to other bundles deals unless you don't even want to close or something like that. So thank you all for watching and I'll see you my next video bye,


Comments
Gemini Peterson: I love this look!! Just a tip for bobs like this. Space the tracks in the very back to eliminate bulk , also you can start laying tracks further up instead of at the nape for more movement.
sincerelyariana: You already know I'm tuned in loved this bob, really making me wanna go short w/ my next hairstyle
L_Michelle _321: You did a great job Tommie. I'm really liking this bob style on you.☺
LaMarshai Allen: Yass girl It looks great on you!
Keanna Jones: Love this hair style on you !
Bria Elayne: Girl..You fixing to have me over here thinking I can make my own wigs..
LovableMe137: Excellent job
Samantha: Love it
corruptedxvoid: How do you measure so you know the wig will fit
ONLY HANNAH LEIGH: I'm jus WAITING for u to do a frontal!! then I'll be ALLLL up in ur dorm waiting for you to do mine....frfr
Shanna Boatwright: Just peeped the name change tho. . .
Aleshia Monét: just a suggestion. try some concealer to blend the part with your forehead
Trinitee Tashea: how do you have companies send hair to you?
Monice Robbins: 10th one to like yay
Alexcia Jones: tommie i didn't know you hade two channels