How To: Make A Closure Wig *Beginner Friendly & Very Detailed | Julia Hair| Lovevinni_
- Posted on 17 August, 2018
- Closure Wig
- By Anonymous
OPEN ME
WATCH IN 1080hp
Aliexpress Julia Big Sales(27th,August - 31th,August)
Up to 40%off
Aliexpress Julia hair store: https://goo.gl/Z84Rwr
Best selling hair on Aliexpress: https://goo.gl/hJM9cr
Coupon Link: https://goo.gl/TF41US
Direct hair link: https://goo.gl/n7Zcfw
Hair information: Maylasian Curly 24,24,26 & 20 inch middle part closure
Julia Hair Official Website: https://goo.gl/hAjDsh
Top Selling: https://goo.gl/JW5hZg
Amozon Julia hair store: https://amzn.to/2L3XHvm
Follow Julia hair on social media:
julia hair youtube: https://goo.gl/6z9tvz
ali_julia_hair instagram: https://goo.gl/yVTv59
—————————————————————————————————
KEEP UP WITH ME❤️
SNAPCHAT- @perfff-xo
INSTAGRAM- https://www.instagram.com/lovevinni_/
TWITTER- https://mobile.twitter.com/lovevinni_
BUSINESS INQUIRIES- [email protected]
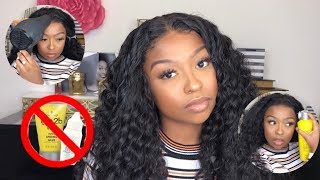
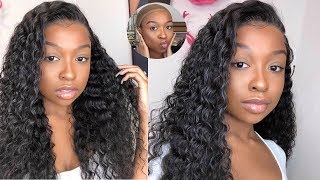
Same voice same boy, same boy, hey boy, hey boy, hey boy! Hey boy! Hey boy! Hey boy! Hey boy! Hey boy! Hey boy, hey boy, hey guys! So today's video is coming courtesy of Julie, a hair or aliexpress. They were kind enough to send me over three bundles of their Malaysian curly hair in 22, 24 and 26 inches with a matching 20 inch closure. So first things. First, I'm making a way. The first step you want sake, is reaching your knots and preparing your bundles. So when I say bliss the knots all these little black dots that you see in the closure we're going to be using a bleach mixture to get rid of those. So our closure looks more like scalp and not like an actual wig. So I'm going to need a mixing bowl and you can use like a professional one. But I got this idolatry and then we're going to use some bw2 bleach from Clairol and I'm going to be using about two and a half scoops of the bleach. And then we're going to be pouring in some 40 volume developer and you can get a lower volume, but just be aware that whatever you're trying to bleach your knots or your hair, it's gon na take longer for the color to take the lower. The volume is so you know just a little FYI. Now I'm going to be mixing everything with a plastic spoon, and you see how it's kind of like falling off the spoon right here. You don't want that because if the mixture is too loose, it's gon na sleep right through the knots and onto your roots and then you're gon na have blonde roots, and that's just not something that you want to have to deal with. It'S very annoying. So you want to get it's like a toothpaste, consistency kind of like this see I was not falling off. That'S perfect right there, okay! So now I'm taking a plastic knife to spread all of that bleach mixture on to the closure, and I use a plastic knife because it allows me not to put so much pressure on to the lace because, like I said it can seep through and bleach, the Actual hair too, so what you see me doing now is wrapping up my closure and some foil paper second process and I'm putting like barely any pressure on this because, like I said before, you don't want the bleep to seep into the knot and then I'm just Gon na leave that on there for about ten minutes and I'm gon na come back to check on it after my time is up so, as you can see after the ten minutes was up, you could still see some of those Black Knights in there. So I let it sit for about twenty minutes more and then, once I felt like everything looked okay, I went ahead and washed out the bleach with some warm water and then went straight in with my simmering light. Shampoo needs to get rid of any brassiness on the closure and that the bleach may have caused I'm just gon na. Let that sit for about ten minutes, and while that is sitting and sucking everything up, I'm gon na go ahead and wash my bundles with my Pantene co-wash cleanser, and this is my favorite car wash like ever. I used it on my bundles and on my actual hair, so after co washing all three bundles. This is a shedding that I got, which I was pretty happy about because it was very minimal and they look almost dressed and nice. So we're gon na go back to that closure and just wash out that purple shampoo that we used and then we're going to go wash this with the same cleanser from earlier. So after everything is done. This is what our closure is looking like. You can still see some black knots in there, but I mean for me I was pretty satisfied or whatever I thought. It'D look good. So next step is gon na be customizing. Your closure and first thing we're gon na use. Is this water bottle to just spray? The hairline just wet it up a little bit and this seems like such an insignificant step, but it really helps with pulling off those little hairs and then I'm going to take my comb and make a part along the hairline and I'm going to pluck behind that. Hairline and I'm going to pluck going back and if you're not sure what to start or like where you should look. I just start on one side and working my way to the next side and just keep going back and forth until I feel like I'm done, and if you're constantly moving from side to side. I feel like this kind of helps with making sure you don't stay in one place too long and over plus and end up with a bald spot. So I just made another part behind that. First part that we made and I'm going to be doing the same steps wetting it and then plucking from side to side, and I kept all the plugging in real time, because I kind of want you guys to see like the exact pace that I do this. At so this is what our plucked side looks like compared to the side we haven't touched yet so I'm just gon na repeat all the steps on the other half of the head, and I will be right back so this is what the closure is looking like. Once we're done plucking - and this is about how much hair I got out - and I was pretty pleased with it - so next we're going to jump straight into plucking the closure and I plug going in a straight line. I have watched videos and people just do it very sporadically and then the closure kind of looks like a zig zag and ends up looking kind of thin. So if you still want the fullness but want the wideness of the closure, plug going in a straight line, be very precise with what you are doing, I hope that makes sense. Y'All, I'm not very good at explaining stuff, I feel like so I'm really trying my patience, so we are finally getting into with construction, and for that I'm going to be using a spandex dome cap and a curved needle and I've already plated it and everything. But first things: first, I'm going to take my closure and place it on my wig head and I'm placing it about a half of an inch in front of the actual cap. I'M not gon na line the hair line up with the gap. I place it in front, like I said about a half of an inch and I'm going to pin it down with some t pins and I'm pinning it on all four sides just so it doesn't move around when I'm sewing cuz. That could be super annoying. So after you're done pinning the closure down, you want it to be as flat to the cap as possible. Just like this. Just so when you start sewing, there's no lumps and bumps and anything in the closure, and what you see me doing is taking the needle through the lace and through the cap, wrapping the thread around the needle three times and then pulling it through. And what this does is just make a knot, so you can really have a sturdy start to your thread. Okay, I'm not sure I'd explain it, but you have to do this because if you don't your thread, isn't gon na add up and it's just gon na slip right through the closure and then once again I wanted to take my needle through the lace through the Cap and then this time, I'm going to wrap it around once and pull it through and also be sure that when you are sewing starting on the band you're not going through the elastic okay, because then your cap won't stretch - and this particular cap was very tiny. Okay, it was tight on my head and I needed all the stretch. I could get so make sure when you are going through that little band on the cap, that you see you're going just through the fabric, not to the elastic too, and that method that you see me doing, of wrapping it around once and then pulling it through. I do that for every single stitch, just because it gives me some extra security, because I had made wigs before where I just sewed it any kind of way. You know, and then a couple weeks or months later and my clothes, my frontal started lifting and you don't want that cuz, it's so annoying to have to deal with so just for that extra security. Just take that extra step and just wrap the thread around the needle once and then pull it through and your closure will be on there for as long as you need it to so now. I'M just sewing up the back, and I forgot to mention this, but I do use three separate needles for each separate side of the closure, and I do this because I feel like if one side does start to lift. You know, like the thread starts to loosen that way. I'Ll only have to worry about slowing down that one side if you use the same needle and thread for the whole thing. If that thread, you know happens to start loosening up. You'Re gon na have to sew down the whole closure, like I hope that makes sense, but I feel like that just makes it easier for you. If you are beginner and you know something does happen with the closure. So this is what everything looks like when I'm done and in no way am i professional sore. So my stitches are really messy, but I mean it's flats to the cap. There'S no lumps so that's all. I really care about so now put a bundles first, I'm going to be going in with my 26th inch and, of course this is the longest one, I'm going to measure it from one end of the closure to the next cut out. However much I need and then I'm going to be using my salon Pro hair glue to glue it to the cap. So when I said this was beginner friendly, like I seriously meant it, the only thing you have to sew down is the closure, and in my experience this holds really well. I'Ve had one wig that I did the glue method on and it's been about a year and there are no tracks have lifted. I wash it and everything and it's still like new, so I'm just gon na completely those steps of measuring cutting glowing into a u-shape and then blow drying, and I will be back when I'm about a third of the way done with the wig. So this is what we're looking like with two bundles on the head, and it is looking fire already okay, so I'm just gon na zoom in and give you guys a better look. What I'm doing so. I found it to be easier when I stuck a pin through the track and then pinned it to one side while measuring and this just cut down on. You know one side lifting while I'm doing the other and causing me to do my work. So I'm doing the same things I was doing before: measuring cutting and then gluing and blow-drying okay, so I'm just gon na. Let you guys sit here and watch me do this, because it's super repetitive and I don't need to talk to it. So, as you guys can see now we're left with the little oval shape at the top of the head, so we're going to start gluing the tracks horizontally instead of in a u-shape and it's the same process of cutting gluing drying and all of that. So I'm just gon na keep on repeating this process. Until there is no more of my black cap showing and then I will be back to show you guys what the wig looks like on okay guys. So we are back with the wave on and it is ship popping okay. I went ahead and I did some powder on my part and laid my baby hairs and if you guys want to see a detailed video on how I laid my closures and my frontals. Just let me know down in the comments and I'll get that right out for y'all, but as far as its hair, like it's super um, okay, shout out to Julie here, cuz. I think this may be some of the best curly bundles that I've had in a while like it's up there. Okay, as far as tangling, I haven't been getting any tangling at all, which is a big plus because it is curly hair like even when it was dry. The comb was still going through it. So I really like that as far as shedding, I have been getting a lot, but I did, as you saw in the video i bleached the knots I plucked the closure and I cut my webs and all three those things cause shedding, but still shedding doesn't bother Me because it is curly hair and I expected I was kind of worried about three models not being enough. I thought it wasn't gon na be as thick as I wanted to, but, as you can see, it's more been big enough and it's super long like I said I got it in 22. 24. 26. So it comes like right here on me. If you guys can see that so it's like obnoxious, so it's like obnoxiously long, which I like y'all, know, I'm super extra. So this hair is this bomb line. I don't really have much to say about it other than I love it. So shout out to Juliet hare, because I love the bundles and I really liked the closure. It was easy to work with it didn't give me a hard time and I was bleaching and plucking all that. So that's really good. I'M gon na leave the direct links to this hair and to their website down in the description box. So if you're interested just don't forget to check that, if you guys have any ideas about any other hair videos or makeup videos, you want to see for me. Go ahead and leave me a comment down below I'm running out of breath. So if you liked the video and if you learn something from me, don't forget to Like share and subscribe, and I will see you in my next one: bye,

Comments
Lovevinni_: tHa PArT iz tOO WidE...we get it
Aaliyah Alicia: as someone who has their cosmo license i think this was a really great video. yes she overplucked the part but other than that the video was 100% perfect. also as a tip for future reference put the glue on the weft and blow dry it before putting it on the cap. it makes it tacky so it won’t slip and saves time.
Jamei Cary: just a tip ladies ☆ if You do make the part to wide you could always use a dark brown or black eyebrow pencil to lightly fill it and it will come out fine ❤
TP: FINALLY a beginner tutorial that is actually for beginners. Love love love it
Antonise teal: They complaining about the plucking but can’t differentiate between to, too, and two... hahaha
Jameelah Jones: Also nobody every explained exactly why people bleach knots. Thanks sis. You here for us forreal. *fist bump*
Samuola Vernet: wow this wig came out amazing, its good to know how to do things yourself that way you don't have to pay someone to do it for you
sweet m0chaaa: Girl you did a great job the “overplucked” part made it look more natural so you winnin sis
Amy Slay: Girl I think you just blessed me why does everyone else’s tutorials look so difficult ‼️‼️‼️
Sarae Raveen: Smh people always got something negative to say! I think your wig looks great!! I definitely learned from this video. ☺️❤️❤️
Lakay: This video was perfect! I’m trying to learn how to make wigs and this video was very detailed and helpful thank you
Tierra Jones: This tutorial was very helpful! I feel confident enough to make my own now
Yoldy Labathe: I love this! Doing this when my closure and bundles come next week
thiss mixed chicck: I love your channel so much !! ❤️❤️I’m starting up making wigs and doing makeup and your channel has inspired and helped me so much! I plan on making a YouTube channel of my own sometime soon too ! You should most definitely post a video of how u lay your closures and frontals ! Keep up the great work my love ❤️❤️
Shaunne N: I’ve watched so many makeup videos and hair videos and yours are so detailed and simple. Also I love that everything you use is pretty affordable. Keep goin sis ♥️
Amoy Myers: This is the most thorough beginner video I've ever watched. Thank you!
Diamond The boss: Damn how many times y’all gone say she plucked to much we see keep it moving
Kimah Mommie: This video was extremely helpful to me ☺️ I made my first wig yesterday I did very good but I wish I would’ve seen this video first thank you so much
Kymf Qweenie: Thank you for your tutorial! I'm new to this wig constructing thing and I wanted to try this but I was unsure how to go about it!!!
bongiwe buthelezi: This is the most helpful tutorial I've ever watched, I'm gonna make my wig this weekend. Thank you❤
Sydney G.: I’m going to try and construct a wig soon! This was the first beginner friendly closure wig video I’ve seen that went into detail about the small but important things!
Gemini Misses: I love the way this wig came out n I’ll definitely be trying it out. Great job miss lady!
Dominique Barlow: Thanks for this video! I feel confident enough to start my first wig now yaaay...
Calisha: Your tutorial was so helpful I’m a beginner with wigs and I’ve been strugggglingggg, but your video gave me hope! Love your channel girl
Jacquié Curtis: Thanks for the tip about using a different needle for each section im a beginner getting into frontals and things like that and ive watched many videos and they never mentioned that also the glue is a really good tip for a beginner cant wait to make mines !
yetunde Ayinmide: OMG I JUST STARTED AND THAT WAS A VERY GOOD TUTORIAL ❤️❤️
SheXSage: I wanna learn how to make wigs & thank you for this very detailed DIY the wig is perffff
Shaneice Mock: You explained in detail the whole process thank you!!
Milalai Miller: Half of y’all can’t even tell the difference between “to, too, & two” stop bashing this woman over a plucked part and learn how TO keep it moving ‼️
Kimyata SImpson: I love this video, you explained how to make a lace front wig, for beginners like me to understand. I will be moving overseas, and this will help me to keep my hair done, and save a ton of money by doing it myself! I love your video and your hair turned out beautiful
Brianna Harris: Over plucked just a lil but I love your makeup please do a makeup routine ✅
Sayon Dore: THIS IS EXACTLY WHAT I NEEDED!!!! love this so much
Ishanta Chimney: ABSOLUTELY LOVED this video tutorial. you basically just taught me how to sew bc hunniiiii .. ❤️
stella faith: I like how detailed everything about this tutorial is
LaKeah Coleman: Girl I love this video! I ain’t even finished watching it yet lol but it’s just the fact that you used things that’s around the house so I don’t feel pressured to buy things I don’t need like a mixing brush but instead a plastic spoon and knife. Girl you lit cus I ain’t gotta wash dishes once I’m done thanks for the idea!
Jameelah Jones: OH! When you show the plucked vs unplucked side of the closure I can see why you do it.
Beauty By Shaee: This is bomb ❣️ I love it
Cierra Jenae: this is an amazingly informative video, very sweet and detailed!!!
Kyndal B.: I LOVE IT omg i’m about to order this hair and make a wig!!!!
Surya Jones: love the hair sis, it was a great tutorial
Rheanna F.: I really enjoyed the video! You’re so pretty and you made it easy to follow for a beginner like me ✨
Kurls by K. Rolanda: Thank youuu! this video was definitely beginner friendly! you're so gorgeous btw :)
JoJo: I’d like to see a video on how you lay your closures! Thx!
deloreshouston95: You plucked that part to wide great video tho
shirlene cambridge: i can’t wait to make my first wig, ty ❤️
itsDigitalisss: Y'all sound like broken records, talking about her part ..Thanks for the video!
Serit Kelly: Probably one of the best videos I’ve seen! Thank you
Pp Baker: I'm trying to learn how to make my own wigs. I watched 7 torturials and yours was the best.
Cyrious: I love my people reading the comments is like we all in one big slumber party of chicks talking ish but still showing love.... it's all good!
Dej Act: I done watched this video so many times , it’s like repeating your favorite song over . I be watching this video as if i have not watched it before .
Lola Lawal: Such a good video. You really took your time which was really helpful
Mimisaidwhat: Would love to see how you install your wigs!
Simone_Diva: That’s beautiful that’s how I like to style my closure to
Plush Barbie: You were very detailed in this video! Wig came out sooo pretty!
Zykia Clark: This video is so helpful girl!
Angie Mack: Issa process sis! Good job Queen let me try one! Thanks for you tutorial..
Stephanieee: Yaaaay do a video of how you slayed the closure
Shaliyah Butler: Sis I love this video ! I wanna know where’d you get that co-wash ?
Ambrielle Caldwell: Love your channel... I’d like to see the video of how you lay your closures and frontals
Lala Love: THANKS FOR THE STEP BY STEP AND SHOWING THE PRODUCTS USED FOR BLEACHING ! :)
Just Chill: I love the part. Perfect size! People have prferences, and dont need to do things to your liking
Alandrea Mitchell: yess you did an amazing job i love your videos can you make a video of how you slay your closure and a make up tutorial
Shelbbbsss: You should’ve left the part the way it was , it’s wayyy to wide now but other than that you did great
Deja Jackson: I love this
Akeiba J: you did a great job explaining
Derri Lenaye: Great video!!!!! You got me on the website purchasing hair right now girl, it looks beautiful #newsubbie
Beautiful Natural Curls: Great video! I learned a lot
Unique Life: Love it love it love it!!!
Danielle Moreno: Love it
zakia hardison: That's so pretty & I think the part is finedo u ever sew or just glue ?
Dalaisha Jones: Have you tried this method with blonde hair? Wish I would’ve seen this video sooner, it took me a day and a half to sew my frontal wig definitely gonna try this method
jet blue: You can skip the shampoo because the hair has a chemical that the manufacturer puts in it to hold the wave, curl and ect , so I suggest just to use a conditioner, after whatever chemical that it is that they use is all washed out , it makes the hair unmanageable.
Shante Halsell: Lmfao I love you girl when you pull the glue out I was like awe yesssss beginner friendly
A.N.: I've been looking for a video that will mention if I should start with the longest bundle...I did that anyways but thanks for confirming...I feel better now knowing I did okay
S.H.E: Yes I would love a detail video
Kimberly Gamble: Thanks for showing the step by step process with the closure prep.
Keisha Lashey: I love it
tashaune Batts: So basically you laid the bundles from the edge of the closure on both sides? Until you got up to the top
JackStacks Tv: Looks great. Even WITH the part. Great video for a beginner like me. And I didn’t even have sound lol.
Mia Emilien: That is so pretty it look smooth in allat
La' Porsha Renee': Girl you slayed that wig! Very precise, love your delivery ❤
Laila key: My hairstylist does that wrap around method my head was secured asf ...thanks can’t wait to make my wig this week
Rosalie Braziel: Loving this very helpful i want a frontal. So bad
Daj Smith: Very beginner friendly ❤️❤️
Gaming With Jas: Idk maybe it’s just me but I love the wig ♀️ looks good to me.
Cherri Brooks: Idk if I missed it but what does the plucking do exactly make it look neater or more natural?
Mari West: This really one of the best videos I've seen about making a wig, but question, will the tracks start to lift if they get wet somehow ,like in the pool?
Amirr iam: This helped me a LOT thanks
Monica Lewinsky: you did amazing at bleaching the knots!
A T: So question why dont you place the closure on the line of the cap ? I've never seen that before
Zaria dove: you didn’t over pluck anything. this is how i pluck mine because i like how it makes my closure look so natural. you did your thing girl ❤️‼️
Serafina: You are always looking good n gorgeous n I thank you. Your the 1st person that I really understand how to pluck smdh lol
zoola mae: I'm dying over here reading y'all comments Red Sea parts holy Halloween y'all
Shariana Price: Can’t wait to make one
tati girl: That Shit Is Fire
cyncere gilliam: I love your method, but the part is a little too wide. I think it would look better if it was a bit thinner, however, your method is easy and I will be using it. So thank you for making this video.
Patiqua Rolle: LOVED THE VIDEO. What's the name of this curl texture?
TanJanika: This was very detailed thanks
Name Is Nicole: This was so helpful honestly!
Naturally Anna: Can you do a video on how you lay your baby hairs with a closure ?