How To Make A Flat Closure Wig: Completely Glueless | Shyne Intl
- Posted on 27 March, 2020
- Closure Wig
- By Anonymous
WATCH IN 1080p
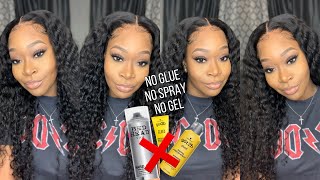
BEGINNER FRIENDLY!!! While we're being QUARANTINED, you might as well learn a new skill!! Who knows when outside will be open again ⁉️ In this video you will learn how to construct a COMPLETELY GLUELESS (NO GLUE OR GOT 2B NEEDED) Closure wig!!
Hair Details:
20" 4x4 Transparent Peruvian Bone Straight Closure
22" 24" 26" Peruvian Bone Straight Bundles
Pinklushbeauty.com/
To learn how to customize a lace, clck the link below:
https://www.youtube.com/watch?v=-QqiTT...
Book a hair appointment with mee (ATL) :
pinklushbeauty.as.me/
IG: Shyne.intl
SC: Sunshyne617
**If you would like to contact me, you can email me at [email protected] ;; Business inquiries only**
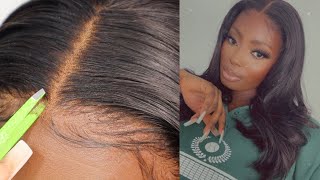
Hey-Yah is shot international here and I'm back with another video. Today I will be showing you how to do a glue disclosure week. It is super flat and there is no glue involved period. That'S what we like specially this summer. It'S about to be hot outside! We don't need any glue holding us back from being outside. Ok, so I'm not gon na do a voice over because I don't like it really. It'S a lot of work, a lot of editing and sometimes whatever you wanted to say, I'm just not doing the voice over. So this is just straight up from the video what you're going to need? What you're going to need for this week is three or more bundles depending on the texture. However, I, like straight hair - and I don't like extra thick straight hair like I like it - to be sleek and flat. So I'm only doing three bundles today, and these are from my collection. Thank You. Persistence on pink, let's be calm. This is my Peruvian bone straight collection and I have a 20 inch, 22 inch and a 24 inch next you'll need close your. It could be 4x4. A to be 5x5, it's really up to you. You know me if you see my videos before then you know that I only do transparent or HD laces, so you know know how I feel about that. I don't like grey laces and I don't like don't like brown delicious, so I already bleached the nuts. If you don't know how to bleach not you can check out my other video, which I'll put a little clip right here to send you to the video how to melt a full last week and it'll teach you there how to bleach the knots of course, you're Going to need needle and thread and scissors, you are going to need a wig cap, so the we camp that I'm using today is the it's mesh and it has straps in the back. That'S why I really got it. I feel like you can use a don't cap rock like the dome cap, doesn't really give you that that fit it fit it and it doesn't have the straps option so t-pins you will need a wig stand and then, of course, you'll need a canvas head. This is not the canvas head that I will be using. I will be using my glue, Oh reliable back here, but she's all dirty and I don't want y'all to judge me stop, but I will be showing you how to put the cap on. If you have a small head, get get you a 22 inch, but if your hair kind of big, like mine, 23 24, I think they range from 20 or 21 to 24 or 25, not too sure about that. So it's a funny, but they do have them on Amazon and there are available for five and though I'm not being sponsored for this, if you're using this cap match cap, this is the front and the straps going to back when you put it on. You want to put it on nice and snug, but you don't want to stretch it out and you're going to tip in it, get your closure and get your scissors and what you're going to do. Is you see these thick parts right here? These aren't gon na lay, so we're just going to cut off a little piece of that like about this much and this how you're going to take parts where she period so you're gon na bring your front to a little bit just a tiny bit over the Cap just a little bit so now you want to pull it. You want to t pity so that is flat on both sides like to take your needle and your thread and you're gon na sell the front down. So I go start right here. The tip of the cap and I go underneath and I'm gon na - do my anchor first then I'm gon na go again. I go under then I loop it twice and then I pull my create or not I'm gon na do that again and then I'm a carry on and do the same thing around the closure. You want to do your thread close together, so you won't have any lumps and bumps cause. We gone for a flat look see how it's lifting right here, you're just gon na pull it on adjust the T pins so that it lays flat on both sides along here and along the side right here that you can see, make sure your sewing close together. Okay, my camera died, so I'm going to record on my iPhone 11 for the time being, the longest length goes on the bottom and this period. I start with the with the folded side first, and I just put it through the folded side, I'm gon na. Do my anchor and I'm gon na go in and do it again and I'm a double loop same way that I stood on the fret, so you don't still on the bread you gon na do this by three four times once I started sewing I'd, get the T pins and I put the tip in where I want the bundles today: do you want to make sure you go through the net and I don't go through the actual whip I go like around it? Are you gon na go, do both cuz we're doubling it up right now, don't so on the outside on this part, because that's elastic as well, and you want your weight to be able to stretch to fit your head and you want to be able to use Them straps, I told y'all about you, okay, so now I'm getting ready to flip it over. So what I'm gon na do is double and triple knot. It three four times I got ta eat when I first started to ditch right, I'm going and I'm gon na slip it over. So when I flip it over, you want to push it down so that it can lay flat flat. I'M gon na take your further. So you see how I started right here now, I'm gon na take it to like right here. I'M gon na take my tea pan and I'm gon na put it through where I want the truck to stop that just to do my stuff. Well, you know. First of all, five two three move to here: okay, are you gon na press it down? So you see right here the hairs trying to come through. I let it go through when I get this, I don't know how to explain it double naughty. Remember we're not gon na sell on these either. I'M gon na skip that and I'm gon na go ahead and fast-forward i'ma switch after. I finish this West right here, I'm gon na switch mannequins and then I'm gon na just fast forward with the process, because it's really pretty much repetitive, I'm at the end of the track nice doing on the big piece and I'm sewing close to it and I'm A double knot it because I have to get ready for the tunnel. This is gon na, be the last time I'm able to wrap it around. So I got my new needle, so I'm just gon na go in the same spot and I'm gon na double knot. It on top of the night, then I made with my last needle do that about two or three times then move on two pieces of the tracks right there. So what you're gon na do is sew like you've been sowing go through both of the whiffs. This whole time we haven't been sowing going through, we've been going around it, but this time we're gon na show through it through the web, go ahead and do that and then this time we could go around it. That was just a so the weft together so that it won't. I don't know if I ever seen anyone this is like poking out or you ever feel it when you like, run your fingers through your hair and then you fit in a little one piece. So to prevent that you go ahead and just so do the weft together and then you're, just gon na keep keep sowing my regular, like nothing happened, so I'm getting ready to sow my second. My second bundle of hair in gon na take the thread and you're gon na put it through the fold aside and since there's an anchor already you're, just gon na put it through the net right next to the last bundle that we used and you're just going To sew them together make sure you hold in the bundle so that you guide where it goes. You know where you so that and you're just them do that two more times go through the new. The new bundle and around the old one just can join them. Make sure it's nice as that, the last two bundles, the closer you get to the top. You want to singly. So the last one is you singly, four bundles. You will have two doubled up and two signature, two bundles signal track, but since I'm only doing three one two doubled up. One signature we're getting closer to the to the closer. So now we're going here to ear, as you can see straight across straight across straight across it in the long way, instead of going all the way from the top. I just feel like it's flatter that way right about here, i'ma cut it and then I'm just gon na you're, just gon na sit close to the so all the way around so I'll be use mighty pen. So go this place and I'm gon na start sewing. You can sew it to the closure or not, but I feel like because this is a week I don't feel like you should so that when you want to replace the closure, you could do so easily. So it's super close and I Ballou mean so you can see what I'm talk about. It'S not connected to the actual closure, just a case later down the line I want to reconstruct to thee. This is the final product of the closure week. This the inside is the outside. Now this little piece right here, this pocket we're gon na, go ahead and cut that off, and you don't want to cut it too close where you cut the the thread, that's holding the closure to leave. If you leave that on, you will see it underneath your closure, so you want to make sure you get rid of that. This is how it should look underneath when you finish Kaylee


Comments
NDapMe Emanuel: You are the truth ! Thank you for blessing us with this video. You make me feel like I can do anything. I’m definitely inspired to make my own wig at this point lol
Shapria Hairston: Girllll I just can’t believe this video ain’t get as much recognition as I thought YOU GOING UPPP! this video taught me alottt thank you
Antonia Williams: Very informative! Thank you for this video
BossyBree TV: Can u do a video on how you customize your lace next ?
Kelli Doll Creator Kelli: N I love living room flow
Khaleesi: Which cap is your favorite the adjustable cap or the dome cap?
CARAMEL B_100: YOU DID THAT,YASSSSS HUNNY!!!!!
tyler burkes: So is it only completely glueless if you use combs?
Miss Marr: Hey babe!! What type of wig cap is that I want to invest... Coming from a babyHAIRCosmetologist. I agree with the pretty ones under me this was very Informative and helps me create my OWN looks.. Later down the line when I do get a chair in the salon this will help me Make sure my foundation is critique and fixed to perfection. #GEMsTHEEVILTWINgang
ibadie: So pretty
Nailedbyshae: Hey can you make a video of you cutting a wig into a symmetrical bob please ?
Kelli Doll Creator Kelli: I reaaalllyy like how you explained the little things!!!
SWEETEA420: Very inspiring
Nisha: I want you to do my hair
LaBeLLa MiSSDonna: When do you start to sew onto the very edge of the cap?????? That part’s confusing me....
Precious Ellington: So how did you see the combs in and specifically what kind of cap like the brand n kind PLEASE...
Josephine Edu: What size of cap did u get?