Soft And Shiny, Beginner Friendly 5X5 Closure Wig | Ft. Unice Hair Amazon | Bold Hold |
- Posted on 29 March, 2021
- Closure Wig
- By Anonymous
#closurewig #unicehair #amazonwigs
Heyy loves thank you so much for watching! Today I’ll be slaying this gorgeous closure unit. It’s perfect for beginners
+ link to same#5x5 HD Lace closure Body Wave human hair wig:https://amzn.to/37D4Spn
★6% Off #Coupon code:LOVEUNICE
------------------UNice Hot Selling Wigs ------------------
★#straight Ombre blonde lace front human hair wig: https://amzn.to/2XznnVr
★#Straight 13x4 HD lace front human hair wig:https://amzn.to/3dvagM4
★# 5X5 HD Lace Closure Curly human hair wigs:https://amzn.to/3bwaCmQ
★13x4 lace front 99J red human hair wig 22 inch➤:https://amzn.to/2YM8iQW
★#Yaki kinky straight u part human hair wig:https://amzn.to/2D16v2C
★#Straight Headband human hair wig:https://amzn.to/3ht4njG
★#Curly Headband Human hair Wigs 18inch ➤:https://amzn.to/2GWW3eR
★#Waterwave headband human hair wig:➤https://amzn.to/3a9tjKh
Want to wholesale and promote unice hair?
Email:[email protected]
whatsapp+8613290756878
________________________________
C O N T A C T M E
S O C I A L S
INSTAGRAM: @ibeatthatface
TIKTOK: iBEATTHATFACE
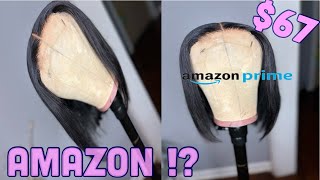
Hi, you guys welcome back to my channel. I am back again with a hair tutorial. We are slaying this lace today, what wig y'all? What wig do you see how melted this is like this hair looks so freaking natural. This is the hair from eunice hair on amazon. This is the 5x5 body wave um closure wig, and it is an 18 inch and do you see how shiny and how healthy and bouncy this hair is like you guys, i am shook okay shook. So if you want to see how i install this wig, you don't have to glue this wig down. I just did because i'm gon na be working all week. Um you could wear it as a glueless unit, but i wanted to glue it down. So i did use both hold active on it, so yeah, but you'll see how melted it looks without the glue later on in the video. So if you want to see how i got this look, keep watching all right, let's jump into this unboxing, so you get the 18 inch wig here you get the hair wrap. You also get a stocking cap and you get instructions on how to take care of the hair. Look how long this one is you guys, like i'm excited, i get to wrap it around twice, so it's real secure! So now, let's jump into this hair, the hair was so soft jaw, so soft, but this is how the closure looks, but look how pretty this hair is okay, so this is what inside the cap looks like. Of course, you get your standard clips on the side and one at the bottom and the adjustable strap at the bottom. Like a standard wig, the construction of the wig was pretty pretty standard um. The knots weren't too dark on the lace, but i did go ahead and bleach them. So this is what the lace look like after i bleached it before i plucked it, and i did a little plucking, not too much, but just a little bit just wanted y'all to see so, let's get into this install. So, of course, you want to start by wiping your hairline with 91 alcohol, getting all the makeup and the oils off of your skin and then, of course, i'm going to spray about two layers of the bold hold skin protectant. This is going to help protect your skin against the glue and also protect your skin. Um will protect from sweating and things like that. So this is a must-have. When i do my weigh-in styles, okay, you guys like a must-have and then you just want to make sure that's completely dry before you go in with the glue. So this is what the hair looks. Air dried super, pretty body wave um, the hair was so shiny and i was just shook so, of course, on the back of the wig comes with a little piece of lace. You just want to cut that smooth off. Okay, all right. So now i'm just putting on the wig to see you know what it's going to be looking like and of course i didn't make my center part straight, so we gon na fix that a little later on now i'm just adjusting it and seeing you know where I'M gon na leave it on my head. Forgive me you guys, i forgot to show the clip of me cutting the lace off, but it's pretty standard cut it off, but just not in a straight line. Now i'm gon na mark out where the edge of the lace ends, because we don't want to put the glue too far um so yeah. This step is optional, but i just like to do it sometimes just to make sure it's real accurate. So after you clip your hair back out of the way, i'm just using the boldhole lace, tape, cutting the sections and the little strips and putting that right across my hairline, i would drop it, i'm always clumsy, but yeah. You just want to pop that right onto your hairline and i just use three pieces and make sure you get it right where you put those dots, because you don't want to get it outside those dots. Okay. So when you put the tape down, you just want to make sure you're pressing it really good into the skin. We don't need it lifting or anything like that, and then you just want to check to see um where the wig lays on top of the tape, because you do want to put a little bit of glue in front of the tape. So that's what i'm just checking here and it's super easy to peel the tape off, because it has a little slit in the middle. So you just take that and pop it right off. Just like so now we're going to go in with our glue. I'M using bold hold active because i'm an active person and i need my hair to stay on during the week. Okay, so i just do little dots, um behind and on top of the glue, then we're just going to spread it out. You just want to make sure you put a really thin layer of the glue not too thick, because your wig won't stick. Okay, so really thin layers. I did about four layers of this glue. I don't know why i thought i could wipe the eyeliner off with my finger, but just take a little alcohol and wipe that um dot that we made with the eyeliner. Now that we got our initial layer down, you don't really need it anymore, because you can see where the glue and the tape ends. So that's what i'm doing here and just going back in with my next layer of glue and making it really thin. Now that we have our desired amount of layers, you're just going to blow dry it a little bit until it turns completely white and then, after that, your wig is ready to pop on also when you're putting your wig on make sure you have every little piece Of baby hair out the way, because you do not want that stuck into your glue because your wig will not stay down so make sure it's all out of the way. Also, you want to put your lace right on top of where you put that glue. So the edge of the lace should line up with the edge of the glue. You do not want to have any glue left out because it's hard to clean up after it's already on your skin, so you'd rather have too much lace hanging out than too much glue. But you just want to kind of get it right perfect later on. You'Ll see that i'm cutting the little excess lace that i have, but you want to get it right on the edge all right. So this is how we're looking i'm just going to press in that lace really good. You want to really melt it into that glue. So that's what i'm doing taking out any pieces that may get stuck when i tie it down and pushing them back and make sure we're just pushing that hairline right in then i'm gon na go back in with my blow dryer on cool. I keep forgetting to tell y'all cool air only when you're blow drying your hair. Well, your glue cool air only and just making sure it's really really in there all right, so we're looking pretty melted so far, just making sure everything is in place. I'M gon na put my hair up into a ponytail to tie my hair down but um. I did see a little piece of lace that i needed to cut, so i went ahead and cut that little edge off you'll see in a second. So you just want to make sure everything is you know not lifting? Okay? We don't want no lifting lace, so i'm just going to tie my hair down with this cute satin scarf. That says you nice on there and yeah. So we're going to leave that tied down for maybe like 20 minutes, 20 30 minutes just to make sure everything is melted. Alright. So after that sat on there we're just gon na get into making this middle part straight, i rarely do middle parts but um. I was kind of feeling it this time, so i was like. Let me just stay with it instead of a side part, so it took me a minute to kind of you know, get that middle part in the middle, but um yeah, you see, we we get it there eventually and then i'm just using the heat from the Curling iron, to really kind of hold that you know part that was already molded to one side, putting it on the other side. Now just to get that part in the middle. You don't want your middle part off the middle. We want it in the middle, so yeah just take your time with a retail comb and get your part directly in the middle of your head, and you already know we got to get the wax stick boom in when we get our parts straight. So it could be nice and silky and flat. I didn't go in with the hot comb this time because i didn't need to, but i just put the wax stick and then i hit it a little bit with the curling iron through the middle and it laid down honey. My hair was laid to the gods. Okay laid all right so now that we got that part all centered, i'm just adding some bio silk oil in my hair - and this is going to make the hair super shiny, super soft and frizz free. So just adding a tiny bit of that all throughout the hair and then we're gon na now, i'm just sectioning out my baby. Hair baby hairs are optional with this um lace, because the lace is really melted into the skin, but i like baby hair. So i put some for a little razzle dazzle a little jose i'm going on. So if you like, baby hair, put you some baby hairs here, i'm just taking my curling iron, being real, careful you guys and making that baby hair a little bit just so it lays down flat. Um, don't burn yourself! You guys just be super extremely careful when doing that, but it really helps your baby hair to um kind of lay down a little bit then we're just taking an eyebrow razor and cutting the excess off and yeah. You want to make sure they're not too long. Not too short, just like the nice little medium amount, so yeah, that's what we're doing here and then we're gon na be laying them down with the bold hold lace jelly i like it because it doesn't turn flaky or crusty. It just holds them in place and yeah. Don'T have any problems with it all right here now, i'm just brushing and smoothing the hair getting ready to curl it and style it. I'M sorry, you guys the end of my um video me styling. My whole head got deleted, so it's pretty standard, how i do my curls just section it off and take kind of small pieces, well, small, medium pieces and curling it with. I believe, that's a one inch iron that i have um. You could do a bigger iron. If you want like looser curls, but this is what i had at the moment, so the curls turned out super pretty you'll see at the end but yeah. This is how i do it just take it wrap it around and don't mind again my concentrating face, because i look real crazy, but the hair looks real good, okay, so yeah all right, you guys. I hope you guys got the general concept of how i styled my hair, but look how pretty and bouncy and shiny this hair is. Thank you guys for watching and i hope you enjoyed, and i will see you in my next video you


Comments
cos: you look like ari fletcher!
Mia j: Can we get a makeup tutorial?
Prettyeyes Joseph: Hi do you still recommend this hair ?
Kat P: Did you apply makeup on the lace?
LUKE 1;45: U fyreeeee