How To Hand Sew A Closure Wig - Beginner Friendly
- Posted on 14 November, 2020
- Closure Wig
- By Anonymous
How to Hand Sew a Closure Wig - Beginner Friendly
Shop: https://www.bisouhaircollection.com
Follow my Business:
Instagram: @bisouhaircollection https://www.instagram.com/bisouhaircol...
Facebook: Bisou Hair Collection https://www.facebook.com/bisouhaircoll...
Pinterest: Bisou Hair Collection https://www.pinterest.com/bisouhaircol...
Follow Me:
Instagram: @chelseaphilias https://www.instagram.com/chelseaphili...
Snapchat: @fabulous_chels
Follow my Son:
Instagram: @cairo_reign https://www.instagram.com/cairo_reign/...
Couples Channel: Ceajay & Chelsea https://www.youtube.com/channel/UCc4Dc...
Music: @gway beats
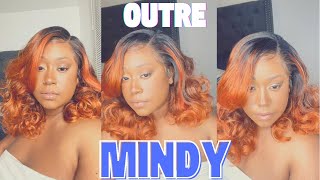
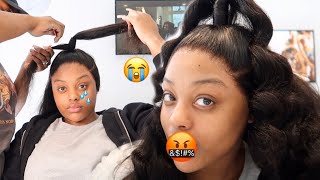
Hey guys welcome back to my channel in this video, i'm gon na be doing a closure wig, and this is me just making sure the closure is flat, like you got ta make sure it's really flat on the head, because when you're sewing it, you don't want Any bumps it's not gon na look right. I'M just gon na go ahead and start sewing um. I don't have a special technique for sewing. I just sold regularly at the beginning. I just wrap to secure the to secure the thread. I just wrap a couple times. Um, you guys see what i'm doing and then i sew around and when i reached it to the end, i do the same thing to make sure um the thread stays secure by the way guys i sell hair 100 virgin hair. The website is called beazoohaircollection.com. Go ahead and check us out and um. I also do custom wigs, they are hand sewn. So if you want one definitely go ahead and check out the website for everything you need and also my instagram is visual hair collection and my personal instagram is chelsea phillies. So go ahead and follow your girl. Okay! Now i'm gon na go ahead and do the same thing. I did at the beginning just to secure the thread. Now. I'M just marking the cap from where i want to install the tracks in i'm. Go i'm not going to double the wefts, so that's why i'm making the tracks so close together, they're like about half an inch apart, i would say: i'm only doing it so close together because i'm not going to double the wefts and i'm also using this cap. I'M using is um a regular mesh dome cap and i'm doing this wig on a 22 inches um wig head block and i'm making it for myself. So that's my measurements. I have three bundles of 12 inches, but i ended up only using two bundles for this wig, because it's it's a bob wig um. I don't. I don't want it to be extremely extremely full. It was it's still full um. You only need two because it's the hair is a shorter length. It'S only 12 inches. You only need two bundles in your closure or front of whatever you're using now, i'm just gon na go ahead and sew the tracks on i'm using the same method. I used for the for sewing the closure. Sorry, this clip was kind of blurry, but it's gon na get better. I promise in a second and yes guys. I do cut the tracks at at the end of each um each track. I do cut them because i don't want the way to be lumpy and bumpy and all that and no it's not gon na - do do all right guys so at the very top i'm gon na sew as close as possible to the closure, as i can, but I'M not gon na sew on the closure, if that makes any sense like i'm, not gon na run the needle on the third one, the actual closure, but i'm gon na so really close to it, because i want it to be flat on top all right guys. So this is what the final results look like. As you can see, my stitching is pretty neat. I'M gon na show you guys what the wig looks like on. So this is what this is. What the wig looks like after i sew everything in like. I said this is um. I use two bundles of 12 inches and also a 12 inch closure. Now i'm going to go ahead and cut the extra cap of the closure. This is what the wig looks like on. It'S really. It fits perfectly to my head. You guys, i don't even need any combs or nothing like that. It could be glueless like if it's so perfectly. I'M about to show you guys in a second, because i'm going to shake my head and it's not gon na fall off. That'S why it's so important to use a cat that really to use a cap that fish your head size and also the wig wig um head. You know it's important to know your measurements, because that's how you're gon na get the perfect fit wig. So this is what it looks like. I didn't do nothing yet to it. I didn't pluck it or nothing like that. I did lightly bleach the knots. That'S all see the wig is not coming up anyway. You guys this is pretty much it for this video. I hope you enjoyed it if you did please subscribe to the channel, give this video a like turn on your post notification and thank you guys so much for watching i'll catch. You guys on my next video bye,


Comments
CassieBeauty: Wow I’m happy I found your channel again I forgot to subscribe last time. We’re alike in a way lol. Both are names start with a “C” . Haitian. We both have a son named Cairo the same age and I just found out I’m pregnant as well! Twinning lol
Divine Fro: Amazing work
Naturally Nae: I think imma try this.this was a great tutorial
Itz MzAquarian: Great video. Stitching is on point. Thank you
As Told By Chy: Are you going through the weft on the whole track or just the beginning and at the end ?
Alexius King: Can you show us a side part one ?
Alexius King: Imma start cutting mine than I think that will work better .
Sequoia Jackson: How many lines do you have ?