How To: Layer And Fix Bald Spots On Old Wig || Assalaxx
- Posted on 22 September, 2020
- Closure Wig
- By Anonymous
welcome to- #layeringwig #baldlace #oldwig
Hey Babes,
Welcome back :) ! I hope you guys Enjoy it! Thanks for watching and dont forget to subscribe and like this video !! XoXo.
SHOP WITH ME:
IG: ladylashbyash
IG: hairsnstn
Connect with me :
IG: Assalaxx__
SC: Assalaxx__
Twitter: Assalaxx__
Email: [email protected]
Subscribe to my channel :https://www.youtube.com/channel/UCILXe...
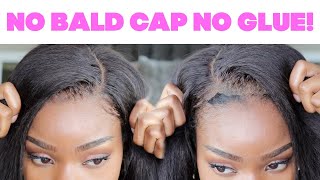
Hey you guys and welcome back to my channel now in this video, i will be showing you guys how i kind of revived an old wig that i had and also finesse the lace. The lace of this wig was actually balding like a literally that pickled and i wanted to do a side part um. No, actually, i wanted to do a middle part, but then the middle part was really really bald and i wanted to figure a way to fix it um. Well, i actually knew a way how to fix it. So i'm just here to show you guys how i normally fix my wigs whenever they have like bald spots um and whenever there's a parting that i want to do, what can it do to the bald spot? So this is what i'll be showing you guys today and also showing us how i layer my wigs, giving it more of a flowy um, look and giving it more body. But you know before we jump into this video fully. Please don't forget to subscribe to my channel hit that notification bell, so you are notified whenever i post and leave all your comments down below now for the first part of the video, all i was doing was pretty much getting the wig ready to start the layering Um but yeah for the layering, all you have to do is pretty much part. The hair out on like an angled um like hold the hair at an angle and then pretty much just use your scissors to cut down in like a slant direction. You'Re going to see exactly what i'm trying to explain, so i you see how i'm holding the scissors and i'm pretty much cutting down. That'S what you want to do. You just hold the hair, cut it down um, and then you are going to go in with your either your flat iron or whatever, to kind of give it a bump. Well, that's what i do to give it a little bump at the ends, so it will kind of fall into place because if you just cut it and leave it like that, it doesn't really. I don't know it doesn't look good to me. So what i normally do is just cut it, and then i go back in with like a flat iron or whatever um, to just kind of bump. The ends to give the ends a more flowy and fuller. Look now you can do this on whatever wigs you have. You could do this, whether you're, trying to curl your wig. You know when you're doing like the body waves, curled or whatever you can do that also or if you're straightening, the hair. Normally, when it's like a deeper curl, maybe like um like a deep wave, deep curl whatever i don't normally layer the hair, because i don't you don't need to lay the hair, but for a straight hair and body wave here, it's good to layer it if you Want to give the hair a more um volume and if you want it to look full and flowy, and you know you know what i'm saying um it's good to lay the hair. A lot of persons are really afraid to cut the hair. I don't know me personally when i have my hair: if they're like 30 inch, 40 inches, i ain't gon na lie sometimes i'm a little bit afraid to cut it and layer it. But if i have like a wig, that's like 22 inches, um, 24 inches the most i'll layer it and do the curl. Because i find when you actually lay your hair to curl or straighten it. It flows better and that's just for me personally um but yeah. All i'm doing is just combing it out cutting um more if needs be or leaving it. It depends on you if you feel like okay, you've cut it enough and you've. You know you're satisfied with the way it looks. Then you can stop. If not, you could go ahead and continue cutting more. I pretty much just went back and forth back and forth trying to make sure both sides are at the same length um. It'S actually at you know a length that i like whatever needs to be cut off. I cut more whatever needs. You know pretty much just going back and forth um between both sides when i'm layering, oh uh um. Now, when i'm using the flat iron to kind of bump it - i don't really put, i don't really do a full full um curl with it. I pretty much just do a little bump. You don't need to fully curl it under because you don't you're not really curling, it you're, just giving it a bump. So when you're using the flat iron to do it, don't really go in and give it like a a full fold under you're, literally just giving it a bump to give it to show like you know, it's been layered and whatever don't really you don't have to Really go in and do a full full fold under when you're doing the flat iron or bumping or whatever, no guys. This is what i am talking about. As you can see, the hair is pretty much falling out um. It happens over time when you have the lace for a pretty long time. I'Ve had this lace for probably two years, so i can imagine that, of course, it would start peeling, oh or whatever, but nevertheless i have a remedy um in fixing this. So it will look like it was never touched: okay, um, okay, so you have two ways of doing it. You have this color, stick that you can use um. I was going in with the color stick at first, but i didn't really like the way how it was looking, because i think the color stick was too um. I don't know because it's like a almost like a creamy substance under here. I didn't like the way. Oh, how it was looking, so i pretty much did the first part with it to kind of get the base of it. But as you can see, i started combing it up because it was a little bit too like off too much of a sticky substance under here. I didn't like how it was looking, so i pretty much use that as a base, but i ended up going back in with a makeup brush and a black eyeshadow everybody uses this um. I can use a black eyeshadow on this hair because um this hair was dyed jet black by me, so i was able to use the black eyeshadow. However, if you have like the 1b here, i recommend you using like a dark brown to make it more realistic, but this hair was dyed yet black. So i had to go in with the um eyeshadow palette with which has which had a jet black um eyeshadow and, as you can see, it was working way way way way way better than the actual stick. Now i had a little bit of trouble with the inside because, as you can see the hair, the part that the hair is laying over like right, where my hand is at right now right, there is also um falling. Oh, so it was a little bit tricky. I had to kind of part the hair open and put some um eyeshadow inside the middle as well, because it was pretty much bald and i didn't want to have like i don't know. It would have showed that there was a line because underneath was bald and then in the middle was bald. So i had to pretty much just part: the hair um and place the black eyeshadow on underneath as well cover it up back and then went in and started doing the front part and, as you can see it's already coming together almost like you know it was Never a problem in the first place, but yeah. This is my little trick on fixing here that has been falling out because again, laces aren't permanent. They will be like you will need to replace them after a while. You can probably use the bundles over and over and over again, but after a while the laces, the hair will start to fall out because they were not meant to be permanent um. So, whichever hair company you order from it could be the most expensive. The best quality in the game after a while it might not follow the the the same time as like a less quality here, but after a while it will eventually fall out because again it's not permanent, but yeah, i'm just gon na. Let you guys watch as i fix the hair and then you will see the end result. Oh ah, so i just wanted to come back and say right here i was just using my concealer to define the part a little bit more, just in case the eyeshadow kind of went in over on the part itself. I didn't want that. I wanted to have a very clean part, so, in order to get that look, i had to go back in with a concealer brush um and my concealer and pretty much just what i do and, as you can see it's perfectly new like it was never touched. Um, so this is the ending result, guys um, as you can tell you, don't really know that i had a bald spot anywhere. You can't really tell um, and that was my aim, pretty much um for the install of this video. I didn't record it because it's just like i have so many videos of me recording installs, and i don't think this was one of my best. Installs like it could have been better, but whatever this hair is like old, like i've. Had this hair from not this birthday, the last birthday so two years um but yeah, this is the ending results. Obviously, i think i need to cut more layers in it because they're not really seeing the layers when i install it on me, but i don't have time right now, so the layers will be added later on. But i just came on here to show you guys how the hair looks when i fixed and everything and it's installed so yeah. Thank you guys for watching. I hope you guys enjoyed this video and if you want to see more tricks on how i fix like different, you know disastrous hair like how i finish it all the time. Let me know - and i will definitely definitely do more, but for now this is the end. Thank you guys for watching, and i will see you guys in my next hey yo smalls turn


Comments
C ‘ Rockinn: skip to 7:20 to see how she actually fix the danm closure
Chloé Shaareé: Slayed it like it’s brand new
Tamika Phidas: Thank you for this bc I can’t ventilate to save my life lol
Nakidra Smith: thank you very helpful video ❤️❤️
Pyra B: Where did you get this wig from ?
Ebony Solomon: What kind of concealer is that.
Kedei TV: Hello I just seen yo comment in my email I don’t know why it’s not showing on my video but thank you! Because them bald spots awful
Donaith Anderson: Are you from the Caribbean?