No More Frontals! ♀️ Easy Glueless Meltdown With 6X6 Closure Wig (From Wiggins Hair)
- Posted on 14 January, 2020
- Closure Wig
- By Anonymous
Hey Ladies!
Thank you all for watching! Don't forget to like, share, comment, and subscribe! Also make sure your post notifications are are on!
Part 1 - How To Bleach Knots & Tint Lace
How I Cut Layers In My Hair
Hair details: straight 6X6 lace closure wig 24”180% density
❤Direct Link ➤http://bit.ly/2SN9y4p
♛Wiggins Hair Official Website ➤http://bit.ly/35lpnSB
❤Recommend wigginshair 6X6#laceclosurewigs ➤http://bit.ly/2sGacGc
❤Best Selling #wigginshair13X6lacefrontwigs ➤http://bit.ly/2FihRNS
Follow @wigginshair on instagram:http://bit.ly/2tuEvzF
Learn More Our Latest Wig Products➤http://bit.ly/34j1tGU
Hot Selling #WigginsLoosedeepwave Promotion ➤ http://bit.ly/31FwYJY
Get $$$ Off on wigginshair.com ➤http://bit.ly/2RXtS2A
Facebook @wigginshair : https://goo.gl/GqrSQt
E-mail: [email protected]
WhatsApp Wholesale: 0086 17703997280
I am now offering “Snatched & Highly Favored” t-shirts & sweatshirts! Merchandise can be ordered via my Teespring page, https://teespring.com/stores/snatched-... . Thank you all in advance for your continued support! ♥️
Helpful Videos
How I Make My Wigs| https://youtu.be/1WrN3B7p1n0
How I Install My Wigs| https://youtu.be/pckRd488TU8
My Fav Edge Controls| https://youtu.be/S8q027j8RSY
**CONTACT ME**
For Business Inquiries
Email: [email protected]
For my random whereabouts & fun, Follow Me!
Beauty IG: @SnatchedBySharmel
Facebook: facebook.com/snatchedbysharmel
Snatched & Highly Favored "She is clothed with strength and dignity; she can laugh at the days to come."Proverbs 31:25
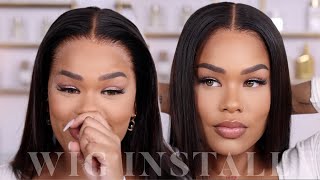
Hey everybody is Charmel, welcome back to my channel, so today, I'm here with a wig video thanks, wig video is in collaboration with Wiggins hair. I'M they've been around for a long time, their Chinese vendor hair seller. I am going to be showing you guys these 6x6 lace closure wig. I have it in the straight texture and 24-inches got it 150 density and I have a medium sized wig cap. So I did two parts to this video, so the first part which will probably uploaded before this video. I showed you guys how I bleach my dad's tinted my lace and how I colored this hair jet-black. I think in the clips, though, I only showed you coloring the roots, but I ended up coloring the entire wig jet black and then in this video, I'm gon na show you guys exactly how I install the way. So, overall, the quality of this hair is pretty average. It'S not so far. I don't feel like it's super high quality, but it's not the worst hair ever it's just very average. As far as the hair quality goes as far as the installation process with this wig. This wig was super easy to install yeah, I'm trying to step up my weight gain between 20, so this is a completely is a completely glueless melt that I have is not 100 %, but y'all I'm getting better. I personally prefer closure wig and typically, if I'm wearing a wig, I'm either wearing it in the middle part or a side part. So I don't find that the lace from ear to ear is really necessary. For me, I do actually like I think I, like the six by six lace. Closure is better than the traditional four by four lace closure, though, because you do have more parting space right now. I just have it in a middle part, but I think I'm going to change it into a side part and normally, when I wear my 4 by 4 closure wigs, I have to just kind of shift it to the side, but, as you guys can see, um You know what you're doing in a little sloppy side part, but I don't have to shift my wig to make you be a side part. I can just actually play it on the side. This hair is very true to length. I am 5-2. This hair is very long. I did cut it and I added some layers to it, but this hair is very long. It comes all the way down. Basically to my past my bellybutton. It definitely touches my butt in the back looking 24 inches on 5/2 and I also trim the ends on this hair, so this hair is extremely long, very shootable in Hindi yeah. I don't want this intros to be too long and yeah so yeah. Thank you all forget for watching, don't forget to check out Wiggins hair. All their information will be linked down below as usual and yeah give me a thumbs up. Cuz y'all, like I said, I'm trying to send my wig game up in 2020, I've been kind of slacking and getting lazy, so yeah, let's jump into this tutorial, hurt you guys so the wave comes packaged in this box and you'll get care instructions. A wig cap, an elastic band, if you want to adjust your wig more a nice satin bag to store your wig in and you'll, also get like this satin head, wrap to kind of lay down and melt your lace and here to tell the wig, looks straight Out the box again this week is super long, so I can't I couldn't even get the whole wig in one full frame, but if the way has two cones on the side and one in the back and then the inside has left it with the 6x6 lace Closure one of my downfalls with this wig is the ear tabs. They are slightly uncomfortable partially because I got a medium sized cap wig and my wig is a little big and so the ear tabs kind of sit on top of my ears. Instead of in front of my ears on my temple, I'm so yeah that was one downfall, make sure that your side, you get the correct size, so it comes in small medium large. I should have got a small, but I got a medium and it is slightly big um again make sure you watch part one to see how I customized and get this wig and the closure to look supernatural so definitely check out part 1. So I'm just gon na place it on my head, and this is how the wig works without cutting the lace. I did plug some of my hairline off-camera, but I am going and plucking more of my hairline in areas where I see that it's fit now that it's on line kit, sometimes it's best to kind of pluck it on your head. So you sometime to customize it to your natural hairline. So that's just what I'm doing here just going in and tweezing more areas that I feel are necessary. Now, I'm gon na take my hot comb and I'm just gon na start. Call me that, hair away from my face, I don't want any stray hairs laying on the lace. I want to make sure that all that hair is out of the way and I'm also going to take a slick, stick just to ensure again that all the hair is out of the way. And now I'm going in with some gorilla snot and I'm just going to start kind of sweeping my hairline to get a rough draft on how I want it to sit. I personally prefer to use gorilla snut if I'm doing a clueless mill. I like the Gorillaz, not because it's tacky and it kind of keeps the hair in place, in my opinion, better than just like got to be or any other kind of gel and so yeah. I use that and then I'm just taking that headscarf and I'm just going to tie my hair down and let that sit for a minute and just allow it to mold into place and as you guys can see, it has been molded back perfectly. So now I'm just gon na start by cutting away the lace, I'm going to cut up the middle with my scissors and then I'm gon na cut off each side using a eyebrow razor and as I can see, the closure looks good. But it's still looking kind of boxy like you can still tell that the wig is just kind of sitting right across my forehead, even though it's been plucked. So I'm going to show you guys how to go in and fix that. But first I'm going to start by adding layers to this hair, just to give it a little more movement and body. I have a full tutorial that I did like a long time ago on how I cut my layers, and I still pretty much do the same method so I'll be sure to link that video. If you guys want to check how I add layers to my hair. So yeah I'm just gon na go in in at these layers and then I'll come back and show you guys how I fix that hairline to make it look even more natural like it doesn't look bad right now, but you can definitely kind of still see the Boxiness to it all right so moving on, as you guys can see, I have pulled out these two little sections right at the top of my forehead on each side and so basically I'm kind of doing the widow's peak method. So I naturally don't have a little steep, but you kind of want to take those areas carve out like that little section. So you have a paint at the top of your head and then I'm just gon na go and pull out all of that hair that I had in that little section. If that makes sense - and if you can't get it all, that's okay, because you can kind of turn them into baby hairs, which is what I ended up doing. So I'm just pulling out as much hair as I can in that section. Just to give like my hairline kind of you know like that uneven is unevenness because nobody's hairline is pretty much just kind of straight across so yeah again. This is called like the widow's peak method. I didn't do like a full widow's peak, but I kind of followed that same technique and creating the point at the top of my head and then kind of thinning out of those little temple areas. If that makes sense so yeah, I did it on one side and then I'm just gon na do the same thing on the other side and yeah. That was pretty much all the customizing idea to this closure. Now, I'm just going in and flat ironing this hair. Just to smooth it out - and you know, make it look pretty, and I did a poll on my IG. So if you're not following me, definitely follow me on there, but I asked if I should keep this week straight or curly, and everyone said that I should keep it straight so yeah, you know I'm just keeping it straight, but this hair does curl I'd like to See I am bumping the ends a little bit to give it a little body, but I did do a tester piece. I haven't actually caught the entire wig yet, but I did do a tester piece and his hair does curl. Oh, no, I'm just gon na add my last finishing touches. This is optional and I'm still taking a little bit of powder and just kind of defining my part just a tad bit more I'd honestly didn't need this, but I do like to put a little powder. Like right at the temple of my mother temple, but at the edge of the lace, because I don't have all make up - and so it I feel like it just blends in with my skin better but guys this is pretty much it. I am loving this wig. I love this install like I said, I'm stepping my wig games up this year, so I think I did a pretty good job again. This is glueless. I have no glue, so my hair is completely protected. I don't have to worry about my edge you're spitting it out or anything like that. So if you all enjoyed this video, don't forget to Like share comment and subscribe and definitely check out Wiggins here again, all the information will be down below and I'll see you on next video


Comments
73pinkchocolate: I loved how you did the baby hair.. I don’t like traditional baby hair on a wig, but yours look so natural!! Great job!!
Foreign Queen: You completely bodied this
Amore Love: yasss. Your wig is slayeddddddddd!
TandA Show: would you consider this a everyday wig?
Glo Gorg:
Marvette Green: Hiyeeee Did you trim the ear tabs?