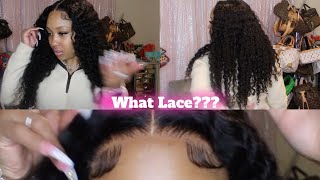
Easy 6X6 / 7X7 Closure Placement For A Flat Wig Construction ♥️
- Posted on 18 November, 2020
- Closure Wig
- By Anonymous
Its Finally Here !! Hope You Ladies Enjoy
---------------------------------------------------------------------
♡ F O L L O W M Y S O C I A L S ♡
◦ instagram: https://www.instagram.com/lifeas_gabie...
◦ business instagram: https://www.instagram.com/laedollscoll...
◦ business website: www.laedollscollection.com
◦ snapchat @lifeas_gabie
◦ BUSINESS: [email protected]
---------------------------------------------------------------------
♡ F A Q ♡
◦age: 24
◦camera: canon G7x mark 2
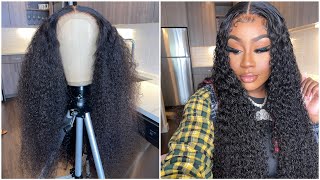
I would like to get to know if i could be the kind of girl that you could hey guys welcome back to my channel today, i'm going to be showing y'all how to do the placement of a 6x6 closure, as you can tell i'm doing a small Circumference, which is 21. - i already have my measurements and stuff set out on the dome head. So this is 6x6 closure. Yes, they have black dye stains. I did not do that. My customer did, but this is the hd lace which i'm showing you guys right here in this clip once y'all see how get it together right about now, it is still hd. The lace is not messed up or anything. It'S just the insider stain so you're going to place the closure on the dome head as usual. You want to make sure it is even as possible, so i use the little lines. That'S on the dome head to make sure that i get it as center and even as possible. So right now, i'm just going ahead and i'm pinning it down my t-pins, i'm making sure that it's even and flat and yeah the hair is on my way. So once i have that t-pin i'm going to turn around to the back and we're going to make this as flat as possible. Y'All. This video is so simple because it's like doing a regular closure. Just you have a bigger one, so you just have more closure and less bundles. So i'm just turning around i'm about to flip this closure and, as you see, i'm lining it up to make sure it is even as possible use all the lines on the dome head use the lines in the cap use whatever you need to make sure that You have it as even as possible, so you're going to go ahead and stretch the closure, all the way back, use your t-pin and you see how it's like a little gap. But it's not too bad. That'S perfect because you're gon na have to still sew it down and you may have to adjust it later on. So i'm doing the same thing to this side, i'm stretching it out making sure it's even, but you see how i'm pulling her hair to make sure. It'S flat, that's what you need to do, but you see i have a little gap still, but the back is super super flat. So what i'm gon na do is i'm gon na go ahead, and i think i'm gon na tie this up right now and get it out the way. So now that i have the closure tied up, i'm about to go and make sure i readjust this closure to make sure it is super super flat. So you see, i have a gap, i'm just going to go ahead and readdress the front, make sure it's even on both sides and you just the whole thing. The whole point of this video is to just show you guys that it's simple you just have to make sure it is flat as possible, and even so, as you can tell, the gap is going away because i'm stretching the closure more and yeah cause. When i look so now, y'all um, i'm just about to sew this closure down y'all can see it is super super flat. The whole point is that you want to lay flat. You don't want no lumps no gaps. None of that. So the only thing i can say that i do differently when it comes to six by six, seven by seven closures compared to my four by four five by five. I do sew the six by six and seven by seven down before i put the bundles on just to make sure that it's super flat and it's secure, and i don't have to worry about. You know my measurements or anything being incorrect with the guidelines and so forth. So that's the only difference i do other than that it is the same simple routine. So you guys about to see me continue to sew this closure down and then i'm going to insert a picture at the end of how flat the closure lay - and i hope you guys learned from this quick little easy video, because it is so so simple. But i wanted to give it out, because i did have a few comments: excellent: how to lay a 6x6 closure. So here you go m, oh will be so, for the guidelines is pretty much the same. I do start off by closure first, but if you watch my guideline video, it is really the same. The only thing i can say is that um, when it do comes to bigger size closures and depending on how many bundles you have, that would determine how many lies you have. I don't really know how many lines i put on this wig because she did send me four bundles, so yeah um, you guys, will see as i get closer to the closure, i would have like a little gap on the side. So you guys can see me draw like a small little guy line there and that's just to make sure that the wig is full and that i use all the bundles. My lines may look crooked as hell, because y'all the way that i had the camera position and the way i was trying to work was so freaking awkward. So my lines are cricket, but i made sure that the wig was still perfect and that all her bundles fit. So i'm about to come up on this part. In a few, where i draw this little line, it's not this one. It'S the next one, i'm gon na draw like a little space in between the curved line you got to see hold on one second right here, so you see that big ol gap. I just drew a little line right there and now that's where i sew bundles. Even though it's small, i still sew the bundle right there to make sure that the wig is full and completed so yeah they did this video y'all. This is how i do my galaxy. This is how you sew on a six by six closure and everything is still bomb. It'S heck, it's the same routine, but i just want to give it to you because i asked for it. So here you go. I hope you guys enjoyed this video and make sure y'all stay to the end. Y'All only got a couple more seconds to see how flat the wig still came out once i um like completed the whole thing by adding the bundles and everything so just stay hold on, don't go nowhere yet wait wait hold on. You got a couple more seconds. Five four three, two one voila you see how sad it is get into it bye. I should


Comments
Kesha T.: Thank you for making this video!!! I know it’s going to be extremely helpful!
Exclusively Shanique: So when these famous instagram wig makers killing up themselvez about classes like its all that difficult they are just fronting. Stop wasting y'all money and watch youtube!!! Lovely video❤❤❤
Nahzia Skye: Thanks sissssss.... I'm just starting out and it's like I'm in classes with u... U really make learning easy..... Watching from The Bahamas.
monique smith: Thank you very much very helpful
J caz: Girl I just love your energy and your videos, can you please tell me where you got the marker from you use to mark the caps? Thanks boo stay beautiful and always keep that great energy
Lanre Ilori: THANK YOU!!!!
Niya Dior TV: Can you make an plucking video ? Love this video
DAKID J: Love the intro
Paige Rogers: Idk what I'm doing wrong, every time I pull the thread, my cap bunches up. I guess I be pulling too hard.
ivory cunningham: Cute video
HairSsans: Hey where do you get your caps from? And do you order one size or it comes in s, m and large
Torri Eley: Do you sell 6x6 or 7x7 closures ?
kyhia k: What wig stand do you use
Coco B: You put 4 bundles on that cap girl?!
Stella Metcalf: “BYE” ☠️