How To: Step By Step 4X4 Closure Wig Tutorial Bleach, Pluck, Install *Very Detailed* Ft Ishow Hair
- Posted on 20 May, 2021
- Closure Wig
- By Anonymous
HOW TO Make Your 4x4 Closure Wig Look Like A Frontal *VERY DETAILED* BEGINNER FRIENDLY FT ISHOW HAIR
Hey guys, todays video is how to make your 4x4 closure wig look like a frontal, i showed you how to pluck a 4x4 closure, bleach and melt a 4x4 closure wig on your scalp. The hair used was loose deep wave hair which was provided by ishowhair.
My 8% off discount code: "IshowLB8"
Ishowbeauty hair official store: https://bit.ly/3v2ztW4
Here is the loose deep wig I'm wearing: https://bit.ly/2S7gI5s
All wig types from Ishowbeauty.com: https://bit.ly/3ykAs6h
13x4 lace frontal wig: https://bit.ly/3fM70O7
Cheap deep curly hair for hot summer: https://bit.ly/3v36rFV
Highly compliment highlights hair: https://bit.ly/2SdbzZi
[ Basic human hairstyles ]
Daily hair bundles with 4x4 closure: https://bit.ly/3bDi66s
Everyday hair bundles with 13x4 frontal: https://bit.ly/2SZaox3
**** Contact #Ishowhair *****
Email: [email protected]
Whatsapp: +86 182 3684 8017
Follow #Ishowbeauty on social media:
YouTube (@Ishowhair): http://bit.ly/2PTT7Bb
Instagram (@officialishowhair): https://bit.ly/3v3IEWm
Facebook (@Ishowbeauty): https://bit.ly/2QDZ6ha
HOW TO: STEP BY STEP 4x4 Closure Wig Tutorial BLEACH, PLUCK, INSTAL *VERY DETAILED
♡ ♡ ♡ ♡ ♡ ♡ ♡ ♡ ♡ ♡ ♡ ♡ ♡ ♡
▷ CONNECT WITH ME!
FOR PROMOTION/ BRAND COLLABORATION ‣ [email protected]
♡ TWITTER ‣ https://twitter.com/Lucybenson__
♡ INSTAGRAM ‣ https://www.instagram.com/Mylucybenson...
♡ ♡ ♡ ♡ ♡ ♡ ♡ ♡ ♡ ♡ ♡ ♡ ♡ ♡
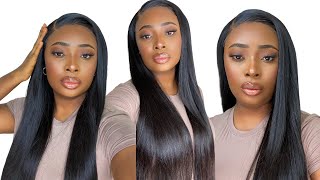
Hey guys welcome back to my channel today's video is going to be how i transform a 4x4 lace closure wig into a frontal wig. Basically, how i make it look like a frontal wig now without wasting any time, let's just dive right into the video unboxing, the hair. This hair was provided to me by eyeshow hair. They provided to me their 24 inch 4x4 loose deep, wave wig and i have it in the cap size medium. I just showed you guys, you know what's inside the bag, you know the care instructions per usual weak cap, and just you know how the hair looks. Initially bouncy luscious shiny, i actually do love eyeshadow, wigs, like they have one of the best quality hair in the market. I'M moving into the bleaching of the knot. You want to treat a lace closure like a frontal. Whatever you do to your frontal, you have to do to a closure. That'S just point: by period, i'm going to use 40 volume developer, the blue bleach powder glitch and also got to be with a mixing bowl. First thing i do is to spray the lace, with the got to be let it dry. Then i move on to mixing um the bleach with the developer. I don't have a measurement or consistency for this, just make sure that it is not too runny and not too thick. Okay, okay, just right in the middle mix mix mix, then i proceed to applying this to the lace now. The way i apply just the lace is, i start from the back first, because you know typically that would bleach faster. I don't want the lace at the front to bleach faster than the back. Basically, so i start from the back, apply it from the back and then move on to the front, and just you know, pat pat pat. I have to be really careful with this, because it is bleached and you don't want it to peep through and also the reason why we sprayed it earlier is because we also want that to create a barrier between the bleach and the lace. I wrap this up with foil leave it on for about 30 to 35 minutes. I take it out, i wash it with a purple shampoo. This is, for you know, canceling out the brassiness from the wig. After that i regularly uh condition it and then air dry. It but i don't dry it completely because i like to work on the hair when it's a little bit wet in terms of um plucking, the lace rather so moving on to blocking the lace um. I start by spritzing some water on the lace. Just to you know, take all the hair back, so i'm able to see what i'm working with and then i cut out the front so basically the edge of the lace. I don't know how to explain, but i'm sure you guys can see what i'm doing. I just separate the front and then i start to plop from the back, like i start to pluck from behind the edges. I don't know how to explain this. I just hope i'm explaining it right. I'Ve done this process a million times on my channel. So if you watch my hair videos, you're very familiar with how i like to block my wigs, this is not any different. Even if it's a closure wig, it's still going to be the same method that way it mimics a frontal wig the technique, just kind of works. If you think about it now, um for this one, i am going to take back the hair that i separated just to see what the hairline looks like and obviously it looks too boxy. So i'm just going to you know, think that out, like you know, make it jagged a little bit so that it kind of mimics a natural hairline yeah. That'S what i'm doing i tried to pluck like as gentle as possible. It doesn't look like i'm i'm being gentle right now, because, obviously it's camera and it just doesn't show the natural you know process, i would say, but yeah, that's just what i'm doing just plucking plucking going back to look at it, eyeball it and see how i Want it to be um and then, when i'm satisfied, i just go ahead to you know style the wig um i'm coming. I was just combing out the excess hair that was in the hair and then i'm also going to use a serum. This is the only product that i use for this wig for this video. Even up until now. That'S the only product that i have used, and obviously you have to go in with a hot comb. Hot combs are very essential for your wigs. You need one to properly get that sleigh and lay on your wigs. You need a hot comb now. The only thing i didn't show was how i pat the hair, but it's just a regular middle part, and then i went ahead with the same hot coat and like flattened it out a bit. I didn't use products or anything, and it just stayed now. This part is very important, because this is the first step to making your wig look as natural as possible. Your closure wig the tabs at the end, where the lace stops the thick ones. You need to cut that off. You cut that off your hair, your wig or your lace would actually lay flat that is number one secret to actually later melting properly a lace closure wig. Now, after this i'm moving on to styling the wig and basically i just threw - i just threw in some calls some you know medium size, one calls that's all i did and then we're going to move into the installation of this week, because this is basically all I did for the wig now right into the installation, okay, so i'm going to take my face powder and i'm going to put this inside the lace. You know, because i realized that when i bleached the nose of this lace like it did bleach, it did but not completely. I realized that when i was plucking the hair, this video is sponsored by eyeshadow hair. They provided to me this lovely uh, loose deep, wave hair, but honestly i wanted to crimp this hair, but i realized that i mean i like the way crimp, coils or crimped curls look, but then i'm not really feeling them right now, they're, not really my style Right now, so that's the reason why i just went with some, like you know, loose wand clothes. This is their four by four lace: closure wig. I have it in the length 24 and also a cup sized medium yup. I love the curls on this hair because, like so bouncy i didn't bring a mirror. I don't know what the frick is wrong with me. Maybe i should just work with. Do you all see how this lace looks? I feel like the light, is washing it out, but it looks so good already. I think the first mistake that people make with closures is they treat it like a closure? They don't treat it like a frontal. Now, i'm here to tell you today that you should always treat a closure like a frontal, i know like obviously they're different in size, but when it comes to laying the wig or laying the lace treat it like a frontal, i'm going to tie it. I'M going to raise this off because you'll see why i have to put this up in a bit but yeah this has to go up. Then i'm going to i'm going to lay this down with good old um got to be spray. I'M not a fan of you know, hair glue, so i'm going to use go to b spray for this. I hope the part is in the middle because i don't be seeing whenever i'm recording you'll see how this looks. You'Ll see how this looks looks really good, but i'm not done actually i'm not even halfway done, but what i did that i didn't show you guys is. I basically brought out like the little baby hair that i'm going to you know work with because it's easier to do it while you're like laying the lace down to your forehead. Listen you guys. I don't know how to talk while i do stuff. I just wish you guys would see what i'm doing and understand because explaining it, while i'm doing it, it's very confusing. So basically, i just brought out the baby hair that i'm going to work with. Then i proceeded to you know completely flame it on my head, but that's not all um, i'm going to tie this down. I'M going to tie this down for a good, let's say five to eight minutes, because i just need it to melt like further. If, obviously, if it was a lace that i had already work worked on before, it was a laser that i'd already worked on before, i don't need to do all of this, but the reason why i do all of this to a new wig is because it's Simply a new week, so i have to lay it down and i'd like to use um an elastic band rather than you know, um a scarf. I would definitely recommend that if you want to melt your lace, use an elastic band like the one that is usually inside a wig, easy to like cut it a little bit thin so that it just sits only on the lace and not on the actual hair. Okay. Thank you later i need. Oh, my god. This is so i'm melty, proud of myself. I'M gon na take this and just like, i'm just softening the baby hair a bit. I know i mentioned this in the beginning of the video when i was like plucking. The lace and everything i told you that you should always you know the the thick parts of your closures. You don't have that in frontals because i mean they're frontals, but you have those enclosures right, so you always have to cut them off. If you don't cut them off, your closure will be looking crazy. Okay, it'll be looking like bulky and every time like the wind blows, because it's closure, it's obviously not a frontal, so it wouldn't like when the the breeze blows, like. Obviously, this part of your hair will show, and all of that - and i find that when you don't cut that piece off, i mean i learnt this not that long ago, but i'm just telling you like previously when the breeze would blow and then this side would Show it'll be that thick part that would just show like the thick and even when you bleach that part of the lace says it does not bleach for my baby hairs yeah. I think this is actually still too long, so i might have to like snip a bit more okay, so i went ahead and put like some layers in front of this wig. So what i'm going to do is i didn't put like crazy layers. I just put like i don't know if you guys can see like just little layers just a little to like frame my face a little bit, because i hate that i hate when i have like every length in a wig. Like the same so i like to like put layers a little bit a little little bit, so what i'm going to do is i am going to raise the top of this wig a little bit and i'm going to use um got to be spray for this. Just a little, i usually don't like to do this. I know i've done like hair videos, where i mentioned that i don't like to do it, because i generally don't like to do this. I like to do this because it doesn't give me the natural look that i want when i want my the front of my my wigs raised. So basically, i just do this just pick this up a bit. Try to get the just like that, and you don't want to use too much of the got to be spray or freeze spray, whatever type of whatever brand you're using you don't want to use too much just want to raise this up a bit yeah when i Do that i just calmly because it goes high, so i push it down a bit like this just trying to use the mirror behind the camera to like yeah yep. This looks so good. I i'm actually so proud of myself for this hair. I it does not. Look like a closure. It says it doesn't look like a cushion. You can't tell me that it looks like a closure because it really doesn't look like a closure. Okay and a four by four, not even a five by five or six by six. I'M going to leave the link to this here in the description box below if i finessed it, you can definitely finish it. So you shouldn't be scared to actually get a 4x4 closure wig, especially because the fact that it is more up on the affordable side, it is way way cheaper than getting a frontal or even a 6x6 any week at all. If you enjoyed this video leave me a thumbs up, i'm sure you did, i'm sure you enjoyed the video, so leave me a thumbs up. Let me know your comments in the comment section below follow me on instagram, and i will definitely see you in my next one. Bye,


Comments
amoure adiior: Who else clicked here of the mannequin
Mk Lashae: So nobody gon talk about how scary that mannequin look
AndUDon'tStopYo: You do and excellent job laying your lace. Looks perfectly melted. Great tutorial
Evelyn: New sub, I like your content Lucy, your enthusiasm and energy
Oma: Congratulations on the new business sis IYKYK
A J: Thank you for this video! because of you I was able to save money and find a man....because I look good!!! Again THANK YOU! You've gained new subscriber !
Ajanay: How did you change the mannequins facial expressions
Cheryl Walker: It looks beautiful
Jhourdan Williams: Can I pluck it while it’s in a middle part??
Gift Edet: What are names of those bleaching items
Natnice: Came out beautiful
bongii_e: I’ve never tried wearing a wig do I have to bleach the lace like is it a necessity?