4X4 Closure Wig Install Ft. Unice Hair (Beginner Friendly) + Giveaway Announcement | Jerianna Je
- Posted on 16 December, 2020
- Closure Wig
- By Anonymous
This was my first attempt on installing a wig including products, baby hairs, etc. and I must say I am pleasantly surprised with how I did. I hope this closure wig install/ review was helpful for anyone in the beginner's stage like me. Let me know what you guys think of my install. Also make sure you guys enter into the 1,000+ Subscribers giveaway to win some really great prizes! And don't forget to LIKE, COMMENT, & SUBSCRIBE to my channel for more content!
#UniceHair #UniceWig #Bettyou
Social Accounts:
IG: jeriannajenae__
https://www.instagram.com/jeriannajena...
Twitter: JeriannaJeNae
https://twitter.com/JeriannaJeNae
Email: [email protected]
Products used:
Doo Grow Mega Thick Oil
Murray's Edge Wax Extreme Hold
Got 2 B Glued Blasting Freeze Spray
Smooth 'N Shine Straight Bodifying Mousse
Direct link to Wig: https://www.unice.com/unice-body-wave-...
Link to Curling Wands: https://www.remingtonproducts.com/prod...
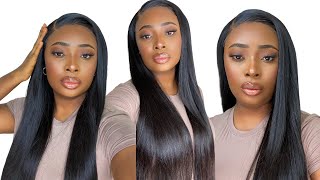
Hey guys welcome back to my channel, i am jerianna janae and in today's video i'm going to be showing you guys this wig that i just recently purchased from yunice hair. So to start off, i want to go ahead and show you guys what the packaging looks. Like so, you will get a cute headband to wear with your wig a wig cap, and then they also put in a cute christmas charm, bracelet um. Here, i'm showing you guys the actual wig. It is a 24 inch, 4x4 closure, wig notice that i did not say a 4x4 lace closure, because it is not full lace. There is only lace right in the front of the wig and then also lace for the actual part, but other than that. There is no lace all over that section um. I also am showing you guys that i put in an elastic band. I sewed that in myself it did not come with that and then there are also three combs two in the front and one in the back and then here you guys can see my very old braids. Please do not get on me. I know they are old and because i didn't plan on wearing this wig very long. That'S why i didn't do redo my braids, but it's all good. It'S going to get the job done, but, as you guys can see here, i'm just oiling in between my braids with some do: grow oil and yeah. I'M gon na be oiling it. Before i get ready to put on my wig cap and then here, i am using some of my murray's edge wax to slick down my frizzy edges, and this is just to help that cap lay down a little bit flatter. And then here i'm just taking that wig cap that came with the wig in the packaging and i'm just using that, like i said you, don't necessarily have to use this wig cap, because the closure wig actually comes with that cap netting, where the lace is supposed To be so, you don't necessarily need it, but because it came in the packaging and for the sake of the video, i'm just going to go ahead and use it. And then, after that, i'm going to be taking some of my black radiance pressed powder to actually tone down the color of that wig cap material. That'S in the lace area, because when i was looking at it, it looked like it was a little too light for it to be my scalp color. So that's why i'm taking that black radiance pressed powder to kind of match the foundation color that i'm using um when i noticed after coloring it a little bit. I noticed that there is like two layers of that wig cap material. So i don't even know that that um - i don't even know that the pressed powder that i used actually seeped through to that section, but it really doesn't even matter because i'm going to be taking some concealer later on in the video to fix my parting. So foreign, so here you guys see me just trying to pluck that part a little bit more. I did try to pluck the part and the wig all together the night before, but i didn't really see it doing anything, and it's probably because i noticed later on that that lace area is not even that closure area is not even really full lace. So there's not much plucking that i can do so yeah and then here i'm taking some of that got to be glue, free spray and i'm just spraying one light layer over the top of it and just kind of letting it air dry so that it gets Tacky and then you're going to see me a few moments later spray another layer of the got to be glue spray, and that is just to give it some hold. So that way it does stay down after you see me, do the two layers of got to be glued free spray, i'm going ahead and laying down that lace on my forehead and i'm combing back the hair. So that way they don't get in the way and kind of start getting messy all over the lace and i'm gon na go back through and spray a little bit more lace. I mean a little bit more got to be glue, free spray on the lace because um i noticed that it was of course still coming up because it isn't glue so yeah, i'm probably going to be using a whole lot of that spray throughout the video. Now you see me getting ready to cut away that extra lace, so i try to stay really close to the hairline of the wig. So that way, i can try to disguise that lace as much as i can, because i am new to this and not true to this, like i've been telling y'all so bear with me if you guys see lace in the end, but i tried my very best To try to stay very close to the hairline so that you guys don't see any lace so now that i have the lace all laid down with the got to be glued freeze spray. It is time for me to attempt to lay these baby hairs y'all. So i'm gon na tell y'all right now. It was a struggle in the beginning, because again i have never done baby hairs really on wigs. So this is a first for me, but i've watched a few tutorials on this to kind of see the idea on how to lay the baby hair. So i'm thinking that i got it going now that i'm looking at it so yeah. I am now taking a very thin layer from the front of the lace closure to basically get ready to cut my baby hairs. You guys can see here that they are very long. Don'T worry about that! I am going to go back in and cut those a little bit shorter, but yeah. I am taking a very, very thin layer from the front, and i also noticed that, after looking at the video um, i'm you i made my baby hairs a little too close to that part. I should have brought the baby hair a little bit further down on the closure, if that makes sense, um but yeah again. This is all a learning process. So now i'm going to be taking some mousse. I actually forgot the brand of the mousse, but that will all be listed down in the description box below, but i'm taking some of that mousse to start to form my baby hairs. So all right. So now that i have the baby hairs all laid, i am gon na go ahead and take my hot comb so that i can try to give this illusion of combing the wig hair back away from the baby hair. I see a lot of people do this when they do their wigs, so i just want to try it out to see if it was going to give the look that it was supposed to give, and it did so and then, after that, i'm gon na go Ahead and take my scarf so that i can lay the baby hairs down and kind of get that lace to lay down a little bit more and then after that um. I let think i left the scarf on for probably about five minutes just to get it to lay down. That'S pretty much, all the time that it needed and then i'm gon na get ready to start curling, my hair, so actually before i get ready to curl. My hair, i'm actually going to trim the ends of the wig first, because i noticed that the ends were kind of looking a little scraggly on the ends um and it was very frizzy for some reason on the ends and by me trimming it. It kind of somewhat it looked like it tamed the frizz or made the frizz not look as frizzy, if that makes any sense but yeah. So i did that first and then now i'm going to go ahead and start to curl my hair with the curling wands. I'M actually going to speed this part up because i'm pretty much doing the same thing over and over again, and i cut a little - i cut a few pieces out because it's the same thing over and over again it's pretty repetitive and i will just check back In with you guys, once i start doing something else, so do so after my hair is all curled. I am going to take a little bit of the got to be glued freeze spray and tame some of the frizz at the top and throughout the hair, and then, after that, i'm going to take some of my la girl pro concealer to actually fix that part. In the middle - and you know, tone down that color that i was telling you guys about in the beginning and i'm taking a little bit of the concealer in the front of the wig to kind of create some sort of. I guess some sort of parting. In the front - because i don't know if i left that clip in but i did try to pluck a little bit by the baby hairs, but it didn't seem to do anything so i felt like if i did. If i took some of my concealer, it would kind of create some parting and make it look a little more sparse in that area, but yeah guys this pretty much wraps up this hair look. So i will be back in a few seconds with my outro all right guys. So this is the final look and y'all. I think i did pretty good like look at this. Tell me i didn't do that. Tell me that this wig is not it and i'm gon na tell y'all y'all lying because this wig look at it yay. This is how the lace looks. I tried to do a little bit of like baby hair um. This is beginner friendly because i'm a beginner, so um don't be. Judging me, too hard in the comments, i gave you all the specs of the wig in the beginning, um. It is a 24 inch. 4X4 closure wig. It is a 200 density wig, as you guys saw in the beginning, when i showed you guys, the inside of the wig. It has um the 4x4 section, but it is not all full lace, so you can literally only have this part. You can't really part it. Any other places because there's tracks in here um, so let me show you if you guys, can see that right there. This is not a full lace, wig, which i thought that's what i was getting when i ordered it. It'S full. It'S a lot of hair ends. Are full as well? I did trim the ends just a little bit because i just wanted it to have that even cut look, but overall, i didn't really have to do too much to the ends. I only trimmed, maybe that much and they are really full. The only thing that i don't like about the hair is that it's like super frizzy, so um i did, i feel, like i had to put a lot of got to be glue spray on there just to kind of tame the frizz, especially at the top bra. I really do like the hair is very soft. I can just rub my fingers through it, i'm not getting shedding. Really. I had to pluck the the closure a little bit. That'S the only shedding that i got, but when i'm running my fingers through it i'm getting barely any shedding, so it was just like two three pieces. I don't know if you guys could see that barely but yeah. It'S not really that much shedding. But overall i really like this wig. I think this is pretty good to say this is a beginner friendly type of wig, because there's not a lot of things that you have to do with it. Besides cut the lace, maybe cut some baby hair, you probably could put this wig on and style it within. Like 20 minutes um, i did mine, probably within 35-40 minutes because, like i said, i'm new to this, not true to this so yeah. So it took me a little bit longer, but on a regular day i probably could get this wig done put on styled all that in 20 minutes, because it's low maintenance - i don't want to keep rambling about it because y'all see what it is. Y'All saw me put it on and yeah so i say purchase it. I hope you guys enjoyed this video. I hope that it was helpful um if you guys did enjoy it. Please make sure to like the video and make sure to comment. Um subscribe to your girl get my subscribers up. I am at 2k subscribers. I still have to do the 1k subscribers giveaway. I know i'm about to announce it so get off my neck with the 1k subscribers giveaway, i'm pretty much gon na have the same rules that i had for my 200 plus subscribers giveaway. I know you had to um. Follow me on instagram and um make sure that you're subscribed to my channel um. I think i'm gon na throw something in there where you guys have to like spam. My account like some pictures - i don't know i am gon na - give away some clothes. There were some things that i ordered that um i end up getting they end up, sending me two of the same things like one package, basically duplicate of the same package, so i'm just going to give away that stuff and i'm going to leave all the details About the giveaway and what you guys got to do to enter y'all, so that's all i have for you guys today. I hope that you guys enjoyed this video hope to see you guys entering in the 1k subscribers giveaway and yeah. I will catch you guys in my next video you


Comments
Jazmin B: love this. i bought 3 units from them over Christmas. a straight one, a bang one and the brown with blonde highlights. i rotate the wig if i want a different part cause there are tracks sewn onto the 4x4 closure. was yours the same way? to combat the frizz end on my wigs, i washed them then applied deep conditioner for 10 mins then rinsed. brought the hair back to life =)
Karen Michelle: I literally loved this wig and install ❤️
Tikara: Now I want some body wave hair too this is some good looking hair and curlssss, even before you curled it looked good. Loved the review boo
Glorious Gloria: This hair has so much body and bounce, I love it!❤️ you did a beautiful job with this tutorial
Kaya Marley: Did a great job i am in love with that unit. Makeup is on fleek. How you get ur eyebrows so nice...
LifestylewithLiette: Looks great!
Jas Yvonne: Such a great video!
RiRi: Yass beautiful. Laiddddd did a great job
Ciara Lachelle: Love the hair. I need to find a wand this big because I do not know how to use a curling iron. Just subscribed, hope you can return the love
RiRi: Can it be placed to the side like as a side part?
I Am Me You Are You: U did it!!!