How I Customise My Closure Wigs | 5X5 Hd Lace Closure Wig| Ft Nadula Hair
- Posted on 06 March, 2021
- Closure Wig
- By Anonymous
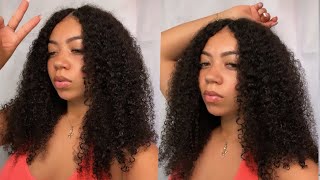
Hey friendss this is how I customise & style this 5x5 closure HD wig from Nadula hair, hope you enjoy!
SUBSCRIBE TO MY CHANNEL SO YOU DON’T MISS OUT WHEN I UPLOAD:https://www.youtube.com/channel/UCJTJB...
-————————————————————
HAIR INFO
●▬▬▬▬▬▬▬▬▬ ◆ #NadulaHair ◆▬▬▬▬▬▬▬▬●
♛All the hair can be paid in 4 installments
♛Use the Special Code get EXTRA $10 OFF: nadulatb
———————————————————————————
Video Hair Direct Link: http://bit.ly/3kuL3F8
Hair details: 5*5 HD lace closure straight wig 24 inch
13*4 Lace Frontal Human Hair Wigs: http://bit.ly/3uDgL7I
https://www.nadula.com/ ➤ Top-sale wigs: http://bit.ly/2ZZtMue
How to install kinky straight headband half wig: https://bit.ly/3kIIqi3
Glueless Headband & half wigs:http://bit.ly/37Z4OQa
Invisible HD Lace Closure Wigs: http://bit.ly/3b4aUAB
Perfect install tutorial of kinky curly headband wig: https://bit.ly/33rv16R
affordable sorts of BoB Wigs: http://bit.ly/3dUlX12
Different sorts of bundles&closure: http://bit.ly/3r5ncyi
Aliexpress Nadula Hair Official Store: https://bit.ly/3hdQLJa
Water Wave New Arrival Headband Wig: https://bit.ly/2Expi6J
#NadulaHair Youtube: https://www.youtube.com/c/NadulaHair
Nadula Instagram: https://www.instagram.com/nadulahair/
Amazon Nadula Hair: https://amzn.to/2rqyP57
Products used:
PAPACHICHISTYLE PRO HOTCOMB
—————————————————————
L E T S C O N N E C T
Email : [email protected]
https://linktr.ee/hannnahlondon
—————————————————————
A B O U T M E
I live in London
Age: 20
Ethnicity: Nigerian
—————————————————————
Closure
Glueless wig
Wig customisation
Straight wig tutorial
Hair install
Frontal wig
Client hair
Hair tutorial
—————————————————————
Hey guys welcome back to my channel, i'm back with another hair insulation, video and today i'm featuring the jeweler hair, so they sent me their hd lace. 5X5 straight 26 inch closure, wig, and it is brazilian hair. This is just the box and packaging it came in, and this is the hair straight out of the box. Um, i'm going to be showing you guys how i bleach and pluck this closure wig just so it matches and blends into my skin nicely. So when it comes to your bleach, you want to make sure it is a thick consistency. It doesn't drop when you lift it up and then i'm just going to get all the hairs out. The way by using my got to be free spray and brushing the hairs away from the lace. Just so that none of the hairs catch onto the bleach. And i'm going to take this tiny brush that i got from a dye dye kit and i'm just going to use that to apply the bleach, making sure that i catch the knots and yeah it seeps through the lace. But i don't want to go too far into the lace, because then you could end up over bleaching or bleaching the roots of your hair. You just want to make sure you apply a nice, even layer throughout, focusing mainly on the part and the front hairline. Just so the knots are lifted and then yeah, i just let this sit for about 30 minutes, and then i wash it out. I like to use blue beach because it turns as well as you know, bleaching so now that i've bleached the hair, i'm going to be straightening and styling the hair first, i'm going to put on my canvas head that is finito. This covers head has been used. Silly, but that's another way for another day, i'm just going to be straightening this unit um, i actually didn't apply any product to this hair because i really like the natural state - and i really wanted to keep the hair nice and flowy. So i didn't apply any product whatsoever onto this wig. All i did was straighten it and hot comb it actually. I lied. I only applied wax thick when i hot comb, the hair, but i didn't apply any serum any oil onto the actual strands of hair. So this is the hair and it's full stick. So, as you can see, i'm just running my straightness through it making sure that everything is nice and silky, and this has straightened really really well. I had no problems with the hair itself and i'm just going to take my papa chichi style, hot comb, and i'm just going to use that to hot comb. The hair, you know a canvas head and a stand is a very good investment. It just saves you the time of doing it on your own head and you can see the back of your hair. You can catch everything, so i highly recommend getting a canvas head, because this has really changed the game for me and my wigs and stuff. So i'm just going to hot comb the hair out of the way. Just so i can begin my plucking process and this plugin is kind of sped up. But if you would like to a detailed plug-in tutorial, i have that already up on my channel, but i just didn't want to skip this step for you guys, so i included it anyway. So i take my teasers apart to make a pattern, and then i just pluck i i just go at it. Really: try not to pluck out any holes just be very careful, make sure you're using the slanted part of your tweezers. I personally use the teaser man tweezers and i love them, so i don't think i'll change and i'm just gon na go at it. This closure was quite dense. Actually, it took me a couple rounds for me to get to the state that i wanted it to be at all right, so bleaching. The knots on this hair was absolutely easy. I didn't have to do two rounds. I normally do two rounds because some blenders give me stuff or not, but this only took one round of bleach and it bleached really really nicely, and then i obviously plucked it and then the actual hair is itself is really really good. In regards to the hd lace, i wish it could be better. It'S still quite good. You know i didn't apply any glue or anything, so it did lay quite nicely, but i wish it was a bit more hd like it's just not there's it's a tad bit. There, like, i could see the lace, though so that's anything i would say like it's not completely hazy this for me, okay. So this is the side. That'S not blocked versus the side. That'S plucked and now i've plucked both sides and i'm just going to hot comb them, and now i'm just going to apply the wig literally the wig is ready to go. All i did was cut the lace and i put on a band. I sewed down an elastic band and i put my foundation on the lace and i literally just applied the wig and you're just going to see that in the next clip. So here's the elastic band that i told you that i applied and yeah. I wish these wigs came with the elastic band and not just the adjustable straps, because um i just prefer elastic bands to adjustable straps but yeah. I wanted this to be a closure. Look. I don't want it to be a closure. Looking like a phone, so i wanted to be a closure look, and it's very different from me because i'm going to close that in a second, but i really really like the feel of this hair. It'S so silky, it's so soft and yeah. This was pretty straightforward. This process probably took me like an hour and a half to complete minus the bleaching time yeah. So this is the end of the tutorial if you enjoyed this, make sure you like comment and subscribe, and all the details on this hair will be in the description box down below stay, blessed, stay safe and stay prayed up.


Comments
BeautyBy Price: You give me life every time
deshaloveable: Just asked for this and you already delivered. I love it here . Thanks boo
Pinky: lovee, you said this hd lace could’ve been better, which would you say is the best hd lace from the aliexpress/china vendors you’ve tried so far please?
Denamic101: Hey, any tips for cutting the lace? The last time I did it was plucked perfectly but I thinking I cut it too close because it looked very wiggy
NOIR: I love the no baby hair look. I want to do it but I feel it looks weird on me. Ima try it again with my new straight wig ima order
Junior Chaves o Picasso de Yahushua: Gorgeous ❤
NOIR: You’re beautiful
lisa Marie: What developer did you use.. 30% or 40%?
Rysse: I couldn’t hear the explanation for why blue bleach is better?