How To Ombré Your Wig To Golden Blonde ✨| Easy Techniques❤️| Klaiyi Hair
- Posted on 18 April, 2020
- Color Lace Wig
- By Anonymous
※※※※※※※※※※※※#KlaiyiHair※※※※※※※※※※※※
Hair Details: Bomb Jerry Curly 22' 22' 24' 26' Bundles with 20' Closure
I'm wearing Jerry Curly Hair Bundles: https://bit.ly/3adscHQ
https://www.klaiyihair.com/ ➤Hot Sale Wigs: https://bit.ly/2XDtvNy
Jerry Curly Lace Frontal Wig: https://bit.ly/2XCzQbZ
Jerry Curly Bundles with Frontal: https://bit.ly/3erDGLh
USE MY SPECIAL CODE "KlaiyiYTB" GET 18% OFF
Affordable Top Selling Bundles: https://bit.ly/2Vw2yc2
Klaiyi Hair Official Website: https://bit.ly/2RHpF24
Aliexpress Klaiyi Hair Store: https://bit.ly/2KaPjIk
Amazon Klaiyi Hair Store: https://amzn.to/36DH4hx
YouTube "Klaiyi Hair": http://bit.ly/2zpjQhu
Instagram "@Klaiyihair_no1": https://www.instagram.com/klaiyihair_n...
Facebook "@NO1KLAIYIHAIR": https://www.facebook.com/NO1KLAIYIHAIR...
Contact for Wholesale: +86 18864600633 Email: [email protected]
Welcome to IAmBeautifulHustler Channel
Be sure to SUBSCRIBE & TURN ON YOUR ALERTS
CONNECT WITH ME✨
Personal IG: Iambeautifulhustler
Business Instagram:_Beautifulhustler & @thebeautifulhustlerbrand
Twitter:_Beautifulhustl
YouTube: IAmBeautifulHustlerTV
✨SLAY WITH BEAUTIFULHUSTLER✨
TO PURCHASE MY PRODUCTS :
WWW.iBhSlays.com✨
Lace Melt Adhesive,
Melts Belts,
GLAMWAX
and more ❤️
Have YOU Purchased your LACE MELT ADHESIVE YET?
To Purchase : www.ibhslays.com
✨✨✨✨✨✨✨✨✨✨✨✨
Spanish Mami Proof✨
Puerto Rican Mami Proof✨
Out the scalp proof
Swimming proof
Sex pulling proof
Waterproof✨
Sweat resistant
Adhesive : Lace Melt Adhesive
@thebeautifulhustlerbrand
YouTube :IambeautifulhustlerTV ❤️
To purchase: www.ibhslays.com
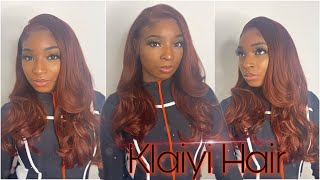
Akari, hey beauties and welcome back to our little hustle TV today, I'll be showing you how to custom. Color ombre your bundles from not too Brown to light brown to a golden build on at the bottom, and I'm also gon na do with a little front. Patch of that same little ombre as well. Now I went ahead and constructed my wig already. I did a soul in stitch, tweak handmade wig and today's has provided by clay here, and they sent me this beautiful 20 inch closure to 22 or 24 and their 26 inch curly bundles and I put all four bundles on a dome cap sewed it on as Well, as the closure went ahead and bleach the nods, and now I'm going to show you how to custom color, I'm Brady's hair. Now I did go ahead and mix up six scoops of bw2 powder and some fifty volume developer and took my little bucket here and I already have the little mixture already going. So I'm just gon na go ahead and start to paint on the color and I'm working on this front section here now. I do want to leave the rules. There'S a natural like natural black color, so I'm not gon na bring that bleaching powder all the way up to the rule, I'm just going to paint it from like an inch down right one in now. The way I do my armor is, you can do ombre. Several different ways: you can bleach the end of it, let that stay for a while and then once you know, go back in and add the next color. That'S let that sit that let that sit in for a while Jesus. What'S going on my words, but I'm gon na show you how I do my ombre. I just like to do it this way, because it's just you know quicker for me, and I just like to do it like this, so you know just to also prevent you know like over bleaching of the hair and everything like that. I'M gon na show you how I do it my way, but, as you can see, I just went ahead and painted on the color on this little piece and now I'm going to go ahead and work on the rest of the week and as you can see, This hair is very, very full. Like I mentioned it is our four bundles in here, so we really have to get to work with this color. So pretty much. The first thing I'm going to do is I just kind of pretty much grab like a handful of hair. I just put everything in a ponytail and I'm going to go ahead and begin to apply the bleaching powder all on this bottom end and I'm just going to apply more as needed. I'M just want to make sure that I get enough of this color on here and I'm just making sure you get in between all those little pieces. So you know I will use my brush and everything like that, but I will also use my hands to kind of rub everything and just make sure that all the bleach is on the hairs in between, and everything like that as well. Now that I have all the police that I want for this first section, I'm gon na go ahead and let this sit for about thirty minutes, and this is what it looked like after letting them. Please sit for thirty minutes. This is a nice brown color. So what I'm gon na do is go ahead and shampoo and condition of or just shampoo, the color using a toning shampoo - and this is the brownish color that I received now to get the ombre that I won. I'M gon na go back in and add bleaching powder higher up to the area that has not been bleached yet, but still put the bleach back on that first section again as well - and you can do this like this and iske. Also, like I mentioned earlier, prevent you from over bleaching the hair by just letting that first layer of bleach sit for a two too long. So I'm just going to double process it by just letting it sit for no more than thirty minutes and just going back and doing that process over again. So I'm going to put bleach higher up once again to get the top section Brown. But as that's turning brown, the bottom section will be lightening up a little more to a thirty color shade and I'm just gon na do this all around and as I mentioned, I'm just gon na continue to do that. Until I have every section around the head. Pretty much leveled and also you know, saturated in there bleaching powder and then I'm gon na go in with that front piece once again and I'm just a more bleaching powder towards the end of their front patch section as well. So now that I have that bleaching powder everywhere, I'm just gon na go mean with my hands and just massage everything on in making sure there's no straight lines. So you don't get a line of demarcation of where the bleach started and stop and I'm going to. Let that process sit again for 30 minutes and then I will go ahead and show you guys what it look like on camera. And then I will shampoo and condition with my shimmering light shampoo off-camera as well, and then come back and show you guys to finishing results and stay tuned for part, two of the installation of this wig after this coloring process - and this is what the hair looks Like after shampooing and conditioning is still wet, you know once is dry is going to show brighter so stay tuned for part two of the installation using his hair.
Comments
Iris Jackson: You did an awesome job. I love the color just amazing.
Shamieka Ross: Yassss I'm going to do My old wig to do this method I just washed it too thanks girly your amazing and don't let anyone tell you different
Jackie Bang: Great review and detailed color process
Blair A'dupree: This color is perfect!! When you go in to do the second bleaching process is the hair still wet? Do you have to let it dry first?
My Kychen: Your work is amazing!!! Great job
Josephine Edu: I can watch ur videos all day and not get bored!! You deserve more views and subscribers ❤️
OSAS GraceByFaith: Thanks!! I had a question, If I wanted to do this same ombré look, could I bleach my hair the exact same way and then dip it in the hair color dye?
Vida Attuah: Did you blow dry before using the second bleach
cgrate2: Hi do you have to dry the hair before add the second bleach on it
Mrs Diva: Can you list the bleaching product you used to color the wig? I want to try and bleach my lace wig. Thank you
wandalicious Q: Hello. Was the hair still wet on the 2nd dye application?
tunnietunney: Great job
Rovalia Brown: Thankyou lovely
Isabell E: Do you think it would be easier to color the bundles first before constructing ?
deseraymiles87:
ISA .M: So what did you use ?
Lady J Tips: Did you say you used 50 volume developer?
Blessing Kamsi Nwaeze: How can I get the second video pls?
Sincerely Paradise: Did you do a ratio or you eyeballed it ?
SashaDonyae: did yu say you used 50 volume?