Loreal Hi Color Highlights | Dying My Wig Red “No Bleach Needed”
- Posted on 15 December, 2020
- Color Lace Wig
- By Anonymous
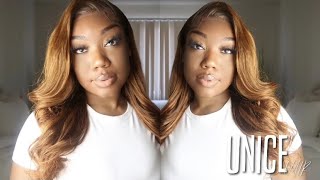
Hair Deets: Unice Hair Body Wave wig in 22 inches.
I ordered this hair about 2 years ago on their Amazon site!
✨Music: @1trapmoneymelo on IG
✨For business inquires contact: [email protected]
✨TAKE OFF W/ ME & FOLLOW MY SOCIALS
Instagram | TikTok | Twitter: @AshTakeOff
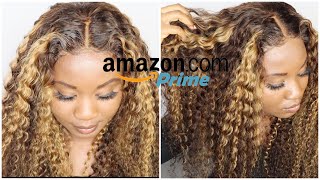
Hey guys, so i just want to come to y'all real quick, but it sounds like i am in love with this color like yes, yes, danny, red, danny red who said you can't color your hair by yourself. Well, a lot of people actually say that i'm here to show you guys that you can do it yourself like seriously. But if you would like to see how i achieve this color, please keep on watching and so here's my wig, i will be using l'oreal highlights in the color red and magenta i had three reds and one magenta. I actually did two color processes for this hair to get the color that i wanted, but um you guys would see that a little later on, and these were just some of the things i used to help me. Do this color application. I did show 30 developer, but i actually used 40 for both applications, and here i am just sectioning off the hair. I did stitching my frontal off um separately and i'm just going to clip it away, and i did find that this was easier to go ahead and just kind of pre-section your hair and go through it like that. So that's all i'm doing right here. I didn't really read the instructions but um to be honest. I'Ve done this so many times and i've seen enough videos, but it is one part color, two parts developer so um the color was actually 1.2 ounces. So i mix 2.4 ounces of developer per box y'all. I just went rogue with this color. Okay, i didn't have a color applicator brush, hey! You got to get crafty. I used one of my edges toothbrushes and i used that to get the individual strands and just to coat each strand with the die and that's what i did for this application. So the back section is complete, and this is what we're looking like so far, and now i'm just going to go into my frontal and part it off um. I did want the color to go to from my root, so i made sure to use um the toothbrush to get as close as the lace as possible. Yes, i did get some dye on my lace, but i saw a apple cider, vinegar, trick um here on youtube, and i used that to get some of the dye that was in my frontal out. So it turned out pretty good, but i am using the toothbrush to get as close as possible to the lace um. So i can get those um roots to color here, i'm just going to continue on with the process getting as close to the lace as possible. Without getting it on the lace, so honestly, the toothbrush was um a great deal of help and i'm just going to keep repeating this process until my frontal is complete. So after i washed the hair out, this was the color. I got from my first application um. It was more so burgundy. I didn't really like that. I wanted to highlight some more red and this time i'm actually using a wig head stand holder that i found at sally's beauty supply. It was very helpful you guys because the first application i had it on a tripod, but this was way sturdier and i like that but um here, i'm just showing you guys. Another look at the first color, i'm going to pre-section the hair off again and just get ready to repeat the same process. I did not film the second um color application, but i am showing you guys, i'm going back in with some more l'oreal highlights, but i'm only using red this time in my 40 volume developer. Now, if you like this color, it's great to just stop right here, but i did want to, like, i said, add a little more tones of red so total. I only used six boxes of dye and each box was only 549 from a beauty supply store. So i thought that was a steal, but i'm just re-mixing it up showing you guys like. I said i will not be coloring it on camera, but you will see um the results from the second application in the next clip after i wash it. I did condition the hair with a after color um sealant. I got the little package from sally's beauty um it's by ion. I did let this color um sit on the hair for about 30 minutes to an hour. To be honest, that's i didn't let it sit over an hour, and this is how the hair looks after i washed it and let it sit in conditioner for about 30 minutes. I washed that out and i'm using this heat protector to put on top of the hair before i blow dry it i actually found that that heat protectant is really good. It gets the hair straight and silky without it um weighing down heavy on the hair. So it's very um lightweight and i just love it, but, as you guys can see it's blow drying so nicely. This video was strictly for how i colored um this unit. If you guys want to see how i installed this hair, please um be on the lookout for my next video, and i hope you guys um found this video helpful and if you did please give me a like comment and subscribe to my channel come and take Off with me guys and we're gon na be popping all right. So let's just do this - i didn't mention earlier, but this is a unit from you, nice, hair. I'Ve had this hair for about two years and just look at how beautiful it is so much volume and so much body. So you guys need to stay on the lookout to see how i install it and style it in my next video


Comments
Thomasina Williams: You did a great job looks beautiful
Romera McDavid: What color did you use first? I saw you opened one box but was it the red or magenta?
Taliyah Bailey: how long did you let it sit the first time??
Alana: love your vids!
Jeanettea Mayle: Yessss I love the color
Dulce Moran: Gorgeoussss
Mercy: how long did u leave it in the first time
Amourr Dede: How much did everything cost in all ?
Jhada Lynn: Yesss I’m doing this rn
Jasmine Robinson: Do you bleach the knots first
jasnextdoor: what if i don’t have a mannequin head?